Whenever I see a piece of furniture in a store that has been prepainted, I assume the paint is still wet inside. This is one of the most common tropes in stock photography, but unfortunately not always what you’re looking at. Although it’s counterintuitive, priming or painting cabinets is far superior to color washing!
Cabinet doors are one of the most striking parts of a kitchen. It’s one of the first thing people notice when they walk into your home, and makes a huge impact on how your cabinets are perceived. Your kitchen can be enhanced greatly by properly painting your cabinet doors. This will give them a beautiful, new look while keeping their original charm.
/cdn.vox-cdn.com/uploads/chorus_asset/file/19493736/july08_step6.jpg "How to prep cabinet doors for painting")
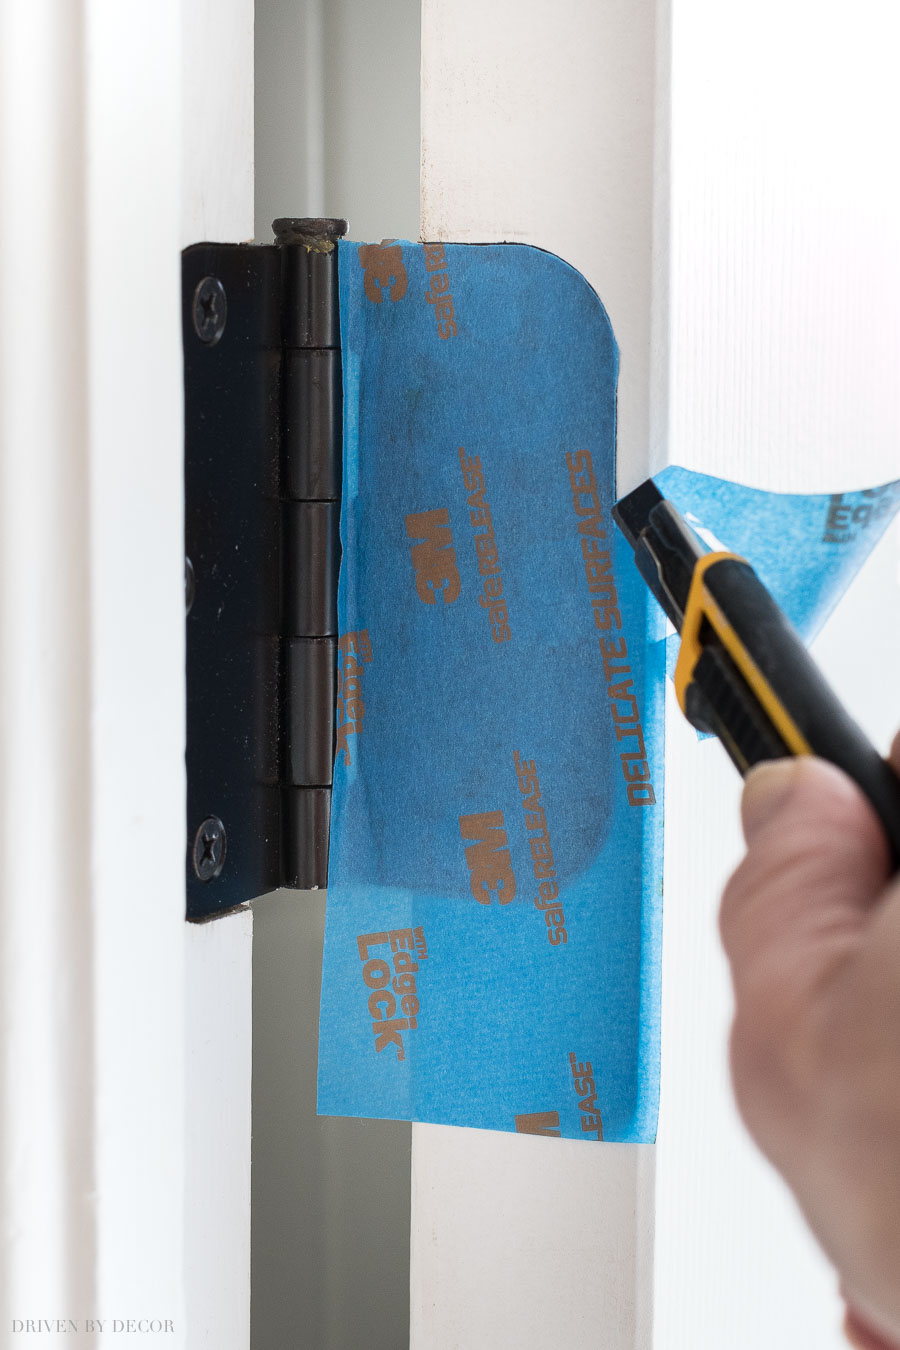
How to prep cabinet doors for painting
1. Remove all hardware from the door. This includes hinges, handles and locks.
2. Sand the wood and remove any loose paint or old varnish with a sanding block (if you are painting over existing paint). If you are painting raw pine, you may need to stain it first to make it darker. Use an oil-based stain rather than water-based stain, as this is more durable.
3. Fill any nail holes or cracks with wood filler and allow it to dry completely before sanding smooth again. You can also fill gaps around any hinges or handles with filler before attaching them back onto the door after painting is complete.
4. Prime all bare wood areas on your door using primer designed specifically for interior use (not exterior use). You can also prime over existing paint if there are no bare areas on your door that need covering up first (e.g., raw pine painted white).
5. Paint two coats of latex paint over everything except glass panes (these should be left unpainted). Use semi-gloss paint for pre
How to prep doors for painting
Door painting is a great way to update your home’s exterior or interior. Whether you’re looking for a change in colour, or want to update your door hardware, painting is an affordable option.
If you are thinking about painting your own doors, then here are some tips on how to prepare them for the project:
1) Remove all hardware from the door
2) Sand down any rough spots or chips on the door
3) Clean the surface of any dirt, grime and grease with soap and water
4) Prime the surface of the door (if applicable) using an oil-based primer followed by a latex-based primer if needed
5) Paint your door with an oil-based paint (if applicable) followed by a latex-based paint if needed
Some doors are not meant to be painted because they’re too old, worn out or have been varnished. If your door is in poor condition, it’s best to leave it alone and call a professional.
If you’re painting an interior door, the first step is preparing the door. There are three main ways to prep your door: sanding, stripping and priming.
Sanding removes surface imperfections such as dents or scratches. Stripping removes old paint or varnish from the door. Priming creates a smooth surface for new paint to stick to when you’re ready for that step.
Sanding: Sanding a wooden door takes time and patience but can make a big difference in how well your final product looks. A belt sander is the best tool for removing large amounts of material at once — but it can also cause damage if used improperly or without caution around sharp corners on your door jamb (the space between where the door sits against its frame). If you don’t want to take this risk, consider using a palm sander instead; these tools are smaller and less powerful but still effective at removing paint, dirt and grime from your wood surfaces
Prepping your door for paint is an essential step in the painting process. It can be a little tricky if you’re not sure how to prepare your doors, but it’s not too hard if you know what you’re doing.
Ready to learn how to prep doors for painting? We’ve got all the details you need right here!
Preparing Your Door For Painting
There are a few different things that will affect how much preparation is needed when painting your door. The type of paint, primer and finish are all important factors that will determine how much time and effort you’ll have to put into prepping your door for painting.
While there are many different ways you can prep your door for paint, it’s important that you follow these steps exactly so you get the best results possible.
1. Wash Your Door Thoroughly
To start off with, make sure that your door is completely clean and free from dirt and dust by washing it with soap and warm water. This will ensure that no dirt or dust will get stuck on the surface when we prime our doors later on in this post!
Painting a door is a simple project, but you’ll want to make sure that your doors are properly prepared before you get started. The first step is to remove any old paint and varnish from the door.
Next, sand down the surface with a fine grit sandpaper (220 grit or higher). Make sure to sand in the direction of the grain. This will help prevent splintering and ensure that your new paint will adhere properly.
Once you’ve sanded down the entire surface, wipe down the door with a tack cloth or lint free rag. This will remove any dust or debris left behind by sanding.
You can use either a spray primer or brush-on primer for painting your door. If using spray primer, make sure that you use an exterior grade product like Zinsser B-I-N primer/sealer (or similar products) as it will be more durable than an interior grade primer/sealer.
For brush-on primers, choose an oil base product like Kilz 2 (or similar products) over water base products as they tend to dry slower which allows for better coverage on rough surfaces like wood, fiberglass doors or steel doors
If you’re getting ready to paint your house, you’ll want to prep all the doors. Here’s how to prep interior doors for painting, cabinet doors for painting, primed metal doors for painting, varnished wood doors for painting and kitchen cabinets for spray painting.
If you have a lot of cabinets in your kitchen, it might be tempting to leave them alone. But even though they’re out of sight, they’re still out of mind — and nobody wants a kitchen full of eyesores.
So take the time to prep your cabinets before you begin any other part of your home’s exterior makeover. This will ensure that they look as good as possible when they show through when the job is done (and help avoid expensive repairs later on).
Cabinet Door Prep: Sand Them Down
You can use either an electric sander or sandpaper with water-based paint stripper on it (that’s what we did here). The point is to get rid of any old finish so that your new coat will stick well. A good way to tell whether or not you’ve removed enough material is if there are any areas where you can see bare wood — those need more work!
Doors are a common spot for paint jobs, but they present a few challenges. Doors have hollow cores and edges, edges that can’t be sanded or primed, and often have wood surfaces that are more difficult to paint. But with the right prep work, doors can look great and last long.
How to prep doors for painting
To prep your door for painting, start by removing hardware and cleaning it thoroughly. Then scrape away any old paint or varnish with a paint scraper and sand any rough spots. You can do this by hand, but it’s easier with an electric sander if you have one. Next, wipe down the door with mineral spirits (paint thinner) or denatured alcohol to remove any remaining dust or dirt before priming and painting it.
Prep your doors for painting and you’ll be able to paint faster, better and more easily. Here’s how to prep doors for painting.
1. Remove hardware
2. Sand rough spots
3. Remove old paint
4. Wash the door
5. Protect wood surfaces with shellac or primer
6. Prime bare wood surfaces
When you are painting a door, whether it is an interior or exterior door, you need to make sure that there is no dirt, grime or debris on the door. If there is then it will prevent the paint from adhering properly to the door. This can lead to chipping, peeling and cracking of your painted surface.
Here are some steps that you can take when preparing your door for painting:
Clean the door thoroughly with a degreaser and wipe down with a cloth or paper towel.
If you have any loose hardware such as hinges, handles or locks then remove them and clean those as well. You can also remove any stickers or decals from your door if they have any adhesive residue on them because that will prevent your paint from adhering properly as well.
Once everything has been cleaned off of your door then it’s time to prime it so that the finish matches up correctly with other doors in your home (if you’re doing multiple). Prime your door before painting so that it doesn’t take away from other tasks like taping off trim pieces around doors and windows.
The door is the first thing people see when they come into your home. It sets the tone for the rest of the room, so choosing the right color is important.
Door prep is an important step in any painting project. It can make or break your paint job, so take the time to make sure you’re doing it right!
Here are some tips for prepping doors for painting:
1. Clean any dirt and grime off of the door with a damp rag (or a DIY cleaning solution).
2. Sand any rough spots or imperfections with 220 grit sandpaper or an orbital sander (use caution near hinges and hardware).
3. Use steel wool to remove any rust from hinges and handles before priming and painting.