Building subwoofers isn’t as difficult as you might think. If you have a few tools and some electrical knowledge, you can build a subwoofer driver in an afternoon. It’s easier to build your own subwoofer box than to buy one from a store or online. Here are the steps to building a custom subwoofer:
The box is one of the most important parts of a subwoofer. The box is directly responsible for the response of how low, and how loud your subwoofer will go. It is important to match the box with the driver for best results:

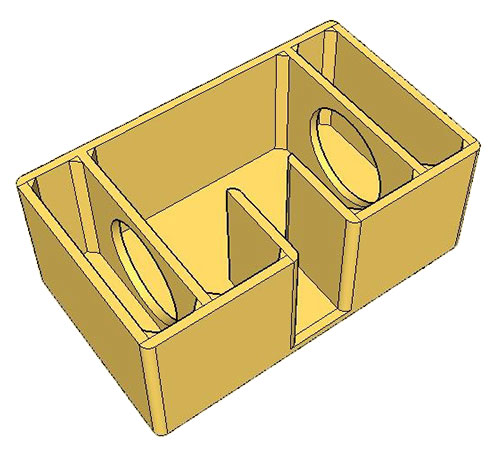
How to build a subwoofer box for deep bass
Subwoofer box design and construction is a very important factor in getting the most out of your subwoofer. A poorly designed or constructed box can lead to driver damage, poor performance and even worse, hearing damage from improper enclosure volume, sensitivity and impedance matching.
The following article will guide you through the process of designing and building your own subwoofer enclosure to specifications.
Before we get started, I would like to point out that there are many other factors which will affect the overall performance of your subwoofer including: driver selection, amplifier power, crossovers and even room acoustics. This guide will cover the basics but it is not an exhaustive list of all things that may affect your system’s performance.
Building a subwoofer driver box is a great way to save money and get exactly what you want from your system. You can build a custom subwoofer enclosure to fit almost any vehicle, and the best part is that you don’t need any special tools or materials.
You’ll just need some wood, foam and glue to build your own subwoofer box.
The first step is choosing the right materials for your project. The best choice is MDF – medium density fiberboard – because it’s strong enough to hold up over time, but light enough to cut easily with hand tools. However, if you’re worried about scratching up your vehicle’s interior with MDF dust, consider using plywood instead.
If you’re planning on building multiple boxes that are identical in size, use a laser level or straight edge to mark out each piece of wood before cutting them out with a jigsaw or circular saw so they match perfectly when assembled together later on. You’ll also want to use clamps or even duct tape at this stage to hold everything together tightly until the glue has dried completely
Building your own subwoofer box for a car or truck can be a rewarding experience. Not only will you get the satisfaction of creating something yourself, you’ll also save money on the cost of buying a premade box.
Building a sub box isn’t difficult and doesn’t require any special skills or tools. All you need is some basic knowledge of how to cut wood, fabricate metal, and use basic tools like drills, hammers, saws, screwdrivers and wrenches.
The first step in building your own subwoofer box is choosing the right materials. You’ll need to choose foam insulation board as well as plywood with a high-density fiber core. This type of plywood is known as “marine grade” because it’s durable enough to withstand moisture damage from humidity or rainwater.
Next, cut the foam insulation board into the desired dimensions for your speaker enclosure. The length and width are up to you but most people choose dimensions that are multiples of 2×4 studs because they’re easy to work with when building cabinets or furniture at home or in your garage or workshop. You should also make sure that your subwoofer will fit inside your enclosure before cutting all of the pieces so that there are no surprises later on down
Step 1: Selecting your Subwoofer Box Materials
Before you start building your subwoofer box, you need to consider which materials to use. There are many different types of wood, but MDF and plywood are the most common. You can also use particle board, but this is not as sturdy or durable as other choices.
Step 2: Measuring & Cutting Your Subwoofer Box Materials
If you’re using wood to build your subwoofer box, it’s important that you measure everything correctly before cutting. If you make a mistake here, it could ruin your entire project!
Step 3: Gluing Your Subwoofer Box
Once all of your measurements are correct and all of your pieces have been cut to size, it’s time to glue them together! Before doing so however, make sure everything fits together properly and then use brad nails or screws to hold everything in place while the glue dries
Building a subwoofer box can be a fairly simple process. Just follow these steps:
1. Measure the dimensions of your subwoofer driver.
2. Choose the right size of plywood or MDF (medium-density fiberboard).
3. Cut out the pieces that will make up your box.
4. Sand all the edges and surfaces of your box to remove splinters and rough spots.
5. Mark where you want to cut out holes for ports, if needed, and then make those cuts using a jigsaw or circular saw (if desired).
6. Glue together all sides of your box using wood glue or construction adhesive (and clamps).
7. Once dried, sand down any rough edges or splinters from cutting so they don’t scratch the inside of your speaker cabinet or get caught on wires when running them through the port openings for wiring connections later on during installation inside your vehicle’s trunk or undercarriage area (if desired).
How to build a subwoofer box to specifications
First, you need to know how big the box needs to be. The rule of thumb is that you should use one cubic foot per inch of speaker diameter. For example, if your subwoofer has an 8-inch diameter cone, then you’ll need an enclosure that’s at least 8 cubic feet in size (8″x 1″ = 8″).
Next, measure the depth of your subwoofers and add 2 inches to that measurement. This will give you an accurate estimate of how much space you have in the rear deck or trunk of your car for mounting your subwoofers and building your enclosure.
Now take a look at each side of your car interior and measure from front to back as well as from side to side. Take note of any obstructions such as seat belts or cup holders that may get in the way when building a custom subwoofer box. Also keep in mind where you want to place your amp so it doesn’t interfere with the installation process either.
If possible, try fitting some cardboard into the cabin of your vehicle like how we did for our project car so that we can visualize how much room we have available for our subs
Building your own subwoofer box is not hard, but it can be a bit tricky. There are a few things you should know before you start.
If you want your subwoofer to sound its best, you need to build it into an enclosure that fits the driver and matches the frequency range of the driver. You also need to make sure that there are no rattles or resonances when you play music through the subwoofer.
A good way to get started is by using ported or sealed enclosures. A ported enclosure lets air move in and out of the box, while a sealed enclosure does not let air move in or out of the box. Each type of enclosure produces different results when used with certain types of drivers and speakers, so make sure that you choose one that matches your needs.
Another important step is making sure that the subwoofer box is properly braced so that it does not vibrate when music is playing through it at high volumes. This will help ensure that your music sounds as crisp as possible

The first step in building a subwoofer box is to cut the pieces of wood that will make up the walls. You can use any type of wood that you like for this project; however, we recommend using medium density fiberboard (MDF) because it is inexpensive and easy to work with.
The dimensions of the box depend on what size subwoofer you want to use. It’s easier to build a larger box than it is to build a smaller one because you don’t need as much clearance inside the box for air movement. However, if you make your box too big, it will create more noise because the back pressure from the large volume of air inside the enclosure will cause turbulence inside your speaker cone.
If you’re building a sealed subwoofer enclosure, then the recommended volume is 0.25 cubic feet per watt RMS power handling rating of your subwoofer driver (varies depending on manufacturer). If you’re building an open-air subwoofer enclosure, then multiply this number by 1/3 or 1/4 (varies depending on manufacturer). For example: If your subwoofer has a 100 watt RMS power handling rating, then multiply this number by 1/3 or 1/4 and divide by 0.75
A subwoofer box is a sealed enclosure that is built to hold the subwoofer driver. The box is usually made of wood or MDF (Medium Density Fiberboard) and has a port that allows air to flow through it. The port allows the subwoofer to breathe and generate more bass sound.
There are many different configurations for building a subwoofer box. The most common configuration is a sealed box, which means that there is no venting in the back of the box. Another common configuration is an open-air design, which has vents in the back of the box but does not have any type of wall between the front and rear sides of the box.
The size and shape of your enclosure will depend on what kind of speaker you are using and how much space you have available in your vehicle or boat. If you’re installing an aftermarket stereo system in your car or boat, then you should purchase all of your components together from one source so that they will work together properly.
A subwoofer box is a wooden enclosure that houses the subwoofer driver, which is a speaker designed to reproduce low frequency sounds. The box will usually be made of wood, but other materials such as MDF are also used.
The box has several functions:
1) It provides an enclosure for the woofer to resonate in (this is called the enclosure’s “natural” or “resonant” frequency).
2) It can provide some damping of the woofer’s motion (damping is often referred to as “brickwall” or “sealed”).
3) It can provide some structural strength (which helps control resonances).
4) It can provide an aesthetic appearance.