In this blog post, you will learn how to build a cable deck rail, using ideas from the experts at BuildDirect. BuildDirect has provided expert tips and step-by-step instructions to ensure you can create your own beautiful decking without breaking the bank. Whether you’re building a classic Timber Deck or a stunning Wood Exterior, or even a custom composite deck, we have loads of information for you – so let’s start building…
How to build a cable deck rail, including several special features, such as a double-sided, dry erase memo board and built in hook for keys or other items.
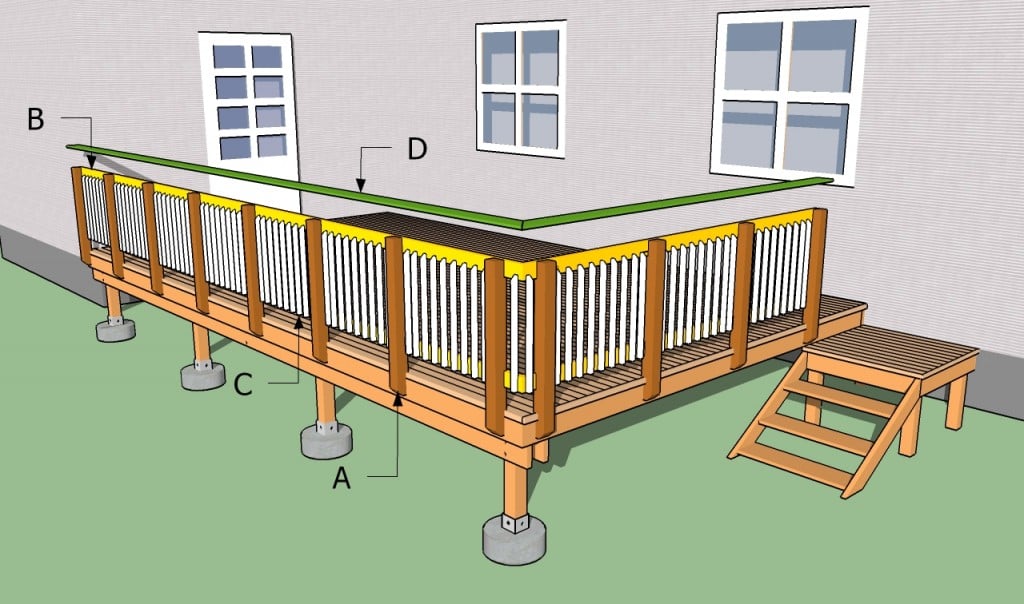
How to build a deck rail
Building a deck is a fun way to add value and functionality to your home. It can also be a great DIY project.
Building a deck rail is an easy extension of your deck that gives you the opportunity to create an attractive new space in your yard. Deck rails are typically made with pressure-treated lumber and attached with lag screws or bolts.
There are two types of deck rails: cable and wood. Each has its own set of advantages and disadvantages, so let’s take a look at each one in more detail.
A deck rail is a structure that can be built with wood, metal, or PVC. A cable deck rail is a type of deck rail that uses cables to support the weight of the deck and its materials. Cable deck rails are a great option for decks that are near water or other areas where moisture may be present.
Cable deck rails can also be built from wood or metal if you prefer not to use PVC. This guide will cover how to build a cable deck rail using PVC pipe as well as how to install it once it is finished. It will also cover how to install other types of cable deck rails.
Cable Deck Rail Materials
PVC pipe – You’ll need PVC pipe in order to create your cable deck rail system. There are many different sizes available but most people choose 1″ diameter pipes because they’re easy to work with and they fit most standard home lighting fixtures and electrical boxes.
Cables – You’ll need cables with special eyelets at each end so that they can be attached to your pipes using special fittings called couplings or “T connectors”. These fittings should come with your cables when you purchase them online or at your local hardware store.
A deck rail is an important part of any deck. It provides safety and security for anyone walking on the deck, as well as a visual focal point. The best way to build a deck rail is to use pressure-treated lumber. This type of wood has been chemically treated with preservatives to protect it against rot and decay. The most common type of cable railing is made from 2x4s, but other sizes are available.
To build a cable deck rail, first measure the length of the run and cut each section to fit between posts or other supports that will hold up the railing. Next, cut each post at the correct length and position them in place on top of concrete footings that are set in place below ground level and above frost depth in your area (usually 4 feet).
The posts should be placed about 16 inches apart so that cables will fit between them easily when you attach them later on. Once you have installed all the posts along your entire length of cable railing, cut seven pieces from 2×4 lumber equal in length to twice their width plus one inch (2 x Width + 1). These pieces will form the vertical members for your new deck railing system.
A cable deck railing is a great way to add style and elegance to your deck. It’s a simple design that accents your home’s architecture and can be installed quickly. The cable rail system consists of two parts: the post and the cable.

The posts are made from aluminum or stainless steel, depending on how long you want your railing to last. The posts attach to the wall with screws or bolts and can be purchased in different lengths depending on how long you want your railing to be. The cables are made from galvanized steel and come in various sizes. The cables attach to the post using nuts and bolts, which makes installation simple and quick. You can also choose between using one or two cables per section of railing.
In order for your cable deck railing system to last, it needs to be properly installed by someone who knows what they’re doing. It’s important that each component is installed correctly so that you don’t have any issues down the road with rusting or bending over time due to improper installation techniques used by untrained workers during construction process
To build a deck rail, you’ll need the following materials:
– Deck rail posts and connectors (depending on your deck design)
– 2x4s (for framing)
– Deck boards (for covering the top of the frame)
– Stain or paint (to match your deck boards)
– Screws, nails or bolts for attaching the posts to the frame and boards to each other
A deck rail is a railing made of wood, steel or aluminum. Railing systems are available in many styles, including cable rails and picket fences. When installing a cable rail, consider using composite decking, which is made of recycled plastic and wood fibers.
Build a cable deck rail using the following steps:
Measure and mark the location for each post on the ledger board. Use a chalk line to mark the locations. Attach a level to one end of a 2×4 and place it on top of one of the ledger boards. Align one end of the level with the chalk line and secure it in place with a clamp or clamping bar. Adjust the level until it is flat against the board and mark its location with a pencil. Repeat this process for each post location on both ledger boards.
Set up your post hole digger according to manufacturer specifications and dig holes at each marked location in your ledger boards. Place stakes into each hole and pound them into the ground with a hammer until they are flush with grade level or slightly below grade level (for drainage).
Place one end of your 2x4s into each stakehole so that they are flush with grade level or slightly above grade level (for drainage). Install
Building a cable deck railing is a relatively simple project that can be completed in a weekend. The steps you’ll need to follow are similar to those used in building a wood deck railing.
Modify the Deck Posts
The first step is modifying your deck posts so they have recessed holes for the cables to pass through. Use a jigsaw or reciprocating saw to cut out the holes and then smooth the edges with sandpaper or an orbital sander.
Install Your Cable Rail
Measure and cut your cable rail to length, then install it with screws driven into the posts and into the 2x4s that connect them together. Drive screws about 3/4 inch from each end of each post, then turn them 90 degrees and drive another screw into them from the other side of the post. Allow at least 1/2 inch between each screw head for strength.
How to build a cable deck rail
The cable deck railing system is the most popular type of deck railing for home owners. The system is strong and easy to install. It can also be customized with different colors and materials to match your home’s exterior.
The following instructions are for building a cable deck railing that’s 8 feet wide by 14 feet long. You can adjust the measurements in these instructions to accommodate other sizes.
Measure the length of your deck railing, including the posts at either end but excluding the post caps. Cut two 2x4s this length using a circular saw or miter saw (a power miter saw makes this job go much faster). Cut two more 2x4s about 3 inches longer than your final measurement, plus an inch for each post cap you plan on attaching later.
Cable deck rail is a type of railing that’s easy and affordable to install, and it looks great. The cable deck rail is most commonly used around decks, patios and balconies.
The cable deck railing system uses a series of cables that are connected to each other by loops. You can connect the cables together in whatever pattern you want or use them separately at each post.
There are many different ways to install cable deck rail, but this tutorial will show you how to do it using the post-to-post method. This method is good for straight runs of about 16 feet or less, but if your run is longer than that, use an L-shaped piece of lumber at each post instead (see our article on building a cable deck railing).
Materials Needed:
2×4 lumber – 2 pieces cut 10″ long (for each post)
Cable railing kit – includes everything needed for installation except paint
Paint
Cable railing is an easy and inexpensive way to add a stylish touch to a wood deck. The cable railings are made from hot-dipped galvanized steel cables and fasteners, which are available at any home improvement or hardware store. The cables come in various widths, ranging from 1/4 inch to 3/4 inch wide, with several cable lengths available as well.
Cable railings are typically installed on decks that have wood posts that match the size of the railing post. If you have 2-by-4 posts, use 2-by-4 posts for your deck railings; if you have 2-by-6 posts, use 2-by-6 posts.
You can also install cable railings on decks that do not have matching posts by adding additional support posts to the bottom of each post.
https://www.youtube.com/watch?v=dPymodBBWMA
Installing a cable railing requires basic carpentry skills such as measuring, cutting and drilling holes into wood. You can also hire professionals to install cable railings for you if you do not have these skills or do not want to spend time learning how to build it yourself.