This article covers how to build a simple work table with a plywood top. The table is supposed to be cheap and easy to make, so I used materials that can be obtained at any home improvement store.
A simple table is a functional and affordable addition to any house. Whether you want one for added workspace in the garage or a place to eat a quick meal, make a simple table by building it yourself.
How to build a simple table
1. Cut the plywood sheet into two equal pieces with a jigsaw.
2. Cut the legs from one of the plywood pieces with a jigsaw. The legs should be twice as wide as the tabletop, and they should be long enough so that they extend 1/4 inch below the bottom edge of the tabletop when screwed into place.
3. Attach one of your short sections of 2×4 to each end of your plywood tabletop using glue and nails or screws.
4. Place your legs in their intended position on top of this 2×4 frame, then screw them into place with 2-inch screws or nails if you’re using thin plywood (1/8 inch). If you’re using 3/4-inch thick plywood, use 4-inch screws or nails instead.
5. Lay out where you want to place your tabletop’s casters, then attach them with screws through pre-drilled holes in both sides of each caster wheel (you’ll need four casters total).
Step 1: Measure the height of the table. The length and width of the table are easy to measure, but you need to make sure your work surface is high enough for your needs. If you’re going to be standing while working, you’ll want a higher surface. If you’re going to be sitting down, you can use a shorter table.
Step 2: Pick out your materials. For this project, we used pine boards that were about 1 inch thick and 6 inches wide. You can use any type of wood if it’s not too expensive or hard to find. We also used screws and glue for this project.
Step 3: Cut down your boards into the correct sizes for each part of the table top and sides. Make sure that all sides are square by measuring them with a ruler and marking off lines where they intersect on both sides of each piece of wood. Then cut along those lines using a circular saw or jig saw so that all pieces are exactly square with one another.
Step 4: Glue together two side pieces with two end pieces using clamps or weights to hold them together while they dry overnight (or longer depending on how well they fit). For added strength, attach two cross supports at each end using screws and glue
Simple worktable
Materials:
2 sheets of plywood, 30×30 cm (12″ x 12″)
1 sheet of plywood, 20×20 cm (8″ x 8″)
4 wooden legs 30 cm high (12″)
Tools:
a saw and a hammer.
A work table is a great addition to any workshop. It’s a simple, yet versatile tool that can be used for a variety of tasks. We’ll show you how to build a workbench using cinder blocks and plywood that’s sturdy enough to handle most projects.
Build the Legs and Top
Start by drilling holes in each block where they will be connected with concrete nails. Make sure that the holes are aligned so that they form a square when viewed from above. This will make it easier to align the blocks while attaching them together.
Next, cut four pieces of 2×4 lumber to length using your miter saw or circular saw. You’ll need two at 27″ long and two at 22″. Nail one end of each piece of lumber onto a block, then attach the other end on top of another block by driving 2-1/2″ concrete nails through both pieces of wood and into each block below it. You should now have two leg assemblies measuring 23-1/2″ tall by 7-3/4″ wide (including legs).
The Kreg Jig is a tool that makes building projects go faster. It uses screws to join pieces of wood together, but it also allows you to drill holes that are smaller than the diameter of the screw. This makes for a much stronger joint than if you were just using screws alone.
Using the Kreg Jig on your table will ensure that it’s strong enough to hold up whatever you decide to put on top of it.
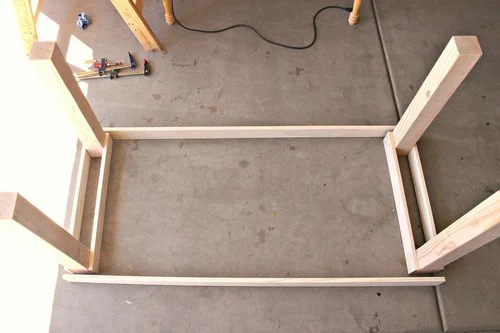
A basic table has four sides and legs. To make this happen, you’ll need six boards in total — two for each side and two for each leg. The following images will show how I made my table:
First, drill holes into both ends of each board using the Kreg Jig. Then, use one 2-ft long screw in each hole to join them together as shown below:
The coffee table is one of the most important furniture of all the rooms in your house. It’s a place to rest and relax after a long day, and it’s also a place to entertain guests. Coffee tables can be simple or elaborate, depending on your taste and budget. In this article we will give you some ideas on how to build a simple coffee table.
Build a simple work table
Step 1: Start by measuring the height and width of your table top. Then measure the length of each side of your tabletop, including overhang on all four sides (the overhang is 1/2″). Now that you know how big your top needs to be, cut down two boards to these measurements using your table saw or other power tool with a miter gauge attachment.
Step 2: Next, cut down two more boards for the sides of the table base so that they are 2″ longer than your tabletop width plus 1/4″. This will allow room for legs later on down the road as well as give us some extra surface area for attaching our tabletop to later on down this tutorial. You may want to sand these boards before moving forward with any other steps in this project but that’s up to you!
How to Build a Simple Coffee Table
If you need a simple work table, or just want to build something for the heck of it, this is the project for you. The table is made from two 2x4s and a sheet of plywood. The legs have an adjustable height feature so you can use the table at different heights.
Materials:
The materials required will vary depending on what size table you are making. For my example I used the following:
2 – 2x4s (8 feet long)
1 – Sheet of plywood (at least 4 feet wide by 8 feet long)
2 – 2×4 blocks (12 inches long)
Building a simple work table is a great project for the beginner woodworker, but it’s also a good project for someone who just needs to build something quick and easy.
This table can be built in about 30 minutes and requires minimal tools and materials. The best part is that this table can be used for whatever you need – from holding tools and supplies in your garage or workshop to serving as additional seating in an entryway or kitchen area.
Materials:
3/4″ plywood sheet (18″ x 48″)
2″ x 4″ x 8′ lumber (2)
1 1/4″ pocket hole screws (1 1/4 inch long)
Step 1: Cut the legs and rails.
Cut two 2x4s to make the legs of the table. Cut two more 2x4s to make the top and bottom rails.
Step 2: Attach the legs to the rails.
Place one of your 2×4 leg pieces on your work surface so its edge is flush with the edge of your work surface (if you’re using a sawhorse, this means that one end of your leg piece should be overhanging). Then place a top rail on top of it so that their edges are flush as well. Use clamps or a square to help hold them together while you drive screws through them into each other. Drive at least six screws through each joint — more if possible, but don’t use more than two per hole or it’ll weaken your joint!
If you want a slightly larger table, simply cut another leg piece and attach it to either side of your original set using four additional screws per joint.
Step 3: Attach bottom rails to legs and top rails with pocket holes.
Flip over your workbench so that it’s sitting on its other side (or flip it upside down if needed) and repeat Step 2 by attaching two bottom rails
It’s easy to build a workbench for your workshop or garage. You can use it as a table to clamp down your projects, or you can add a vise and use it as a bench for working on them.
The project shown here is made from 2x4s and plywood. It’s sturdy, too: The top is supported by two layers of plywood, spaced three inches apart. That gives you plenty of room to clamp down any project that won’t fit into the vice (which is mounted in the front leg).
You can also add drawers or shelves at the bottom of the legs if you want storage space below.
The base is built from four pieces of 3/4-inch plywood — one for each side and one for each end. Cut them out with a circular saw or jigsaw and then fasten them together with 1-1/2-inch screws (don’t use nails).
To make the frame sturdy enough to support your workbench, use 2x4s instead of 1x4s for all four sides — they’re much stronger. The 2x4s should be ripped down to 3-1/2 inches wide so they fit neatly between the two layers of plywood that make up the.