How to build a shower pan, how to build a shower pan on plywood floor, how to build a shower pan on a concrete floor. The finished shower base sits centered and in contact with edges of the bathroom subfloor. The walls should be built up, sheetrocked and taped before installing the tile-board.
When building a shower pan on a wood subfloor, the most common practice is to use a plywood floor deck or a layer of OSB subfloor. Shower pans installed on wood subfloors must typically be built up with a cement mortar or concrete. While cement mortar is the most popular method for tiling directly onto plywood, it is not very suitable for use on concrete subfloors since it doesn’t bond well to this material. A shower pan built on concrete requires the installation of some type of porous base material that is compatible with mortar and tile.
How to build a shower pan
To build a shower pan on a wood subfloor, you’ll need to make sure that your subfloor is level and has no large gaps or cracks. The shower pan needs to be perfectly level with the rest of the floor. If there are any bumps or dips in the subfloor, they should be filled with mortar before laying down the new shower pan.
You’ll also need to prepare your walls before installing the plywood base. You need to remove any drywall or plaster from around the area where you’ll be installing your new shower pan. This will give you enough room for framing and installing your plywood base.
When building a shower pan on plywood floor, you should first frame out the walls using 2x4s as studs. If you’re going to install sheetrock over top of this frame later on, make sure that there’s at least 1/2 inch of space between each stud so that there’s room for insulation and vapor barrier behind them once everything is framed out correctly. Once all of this framing is finished off, it’s time to lay down your plywood base which will become your new shower base once everything else is finished off.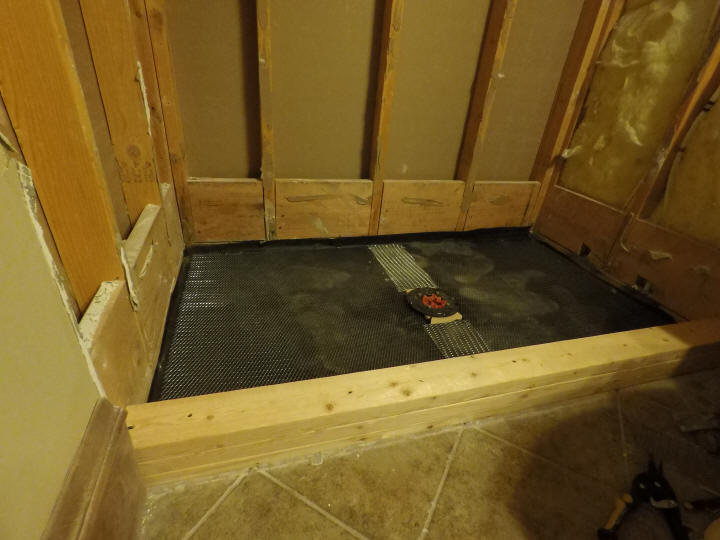
How to Build a Shower Pan on Plywood Floor
1. Measure and cut the plywood to size and install it on the floor over the shower base. Set it into place with 2-inch screws through the plywood and into the base frame. The plywood should be flush with the outside edge of the frame, but not sitting directly on top of it.
2. Cut a piece of 2-by-4 lumber to fit between the studs in your wall. Nail this piece to one side of your base frame so that it’s flush with one side of your plywood pan and extending beyond both sides by 1/8 inch on all sides. This is known as a “stop block.”
3. Set your shower drain in place on top of this stop block, making sure that both sides are flush against their respective walls. Slide a plastic washer down over each end of your drain pipe, followed by a rubber gasket and then slip a collar over each end before tightening down with an adjustable wrench or crescent wrench until snug against its corresponding stop block (you’ll need someone to hold things in place).
The best way to build a shower pan is on a plywood floor. This method will allow you to use the most common types of materials in your bath remodel.
Plywood is a great material for the floor because it is flexible and can easily be cut to fit into any space. The downside of this method is that it requires you to replace all of your flooring, which can be expensive and time consuming.
If you are going to use plywood, then make sure that it is at least 3/4 inch thick so that it can support the weight of your shower pan. You will also need access to an electric saw so that you can cut out the shape needed for your new shower pan.
You need access to an electric sawed so that you can cut out the shape needed for your new shower pan.
A shower pan is a critical part of any shower, whether you’re building a new one or replacing an old one. The pan is what holds the water and keeps it from leaking out onto your bathroom floor. The pan also provides a place for the walls to rest on so that they don’t fall down. If you don’t know how to build a shower pan, here’s how:
Step 1 – Measure the Floor
The first thing you need to do is measure the floor where your shower will be located. This includes measuring the width, length and height of the area where you want your shower. If you’re not sure how deep your floor is, use a leveler to find out how high up from the bottom of your wall should be (this will vary depending on which wall it is). Remember that if your walls are going against an outside wall (like in an apartment building), then they will have to be higher up than if there was another room on top of them (like in an attic).
Step 2 – Prepare Your Walls
You’ll need at least two sturdy walls for this project (one on each side). You can use either wood or concrete blocks for these walls but make sure that they are
A shower pan is an important component of a shower. It serves to collect the water from the shower head, and it provides a base for the tiles or other surface covering. Some types of shower pans also have drains built into them, so that water can be easily removed from the area.
Many people consider building their own shower, which can be done for a variety of reasons. Building your own shower can save money, reduce waste and provide you with a sense of accomplishment.
Shower Pan Basics
A shower pan is made up of two different types of materials: plumbing and waterproofing. The plumbing material is typically concrete or mortar, while the waterproofing material is typically acrylic latex or silicone caulk. The combination of these two materials creates a waterproof barrier that keeps water from seeping through the bottom of your shower pan.
Plumbing Materials: Concrete vs Mortar
When you choose between concrete and mortar as your plumbing material, you must consider several factors before making your decision. First, how much do you want to spend? Concrete costs more than mortar because it requires more labor and time to make it properly dry before use (around 30 days). Second, do you have any experience working with concrete or mortar? If not, then it
A shower pan is the bottom of your shower. It’s the part that you stand on when you’re in the shower. A shower pan is typically made from plastic, fiberglass or metal, with the most common being a fiberglass pan. The rest of this article will focus on how to build a fiberglass shower pan on a concrete floor.
Step 1 – Prepare Your Floor
The first step in building a shower pan is preparing your floor and walls for it. For example, if you are building on a cement slab, you’ll have to make sure that it’s level, flat and smooth before you start working on your new project. You can use a laser leveler or a bubble leveler to create a perfectly even surface for your new shower pan to sit upon. You’ll also need to make sure that all of the holes in your walls are patched up with spackling compound or putty so that there aren’t any leaks when water flows through them during showers. Once this has been done, cover everything with plastic sheeting so that none of these surfaces get damaged by moisture while you’re working on them
The easiest way to build a shower pan is on a concrete floor. If you have access to the underside of the slab, you can pour a concrete pad that extends beyond the perimeter of your shower walls. If you don’t have access, you’ll need to create some kind of form that will support the shower pan during its curing period.
The first step is to make sure there’s adequate drainage under the pad by installing French drains or perforated drain pipe at least 6 inches below the pad. If there’s not enough slope in your yard, you may need to install sump pumps inside the house.
Next, rent a concrete saw (or buy one if you plan on doing more than one job) and cut out a section of your slab large enough for your shower pan (see “Shower Pan Sizes”). The edges of this opening should be smooth so they won’t interfere with the installation of tile or other materials later on.
Shower Pan Sizes
Shower pans come in many different sizes and configurations, but most are rectangular with dimensions between 48″ x 36″ and 60″ x 72″. However, even if your wall dimensions match those of an existing pan, be sure it has enough height before purchasing one — otherwise
The best way to build a shower pan on a concrete floor is to build it up from the floor. This way, you can work with a concrete slab that’s already there without having to worry about what happens if you don’t like the way it looks. If you’re building a shower on top of an old, cracked and broken concrete floor, this is the best option for you.
If your shower pan will sit directly on top of the concrete slab in your bathroom, then it’s important that the concrete slab be smooth and level before you begin construction. This means that it should be as flat as possible or else you’ll have problems with water flow throughout your shower area.
The first step in creating a solid base for your shower pan is to install plywood decking over the existing concrete slab. This can be done by laying down several sheets of plywood so that they overlap one another by no more than 6 inches per sheet or 4 inches per sheet if you’re using OSB instead of plywood because OSB tends to swell up more than plywood when wetted down with water.
Once this has been done, it’s time to add waterproofing materials such as HydroBan or Sure Step® products over top of the plywood decking before installing
A shower pan is a tray that sits on top of your concrete floor. The pan is usually made of fiberglass and has a lip around the edge that allows water to drain into the drain pipe underneath. A shower pan makes it easy to install a shower stall, because there’s no need to dig into the concrete floor.
Installation can vary depending on whether you’re installing an acrylic prefabricated shower base or building an in-floor tile shower pan out of plywood. This article will show you how to build a shower pan with plywood.
1 Measure and cut the plywood pieces
Measure and cut four pieces of plywood: one 60 inch x 36 inch piece for the bottom; two 36 inch x 22 inch pieces for the sides; and one 36 inch x 22 inch piece for the back wall (if your shower has a back wall). If you don’t have access to a saw at home, ask at your local hardware store if they’ll do this step for you (most will).
2 Mark holes for plumbing pipes
Mark where your plumbing pipes will go using a marking pen or pencil. The pipes should fit snugly against each other and be spaced about 12 inches apart from each other vertically, with about a quarter-inch gap between them
A shower pan is the base of a shower enclosure. It’s a waterproof pan that sits directly on a floor or other surface, as opposed to being suspended from the wall. Shower pans come in a variety of shapes and sizes, and some even have built-in drains that allow water to flow directly into the drain pipe without clogging up the drain.
Shower pans are typically made from cast iron, fiberglass, or plastic. The type of shower pan you choose will depend on your budget and personal preferences. The most common types of shower pans include:
The curbless shower pan
The curbless shower pan is also known as a zero threshold bathroom because it has no step up or step down between the bathroom floor and the shower area. This makes it ideal for anyone who has difficulty getting in and out of the bathtub or shower area. The curbless design also makes cleaning easier because there are no crevices where dirt can collect.
The prefabricated shower base
A prefabricated shower base is made from precast concrete slabs that can be installed with minimal effort by one person. These bases are available in different sizes, so they’re perfect for customizing them to fit