How to build a shower base with concrete – Shower Base Bench…If you want to learn how to build a shower base, we’ve got you covered. Learn what a shower base is, the materials required for preparing the subfloor, and different methods of constructing a shower base
Building a shower base is not a complex undertaking as long as you follow the right steps. Moreover, not always you need to buy ready-made products to build one. This article will show you how to lay a shower base using cement and make it hard wearing against water and mold. Read through the whole article before starting with construction works and remember the tips on waterproofing while building the shower base. How to Build a Shower Base | The Right Way
How to build a shower base
Building a shower base is an easy DIY project that can save you money and add value to your home. This article shows how to build a shower base in two different ways: first, with concrete and second, with tile. The first method is more affordable, but it takes longer to dry. If you want the job done fast, use the second method.
Step 1 – Measure the Floor
Measure the floor of your shower stall using a tape measure and then add 4 inches to each measurement. Mark these measurements on the floor with masking tape or chalk so you know where to put your form boards later on.
Step 2 – Cut Your Form Boards
Cut four form boards from 2x4s or 2x6s using a circular saw or table saw so that they are all at least 4-inches longer than your measurements from Step 1 (plus any additional length needed for connecting multiple boards together). If you’re building a large shower stall, it’s best to use multiple boards for each side of the form since this will make it easier for two people to lift when setting up and removing at the end of construction.
How to Build a Shower Base
A shower base is the bottom of your shower. It provides a solid foundation for the rest of your project, and it keeps water from seeping into the surrounding area. A shower base can be built with concrete or tile and mortar. The most important thing to remember when building a shower base is that it needs to follow local code requirements.
For example, in some areas you will need to install weep holes in the shower pan so that any water that leaks through the tile can drain out of your home. In other areas, you may need to install a drain pipe that connects directly to the city sewer system. If you’re unsure about what type of drainage system is required where you live, call your local building inspector or plumbing contractor for advice.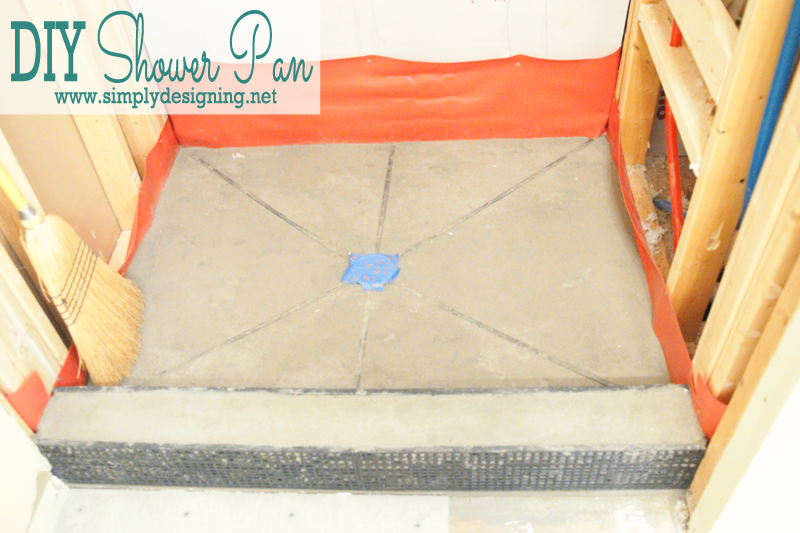
Step 1 – Measure Your Shower Area
Measure the width, length and height of your planned shower area and transfer these measurements onto a piece of graph paper (or use a computer spreadsheet program). Draw lines showing where all four walls will be located, ensuring that they are level with each other at both ends of the room.
Step 2 – Mark Out Seating Locations
Mark out two locations for seating near each end of the base (see image). Use these marks as guides when
Shower bases are the most important part of any shower installation. A quality shower base will provide you with a strong, sturdy surface that will last for years to come. If you’re looking to build your own shower base, this guide will teach you how to install a shower pan on concrete or tile floors.
The first step in building a shower base is preparing the area where it will go. If your bathroom floor is made of concrete, prepare the area by removing any existing moisture and debris using a broom or vacuum cleaner. If your bathroom floor is made of tile, remove all of the old mortar from between each tile with a chisel and hammer before installing a new shower base.
Next, cut out four pieces of plywood large enough to cover the floor space of your new shower pan (make sure these pieces are slightly larger than your desired dimensions). Place these pieces on top of each other so that their edges line up perfectly and then use screws or nails to secure them together into one solid piece. This piece is now referred to as your subfloor because it will be placed directly against the concrete or tile flooring underneath it.
You should now have a large square piece of plywood that fits perfectly into your bathroom floor space without gaps around its edges
Build a Shower Base
Building a shower base is not difficult. It does require some carpentry skills and the ability to read and follow directions. The first step is to build the floor of your shower base, which should be made from pressure-treated lumber or another durable wood. The next step is to attach the walls and floor together with waterproof sealant. You can then finish your shower base by staining or painting it.
Step 1 – Build Your Floor Frame
To make sure that your shower base is sturdy enough to support people, you need to make sure that your floor frame is solid. Start by measuring and cutting two pieces of pressure-treated 2×6 lumber to make up the bottom of your frame; this will be where you’ll stand while taking a shower. Cut four more pieces of pressure-treated 2×6 lumber for each side wall; these will form an “L” shape with the bottom piece when they are attached together. Attach each piece of pressure-treated 2×6 lumber together using galvanized nails; make sure that all nails are driven in at least 3/4 inch from any edge so that they won’t interfere with any sealant that you may use later on in this project.
Step 2 – Install Sealing Tape
When it comes to building a shower base, there are many different ways to go about it. If you already have a hole in your bathroom floor that you’re looking to fill, then you can skip the concrete step and just install the base directly on top of the subfloor.
If you’re building from scratch or adding a shower to an existing bathroom, however, there are a few important considerations that will affect how you choose materials for your shower base.
Here’s what you need to know about building a shower base:
1. What type of material should I use?
2. How much does it cost?
Build a shower base with concrete. Constructing a shower base can be done in many ways, but this article will show you how to build a shower base with concrete. The first step is to measure and mark where the walls of your shower base will go. It is important that the wall corners are square, so use a framing square or other straight edge to make sure they are level. Next, use the level to make sure the bottom of each side is level along its length, then use the framing square again to check for square corners at 90 degrees from each other. For this particular project we are using 4 inch thick x 8 foot long pieces of concrete board (Durock) as our substrate material instead of plywood because it has higher compressive strength than plywood and will not rot over time like plywood would which would cause leaks in our finished shower base.
Shower bases are the most important part of the shower. Without a good shower base, your shower will not be able to withstand the weight of water and will crack or leak. So it is important to build a good quality and durable shower base.
Here are some tips on how to build a shower base with concrete:
Get all the materials ready: You will need some basic materials like sand and cement for making concrete and also some tools like shovels, hammers, saws etc.
Prepare the flooring: Make sure that your flooring is solid enough to withstand the weight of your shower base. If there are any cracks in it then fill it up with mortar or use concrete filler paste before laying down your new shower base.
Lay out the cement slabs: If you have purchased readymade cement slabs then lay them out in a nice pattern on your flooring surface according to their size and shape. If you have bought individual pieces then cut them into required sizes using circular saws or jigsaws so that they fit together properly without any gaps between them.
Mix up the sand and cement: Mix up equal amounts of clean sand with portland cement powder in a large bucket until you get thick paste-like consistency which does not stick
Learn how to build a shower base with concrete. A shower base is an important part of any bathroom, but it can be tricky to get right. Here’s what you need to know:
A shower base has two main functions: It provides a sturdy surface for the rest of your shower system and it keeps water from leaking into the floor below.
The first step in building a shower base is picking out materials and getting them delivered. Concrete is heavy, so make sure you have plenty of help when hauling it in. You’ll also need plenty of space to mix up the batch and move around while it dries.
Once everything is delivered and set up, mix up some concrete according to the instructions on the bag. This will take several hours, so plan accordingly. Once mixed, place your forms in place over top of your plywood subflooring and fill them with concrete, working quickly before it sets up too much (this will take some practice).
How to Build a Bathroom Shower Base
Showers are one of the most important parts of your bathroom. A shower is a place where you can relax and unwind. It is also an area where you can wash off all the stress, dirt and grime that accumulated during the day. When you build a shower base, you will be creating the foundation for your shower. This will give it stability, making sure that it does not move or crack over time.
Shower bases come in many different styles, shapes and sizes. If you want to install your own custom shower base, here are some tips on how to do so:
1. Measure Your Area
The first thing that you have to do is measure the space where you want to put your new shower base. You should measure from floor to ceiling as well as from wall to wall so that you can get a good idea of how much space there is in between these two areas.
2. Choose Your Size
Next, choose which size of shower base will fit best in this area by measuring out its dimensions (width x depth x height). Make sure that this size matches up with the measurements that you took in Step 1 above. Once you have determined this size, make sure
A shower base is a slab of concrete or a combination of concrete and tile that’s installed beneath the floor of your shower. Shower bases are typically used for walk-in showers, but they can also be used for standard tub and shower combinations.
Shower bases have several advantages over other types of showers, including durability and strength. They’re less likely to crack or warp than tile alone or tiles laid on a solid surface. In addition, they provide a stable platform for your bathroom fixtures and allow you to easily clean the entire area around them without damaging any part of the structure.
A shower base is typically made from materials such as concrete, tile backer board, cement backer board or plywood. Each type has its own advantages and disadvantages, so it’s important that you choose the material that best fits your needs and budget before starting construction: