It is necessary to equip your boat with a mold in order to experience molds. This mold is often used as a model or plug that can serve as a template for the boat shape or hull. The advantage of using this boat mold is you do not need to synthesize your own materials – it is made of fiberglass or polyester resin. If you want to make fiberglass molds, the first thing you must do is to design boat parts using suitable tools and then determine your mold’s size. After figuring out the size, you can start working on both mold construction and boat making.
For a successful molding, you need to learn how to build and maintain your boat mold. A boat mold is an integral part of the creation of any fiberglass vessel.
How to build a fiberglass boat mold
It is important to have a good mold when casting fiberglass. It will last for years and you can make multiple copies of your boat with it. The plug is the first part of the mold, where you will build the rest of the mold around it.
There are many ways to create a boat mold plug. We have chosen one way that we have found works best for us. It’s simple, fast, easy and cheap.
Tools:
-2×4 lumber (8ft long)
-Drill with 3/8″ bit or larger (For wood only)
-Jigsaw (Or other cutting tool)
-Sanding block and paper (Or power sander)
-Razor knife and painter’s tape (For cutting foam)
How to Build a Boat Mold
How to Build a Boat Mold: Building a boat mold is not as complicated as it may sound. The process requires patience and careful planning, but with the right materials and tools, you can complete your project in just a few hours.
Materials for Building a Boat Mold
You will need the following materials to build a boat mold:
Fiberglass matting – This is used to reinforce fiberglass layers and prevent cracking in the finished product. It is available at most home improvement stores or online retailers.
Wooden board – You will need this to create the shape of your boat’s hull before you begin applying fiberglass. You can use any type of wood that is relatively sturdy, such as oak or pine, but make sure it is smooth so that it does not interfere with your work later on.
Staple gun – This tool will be used to attach fiberglass layers together once they have been applied to your wooden board. Most staple guns come with staples that are specifically designed for this purpose; however, if yours does not have them, you can purchase them separately at most home improvement stores or online retailers.
Sandpaper – This will be used to sand down rough areas on your boat’s hull so that it is smooth
The first step in building a fiberglass mold is to make the plug. This is the model that is used to create the master pattern for the mold. There are several methods for making plugs, but this article covers only one method – using a polyester resin and fiberglass cloth layup over a foam core.
The first step in making a plug is to cut out two pieces of Styrofoam, one larger than the other. You can buy pre-cut sheets at most hardware stores, or use scraps from previous projects. The foam core should be about 1/4″ thick.
Next, cut out your plug shape from 5/8″ plywood with a jigsaw or circular saw (you could also use MDF). The size of your plug will depend on how large of an area you need to cover. For example, if you want to build a mold for a 16 foot sailboat then your plug should be at least 16 feet long by 8 feet wide and approximately 8 inches thick. If you want to build a smaller boat then your plug might only be 12 feet long by 6 feet wide and 5 inches thick.

1. Get your mold box and filler block ready. The mold box should be made of wood or metal, and the filler block should be made of cement (slightly damp) – it’s better to make the filler block slightly smaller than the size of the mold box.
2. Cut a hole in the middle of the filler block with a drill or a knife (the hole should be as big as your boat). Make sure that the hole is at least twice as deep as your boat is wide (so that you can lift it out easily later on).
3. Put some clay around this hole and press your boat into it so that the clay sticks to its bottom (this will help you get your boat out without breaking any glass). If you don’t have any clay, use any other kind of solvent (such as white spirit or acetone).
4. Remove all excess water from your boat and let it dry off before placing it in its mold box (make sure that no water stays inside!). Then put some more cement around your boat until it is completely covered by cement (don’t forget about small holes like screw holes etc.).
To make a fiberglass boat mold, you will need the following tools:
Fiberglass matting, fiberglass cloth and resin or vinyl ester resin.
A silicone putty knife, wood blocks and wood putty knife.
A pair of scissors, a sharp knife and a compass saw.
An electric drill with various bits.
A respirator mask if you are using epoxy-based resins, which can be harmful if inhaled.
In this video I show you guys how to build a boat mold, how to make a boat mold plug.
I want to talk about the basics of how a boat mold is made.
I’m going to go through the whole process of making this boat mold, but what I want to do first is just talk about some of the basic terminology that we use in the industry when talking about molds.
So, what we’re getting ready to do here is make a boat. This is a plug that we’re going to use as part of our tooling process. And before we get started on any of this stuff, we have to know exactly what part of our boat we’re making and what size it’s going to be and what materials it will be made out of. So, if you’re looking at some plans or blueprints or anything like that, you’ll see that there’s always information on them about what size they are; how many pieces they are; and also what material they’re made out of; whether they’re wood or plastic or metal or whatever it may be.
And then from there, once we know all those things and we know exactly what piece we’re building, then we can start thinking about how big our mold needs to be
The process of making a boat mold plug is not as difficult as it may seem. The whole process takes only a few hours and can be done by anyone with basic carpentry skills.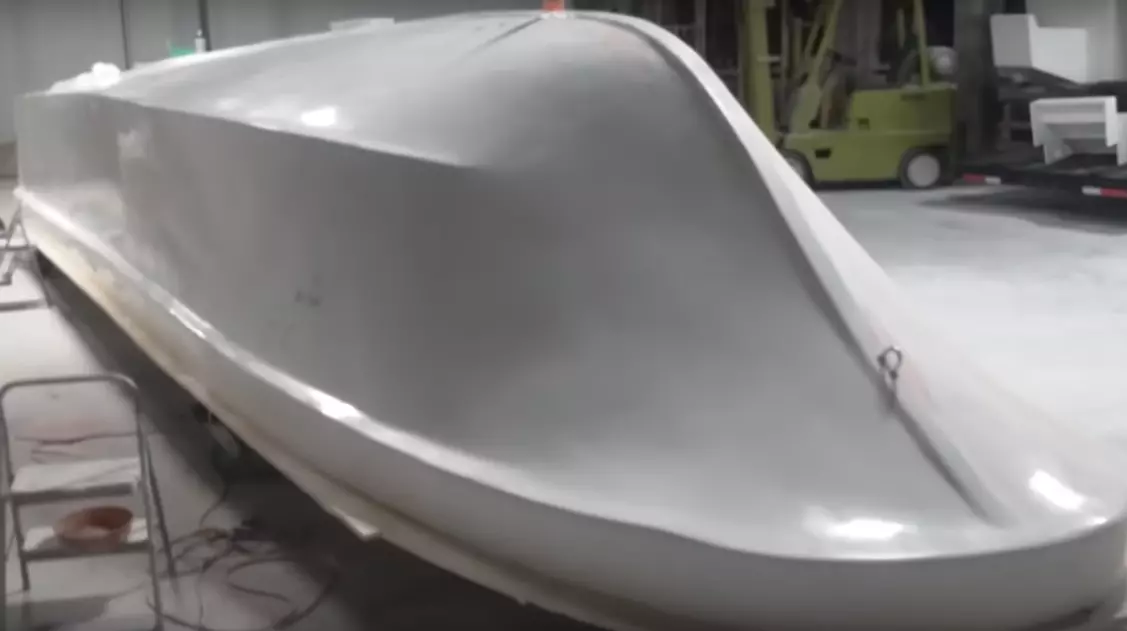
The first step is to cut the plywood pieces for your boat mold plug. There are two main types of plywood: solid and veneer. Solid plywood is less expensive than veneer, but it is also heavier and stronger. You’ll want to use this type if you’re planning to build a large boat or canoe from your plug. Veneer plywood on the other hand is lighter and more flexible which makes it ideal for smaller boats such as kayaks or canoes.
The next step involves cutting out the pieces that will make up your plug’s hull. Each piece should be as wide as possible so that they can float on water when they are placed together (which will allow them to form an airtight seal when they are glued together). However, keep in mind that these pieces must fit inside of your vacuum bag before gluing them together so make sure they aren’t too wide!
Once all of your pieces have been cut out and sanded down, it’s time to start gluing them together! The best way to do this is by
How to make a boat mold plug
1. The first step is to build the mold plug. To do that, you need to have a wooden board that can be used for making the mold. You can use plywood or any other material that is strong enough to withstand water pressure and has an inner surface smooth enough to make the mold.
2. Once you have a good board, mark out the shape of your boat on it using a pencil. Make sure that the shape is accurate and fits in properly with all the joints and corners.
3. Next, cut out the shape with a jigsaw or other wood cutting tool and sand down all rough edges so that they are smooth enough for making molds later on.
4. Now drill holes at all corners of your boat’s hull so that they can be mounted on sticks later on while casting concrete in them. These holes should be big enough for inserting wooden dowels into them later on too so there is no gap between them when casting concrete inside them during production runs of boats using this molding technique
Mold plugs are used to make the actual mold of a boat. This method involves building up layers of clay around a solid core. There are many different ways to build a mold plug, but the most common is by using a wooden form and adding wet clay to it.
Molds are made in order to create copies of objects. They can be made from plastic, foam, latex or even metal. Molds can be used for making jewelry, sculptures, figurines and many other things that can be made with molds.
There are many ways to build a mold plug for your boat. The first thing that you need to do is create a wooden form for your boat out of wood. Your form should be large enough for your boat and have enough space between each layer so that you can add wet clay without overlapping previous layers. Once you have created your form, add wet clay around it until it completely covers the entire surface area of your boat’s wooden form