Before you can start developing web applications on Windows 10, you will need to set up a web server. There are several free and commercial web servers available for Windows 10.
In this article, I’ll show you how to install Apache HTTP Server on your Windows 10 PC. Apache is an open source web server that’s been around for almost two decades now. It’s widely used by enterprises, governments and individuals alike because it’s highly configurable, secure, reliable and scalable.
The latest version of Apache HTTP Server is 2.4, which was released in October 2017.
Setup Web Server On Windows 10
The Internet Information Services (IIS) is a web server that comes with Windows 10 and is used for hosting websites and web applications. It allows you to create a local web server on your computer so that you can test your website locally before uploading it to the internet or hosting provider.
The IIS Manager tool is used for managing the IIS services and websites hosted on your computer. It lets you configure settings like IP address bindings, security rules and much more.
You can also use IIS Manager to stop or start websites or application pools that are running on your computer.
To open IIS Manager, click on Start > Administrative Tools > Internet Information Services (IIS) Manager. You will see a window with four tabs at the top: Overview, Connections, Features View, Configuration View. Each tab has its own set of options that you can use to configure your web server settings.
In this article, I will show you how to configure iis in windows 10 step by step. First of all, we have to enable Web Server role in Windows Server 10. It’s a free feature and easy to use. You can get access to the internet at any time with your personal computer.
Now let’s start the process of configuring IIS on Windows 10.
Step 1: Enable Web Server Role
Click on Start menu and type “server manager”. In the result, click on “Server Manager” option. It will open a new window for you. Click on Manage -> Add Roles and Features link from left side pane of the window. It will open a new window for you where you need to click on Next button two times until you see “Role-based or feature-based installation” option at the top of installation window.
Step 2: Select Web Server Role
In next window select “Web Server (IIS)” option and click on Next button. It will ask you to choose destination server where you want to install IIS role so if you want to install IIS on same machine then just leave default value as it is otherwise change it according to needs.
Windows 10 is a great operating system for web servers, especially if you’re using IIS. The latest version of IIS has some great features that allow you to host websites locally or on the internet. This guide will show you how to set up your own web server on Windows 10.
Configure IIS (Internet Information Services) in Windows 10
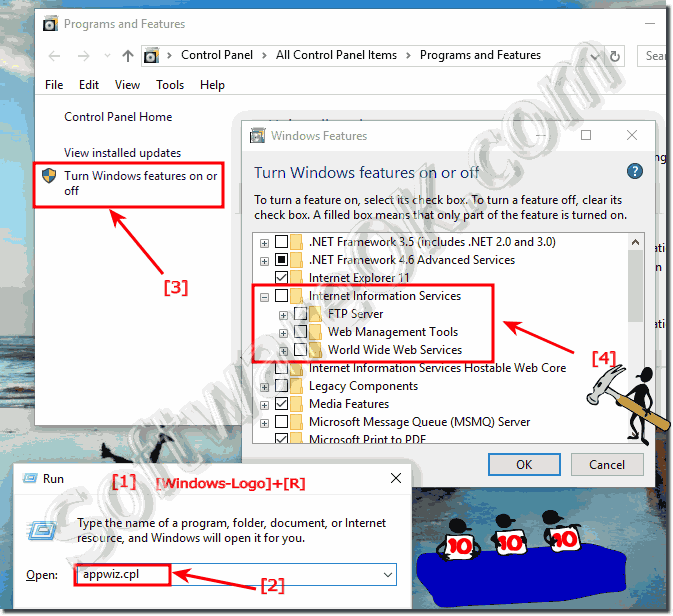
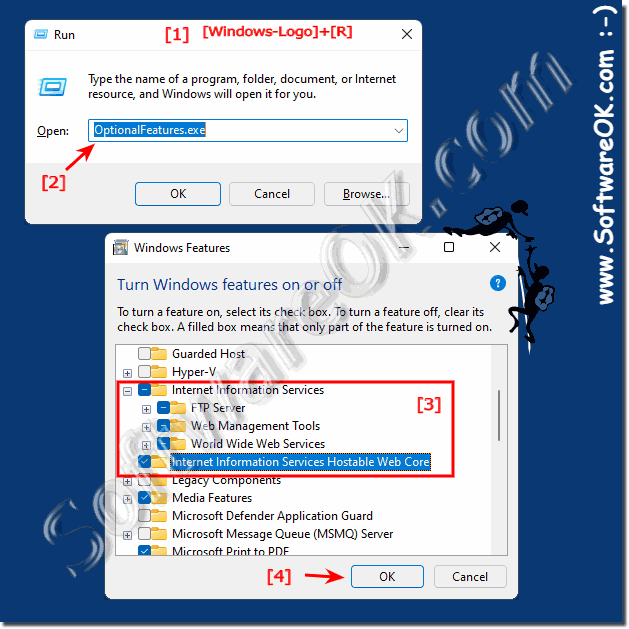
Open the Control Panel by right-clicking the Start button and choosing Control Panel. Under Programs click Turn Windows features on or off.
In the list of installed features, scroll down until you find Internet Information Services (IIS). Check Internet Information Services Manager and click OK.
Configuring IIS on Windows 10
IIS is a web server that runs on Windows Server. It’s a part of the operating system and is installed by default during the installation process. You can use IIS to host websites, and also run other types of applications.
In this article, you’ll learn how to configure and manage IIS on Windows 10.
You can configure IIS in Windows 10 using the following steps:
Open the Control Panel from the Start menu, or search for it using Cortana’s search bar. Click Programs > Programs and Features > Turn Windows features on or off from the left pane, as shown below:
In the list that appears, check Internet Information Services (IIS) checkbox and click OK button, as shown below:
Click Next button when you see “Internet Information Services” window as shown below:
Step 1: Open the Server Manager app and click on the Add Roles and Features option.
Step 2: In the wizard that appears, choose Role-based or feature-based installation as your installation type, and then click Next.
Step 3: Under Server Selection, select your server from the list of available servers. If you have several servers in your organization, you need to make sure that you select the right one by checking its name and IP address (if it has one). Click Next.
Step 4: On the Select Server Roles page, expand Web Server (IIS) and then check Web Server (IIS). Click Next when done.
Step 5: On the Select Features page, ensure that all features related to IIS are selected by default. Click Next when done.
Step 6: The Confirm Installation Selections page displays a summary of all selected items for this role installation. Review them and click Install if everything looks good; otherwise click Back to make any changes before proceeding further with the installation process.
iis manager windows 10
iis manager is a web server that comes with Microsoft Windows and is used by default to host websites. It is also known as Internet Information Services (IIS).
To configure iis in windows 10 step by step, follow these steps:
Open the Start menu, search for “Control Panel,” and click on it.
Click on “Programs” and then “Turn Windows features on or off.”
Under “Windows Features,” scroll down and check the box next to “Internet Information Services” and click OK.
A Web Server is a computer system that hosts web sites and web pages. It’s a server because it provides services to other computers and clients on the network.
A Web Server is also called a HTTP (Hypertext Transfer Protocol) or HTTPs (HTTP over SSL/TLS) server, because it serves documents using the Hypertext Transfer Protocol (HTTP).
There are many different ways to set up a web server. This article explains how to use IIS (Internet Information Services) Manager in Windows 10 for local testing and development.
How to Configure IIS in Windows 10
Configuring IIS is not a difficult task if you follow these steps.
First, open the Control Panel and click on Programs. Then click on Turn Windows features on or off. You will see an option like Internet Information Services (IIS). Click on it and then click on the arrow beside World Wide Web Services.
You can now check all the options to enable them. Hit Next and then Install to enable the features that require installation. This process may take some time depending on your system’s hardware configuration.
How to Configure IIS in Windows 10 Step by Step
In this article, we will see how to configure IIS in Windows 10 step by step.
Before we start, let’s understand what IIS (Internet Information Services) is. IIS is a web server that allows you to host websites on your local machine or on the cloud. You can also use it for other purposes like FTP server, database server, etc.
Now that you know what IIS does, let’s see how you can configure it in Windows 10.
The first thing we need to do is open the Control Panel and then click on Programs And Features:
On the right panel, click on Turn Windows features on or off:
Now look for Internet Information Services (IIS) and checkmark all its options:
Next go back to Turn Windows features on or off and scroll down until you find Web Management Tools, then checkmark its option as well:
IIS has been a part of Windows for a long time. It’s one of the most powerful web platforms available and is used by both large and small companies to host websites and applications.
In this tutorial, we’ll show you how to configure IIS on Windows 10 so that it’s ready to host your website or application.