A swinging journey that started with a simple idea, an inquisitive mind and some basic tools. Out of all the swings I have built, this one is the most comfortable and sturdy and resilient to weather.
Have you ever considered making your own backyard swing, how to build a wood porch swing, how to build a baby swing out of wood? One that is sturdy and will last a lifetime? It’s easier than you think.

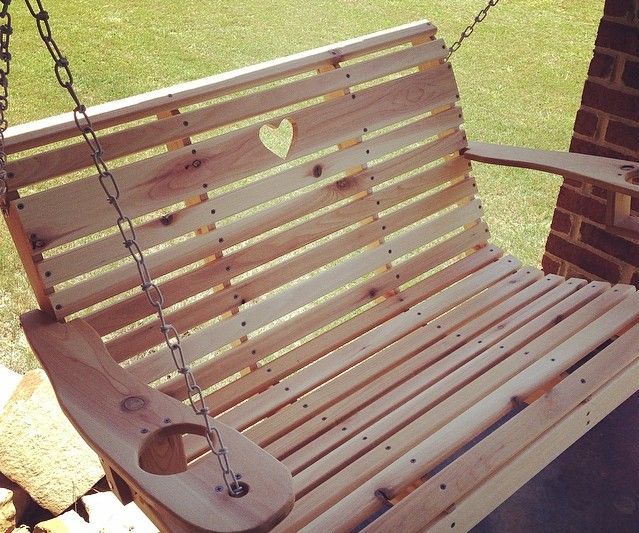
How to build a wood swing
The easiest way to build a porch swing is to use two pieces of 2×4 lumber. Cut each piece into two 6-foot lengths, then screw them together at the middle of each 8-foot side. Finish the frame by attaching an armrest and seat support to each end with 2-inch-long screws.
How to build a baby swing out of wood
A wooden baby swing is easy to make with basic carpentry skills and inexpensive materials. You can easily customize the design with decorative touches like paint or stain, or add storage shelves underneath for toys and diapers.
The rocking motion of a baby swing mimics that of the womb, making it comforting for babies who are adjusting to life outside their mothers’ wombs. Swings are also useful for calming fussy babies who need soothing but aren’t sleepy enough to sleep yet.
To make a wooden baby swing, you’ll need:
Two 4-foot by 8-foot sheets of 3/4-inch plywood or OSB (oriented strand board)
Four 1x4s (1 inch by 4 inches) for seat supports
How to Build a Wood Porch Swing
Wooden swings are an elegant addition to any porch or patio. They can also be made into baby swings, so that you can enjoy them for many years. The benefits of building your own wood porch swing are that you can customize it to fit the size of your porch and save money by buying the lumber in bulk. A wood porch swing is easy to build, but it does require some carpentry skills.
Materials:
1/2″ plywood (for seat)
1/2″ x 4″ x 8′ boards (for legs)
2 x 4 x 8′ boards (for armrests)
Building a porch swing is a great way to get the family together, and it’s also a fun weekend project for the whole family. The plans below are for a basic porch swing that you can use as a guide for building your own. If you want to make the swing more comfortable or add some style, there are plenty of options available at home improvement stores. Just be sure to choose one that’s designed for outdoor use.
Another popular option is to build a wooden baby swing out of wood. These swings are typically hung from trees or other structures and can be used by children up to 40 pounds or so.
The first step in building your own porch swing is collecting all the necessary materials. You’ll need:
2x4s (enough for two frames)
1×6 boards (enough for two frames)
1×6 slats (enough for two frames)
Building a porch swing is a great project for the DIY enthusiast. It is easy to build and can be made from wood, rope or canvas. The materials needed for this project are relatively inexpensive and can be purchased at any home improvement store.
Building a porch swing does not require any special tools or skills. If you can use a hammer and drill, you can build a porch swing. The first step in building your own porch swing is measuring the lumber that will be used to build it. You need to measure each piece of lumber before cutting it down so that they fit together properly when they are put together.
The next step in building your own porch swing is cutting down each piece of lumber using a saw or circular saw with a blade that has at least two inches of depth on it so that it cuts through each piece of wood with ease without difficulty.
Once all of your pieces have been cut down and measured then you can begin assembling them together. To do this, simply place two pieces side by side so that there is about one inch between them then nail them into place using nails with heads on them rather than screws because screws tend to break off easily if you don’t hit them just right when hammering them
Wood swings have been around for centuries, and they are still popular today. They look beautiful in a backyard, on a patio and even on a porch. If you want to build your own wood swing, there are a few things you should know before you get started.
Choose the right type of wood
When building a wood swing, choose hardwoods like oak, hickory or ash instead of softwoods like pine or cedar. Hardwoods will last longer than softwoods and will hold up better under pressure. Make sure that any wood you use is free from knots and cracks before starting building your swing set.
Measure carefully
You need to measure your wooden swing carefully before building it so that it will fit in the space where you want to put it. Measurements include length, width and height, as well as the distance between all four legs of the frame (front to back). This will help ensure that your outdoor wooden swing is stable when it’s finished being built and ready for use.
How to build a wood porch swing
Building a porch swing is not as difficult as it may seem. If you have basic carpentry skills and know how to use a few power tools, you can build one in less than a day. Building the swing frame is actually the easiest part of the process because most of the work is done by using power tools.
Step 1: Gather Materials
Before you begin building your porch swing, make sure that you have all of the materials that you will need on hand. You will need two 2 x 4s for each seat and four 1 x 4s to connect them together. You will also need 1/2-inch plywood, which will be used for several parts of the frame, including the seats and backrests. Make sure that you have enough wood glue and screws on hand to complete everything properly.
Step 2: Cut Wood Pieces
The easiest way to cut all of these pieces is with a circular saw or table saw. However, if you do not have access to either tool at home then it may be easier for you to use an angle grinder instead. If so then make sure that you wear eye protection when doing so because small pieces of wood can fly off into your face if not careful during this step.
How to Build a Wood Porch Swing
Building a porch swing is one of the easiest projects you can do, and it’s also one of the most relaxing. The materials are inexpensive, the setup is quick, and you don’t need any special tools. You just need to know what type of wood to buy and how to properly cut it.
If you’ve never built anything before, this is a great project to start with. If you have some experience building things, this will be easy for you too.
The first step is to decide where you want your swing to hang from. The standard height for porch swings is 8 feet off the ground. To determine where you should mount your brackets, measure from the floor up 8 feet and make marks on both sides of the beam or studs where they meet each other at that height. Then measure out from these marks 16 inches on either side (for a total of 24 inches). This will give you room for 2×6 boards between brackets (2x4s if you’re using shorter 2x6s).

Build a Wood Porch Swing
The first step in building a porch swing is to choose the right wood. Pine and cedar are good choices because they’re inexpensive and easy to work with. However, if you want an heirloom quality swing, use kiln-dried hardwoods like oak or teak.
Wooden Porch Swing Frame
Cut two 2x4s to 16 inches long and two 2x4s to 9 inches long. These will form the base of your porch swing frame. Attach two 16-inch pieces to the 9-inch pieces with three screws at each joint (see image). Use deck screws rather than nails or staples because they won’t split or damage your wood when you remove them later.
Attach Cushion Support Boards
Cut two boards that are 12 inches long, then cut them down into three sections (6 inches per section), so you have four boards total that measure 6 inches by 12 inches. Attach these boards along the inside perimeter of one side of the porch swing frame using 1 1/2-inch galvanized lag bolts and washers (see image). The front side of each board should be flush with the front edge of the porch swing frame;
How to Build a Wood Porch Swing
The classic porch swing is an American icon. In fact, it’s so iconic that it’s even on the back of the $20 bill! If you’re looking for a relaxing place to sit and enjoy the outdoors, then building your own porch swing is a must. Here’s how:
1. Gather all of your materials. You’re going to need some basic tools for this project, but the most important thing is the wood itself. You’ll want to use cedar or pine for this, as they are both very strong and weather resistant. Make sure that you have enough wood for all of your pieces (seat, arm rests and back).
2. Cut all of your pieces out of the lumber using a saw or jigsaw. It’s best to make sure that everything fits together perfectly before screwing anything together, so make sure you measure things multiple times before cutting.
3. Once all of your pieces are cut out you can begin assembling them together using screws or nails (depending on what type of wood you used). I recommend using clamps while working with large pieces like this so they don’t move around while being attached together

Your best bet is to go with a do-it-yourself kit that comes with all the materials you need. You’ll find several online, at prices ranging from $200 to $500.
The wood for the swing can be any type of hardwood (such as oak, pine or cedar). You’ll also need some screws, dowels and sandpaper.
The first step is cutting out the pieces from the boards of lumber using a circular saw or handsaw. The exact measurements depend on which kit you buy, but they should be fairly straightforward to figure out from the instructions included with each kit.
You’ll need to use clamps to hold everything together while you screw it together with wood screws. If you don’t have clamps, use duct tape instead! The important thing is that everything is held together securely so it doesn’t fall apart while you’re working on it later on.
Once all the pieces are cut out and screwed together into one large piece, sand down rough edges and round corners if necessary so they don’t hurt anyone when they get too close to them (you know how kids are!).