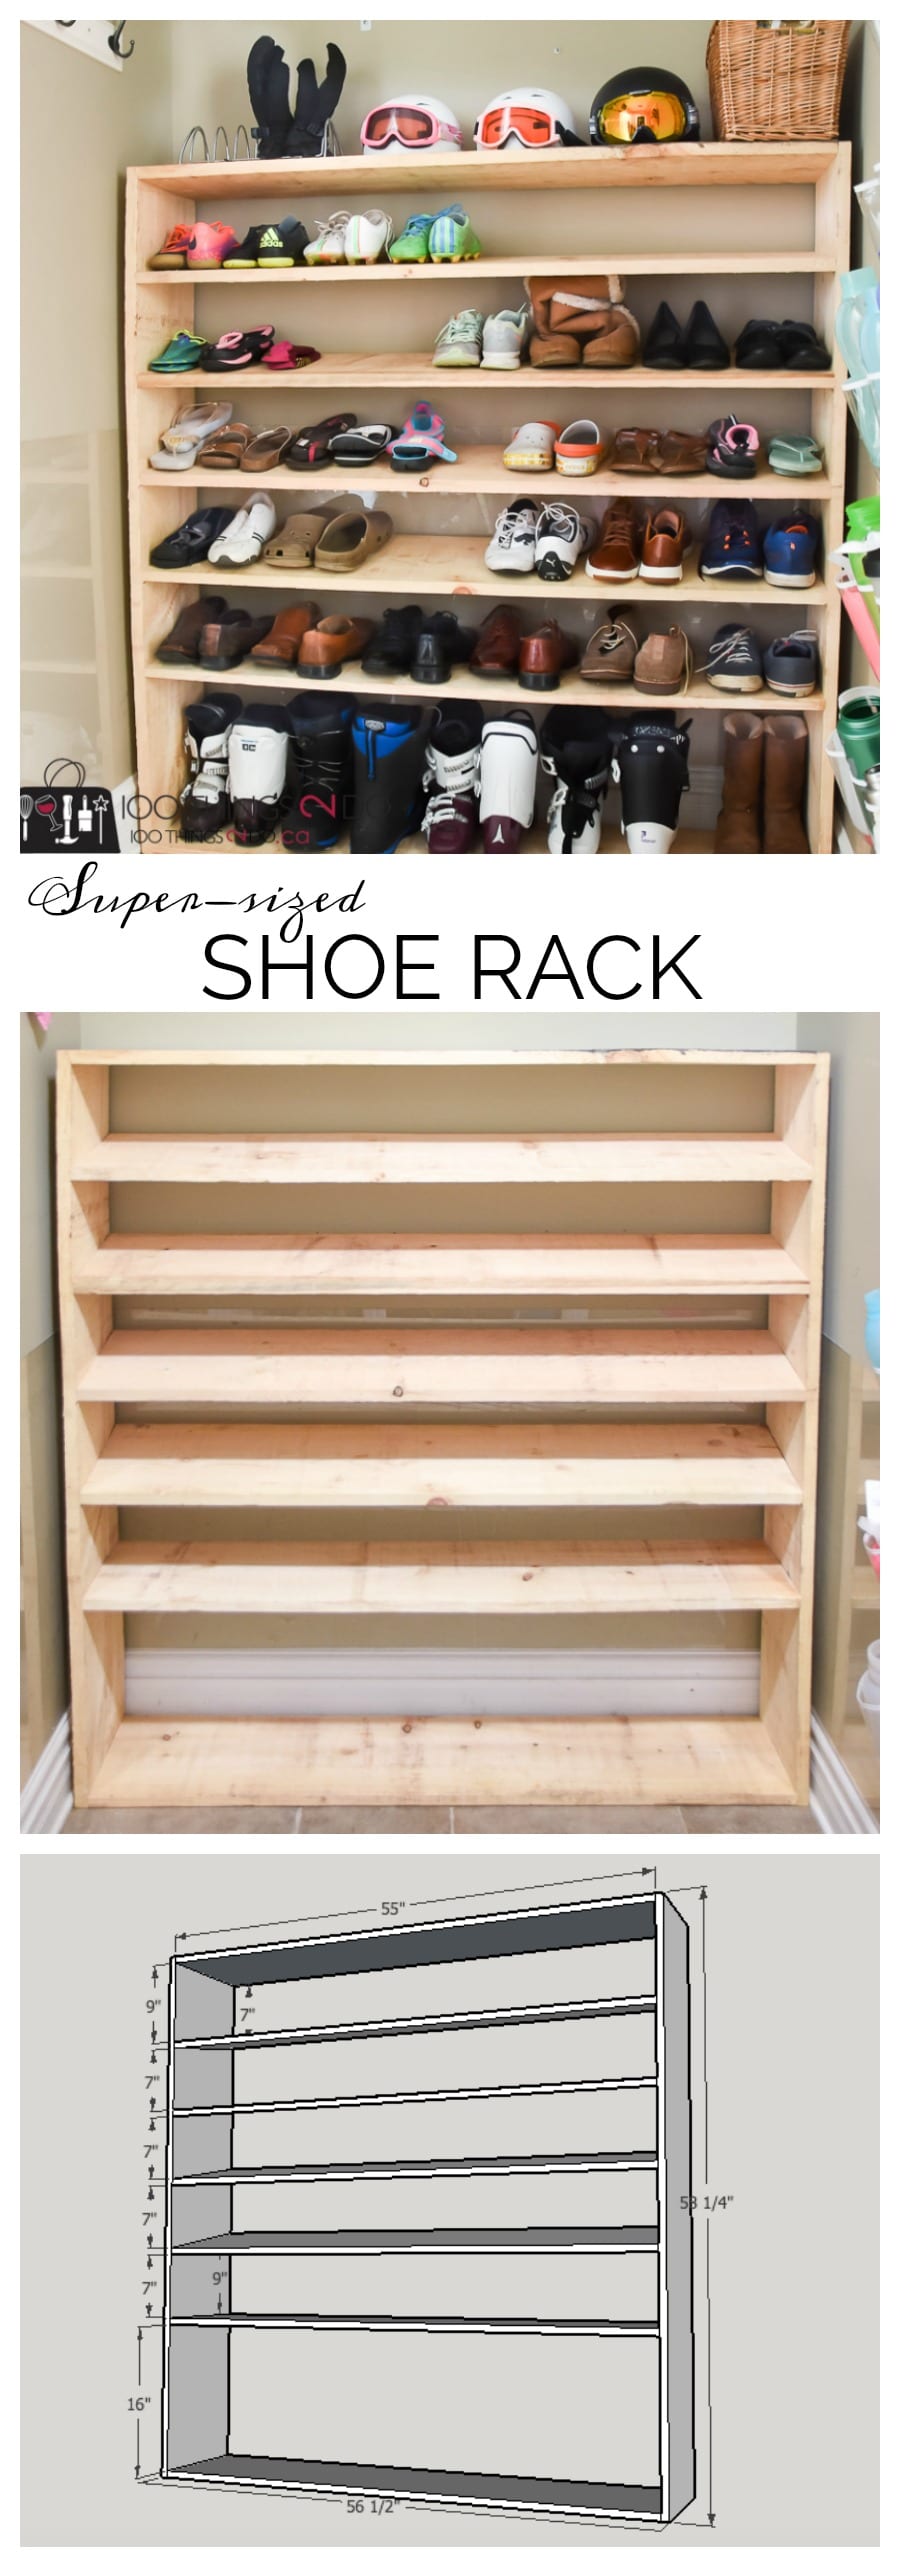
A shoe rack is an important thing to put in the house especially if you have many pairs of shoes. It takes little effort, but provides a huge help. The following steps will show you how to build a wood shoe rack that looks nice and is easy to assemble.
Have you ever considered building a shoe rack for your shoes, how to build a shoe rack for closet, how to make shoe rack with plywood? It might sound like an odd idea, but it’s easier than you think. In fact, I built a wood shoe rack for my shoes — here’s how you can build one too.
![Build [a NOT SO FANCY] Shoe Rack for Work Shoes. - YouTube](https://i.ytimg.com/vi/saT6PS1qjFw/maxresdefault.jpg)
How to build a wood shoe rack
You can make a pair of shoes rack shoe rack at home with waste material or plywood. It is not a big project and you will finish it in an hour.
In this article, we will show you how to make shoe rack at home with waste material.
Materials needed for making shoe rack at home
1/2 Sheets of Plywood
Wood Glue
Paint or Stain (optional)
How to build a shoe rack
A shoe rack is a simple and inexpensive way to organize your shoes. Just like you can use a shoe organizer for clothes, you can also use one for your shoes.
Materials needed:
1. Plywood board – 1/2 inch thick or more depending on the size of your closet
2. 2×4 wood pieces (for frame) – These are used as posts that hold up the plywood shelf that you will be using as a base for your shoe rack. You may need more than one depending on how big your closet is and how many shoes you have.
3. Screws or nails – You will need these to secure the posts into place so that they don’t fall off when someone puts their weight on them while taking off their shoes or putting them back in place again once they’re inside their closet again after wearing them out of the house for some time during the day or night!
Do you have a lot of shoes and don’t know how to organize them? Make a shoe rack. It’s easy, cheap and customizable.
Here are some ideas for building your own:
Building a wood shoe rack isn’t as hard as it might seem. There are many different styles of racks that can be built from wood. The type of wood used will depend on what look you are trying to achieve and the amount of money you want to spend on this project. If you want something simple then pine or cedar would work great but if you want something more complex then oak is probably going to be your best bet here.
The first thing that needs to be done is measure out where you want your shoe rack to go in the closet or room that it will be placed in so that it has plenty of room around it for shoes to fit easily onto the rack without being crowded or smashed up against each other while they sit there waiting for someone to come along and take them off so they can wear them!
Once this has been taken care of then build up your base with plywood or whatever kind of material
Step 1: Measurements and Cutting
First, you’ll need to measure the area in your closet where you plan on installing the shoe rack. Then, using a pencil and ruler, mark out where each of the shelves will go. Make sure that there is enough space between each shelf for shoes to fit comfortably.
Next, cut all of the pieces to size using a jigsaw or circular saw. You can use a hand saw as well if you prefer, just be sure that it is sharp enough so that it doesn’t cause splintering or tear through the wood too quickly.
Step 2: Assembling the Racks
Once all of your wood pieces are cut and sanded smooth, it’s time to assemble them into one large unit. To do this, place two boards on top of one another so that they are parallel with one another and facing in opposite directions (make sure they are flush). Then add two more boards on top of these so that they form a rectangular box shape with four sides total (two open sides). Next, attach screws or nails along each seam between each board until there are no gaps left between them.
Do you have a closet and a lot of shoes? You are not alone. We all have a lot of shoes, and most of us can’t put them on the floor because we don’t want to mess up the carpet. So what do we do?
We buy shoe racks. But if you are like me, and don’t have enough money to buy one, then you need to build one!
How to build a shoe rack for closet
So, you have a lot of shoes, and you don’t know what to do with them?
Well, this is not a problem anymore! You can build your own shoe rack at home using simple materials.
If you want to make a shoe rack for your closet, this article will help you. It will teach you how to make shoe rack at home with waste material and without any tools.
Materials needed:
– Plywood sheets (or any other wood)
-Nails or screws

How to Build a Shoe Rack for Closet
Shoe racks are a must-have in every home. They help keep your shoes organized and save you a lot of time when you need to find a pair of shoes in your closet.
Here are some simple tips on how to make a shoe rack at home:
Materials:
1) Plywood (1/2″ thick) – 1 piece of 4′ x 8′ plywood is enough for making 2 shoe racks with our plans
2) Wood glue
3) Screws (1″ long) – around 30 screws should be sufficient, depending on the size of your shoe rack and its weight capacity
4) Nails or screws – to secure the joints before applying glue
Note: If you want to make two identical shoe racks, you will need two pieces of 4’x8′ plywood, otherwise one piece will work fine.
Tools: Drill with bits: 1/4″, 3/8″, 1/2″
This tutorial will show you how to build a shoe rack for your closet. The project is very easy and inexpensive. It can be made out of plywood and screws, or even out of cardboard, paper and tape if you don’t have any other materials on hand.
You can also use this post as an inspiration to design your own shoe rack, using different materials and dimensions.
Materials:
2 pieces of 1/4″ plywood (1/2″ thick) measuring 22″ x 28″ each**
Use the first piece as a base for the shoe rack and cut it into 2 parts: one piece at 22″ x 13″, the other at 22″ x 9″.**
Use the second piece for making shelves for your shoes; cut it into 3 parts: 2 pieces at 15″ x 18″, 1 piece at 17″ x 8″.**
Cut two strips from scrap plywood measuring 1-1/4″ x 15-3/8″, then cut these strips into 12 small blocks measuring 1-1/4″ square; use these blocks as spacers between shelves so that they form gaps between them (see photo above).**
Cut two strips from scrap plywood measuring 7/8″ x 19″, then cut these strips
Shoe rack ideas are endless. You can make one yourself using materials that you have at home. For example, you can use old wooden pallets or make one yourself using plywood sheets and other materials.
To make a shoe rack at home, here’s what you need:
Shoes (any types)
Plywood sheets (You can use the ones from your local hardware store.)
Nails or screws (Whatever suits you.)
How to Make a Shoe Rack
A shoe rack is a convenient way to store your shoes in a small space. A shoe storage system can also help you keep your shoes organized and avoid clutter. There are many DIY tutorials for making shoe racks on the Internet, but here are some easy plans that you can use:
1. Use a wooden pallet as a base to make this simple and sturdy shoe rack.
2. Use wine crates from the grocery store or wine shop as the base for this unique-looking wall-mounted shoe rack.
3. Build this simple DIY wall-mounted shoe rack with plywood and pine boards from Home Depot or Lowe’s home improvement stores.