Over the last few years, I’ve been working on a series of videos, design kits and documents to help homeowners and businesses build shed bases. shed base is an important part of a shed. It protects the shed from rotting. Therefore, choosing the right materials is critical.
Are you looking to build a wood shed base, building a wooden base for shed, how to build a wood shed step by step? If you are moving or adding onto your house and have looked into building a wood shed, you will notice that the cost can be expensive. A majority of shed plans call for pre framing and plumbing for electrical. If you are like me, I want something that does not take forever to build and has the look of built-in.

How to build a wood shed base
This article will show you how to build a wooden base for shed.
Step 1: Start by marking out the area where you want your shed to be. The best way is to use chalk or string and measure out the size of your shed. You must also decide where you want your door, windows and any other features that you want to include.
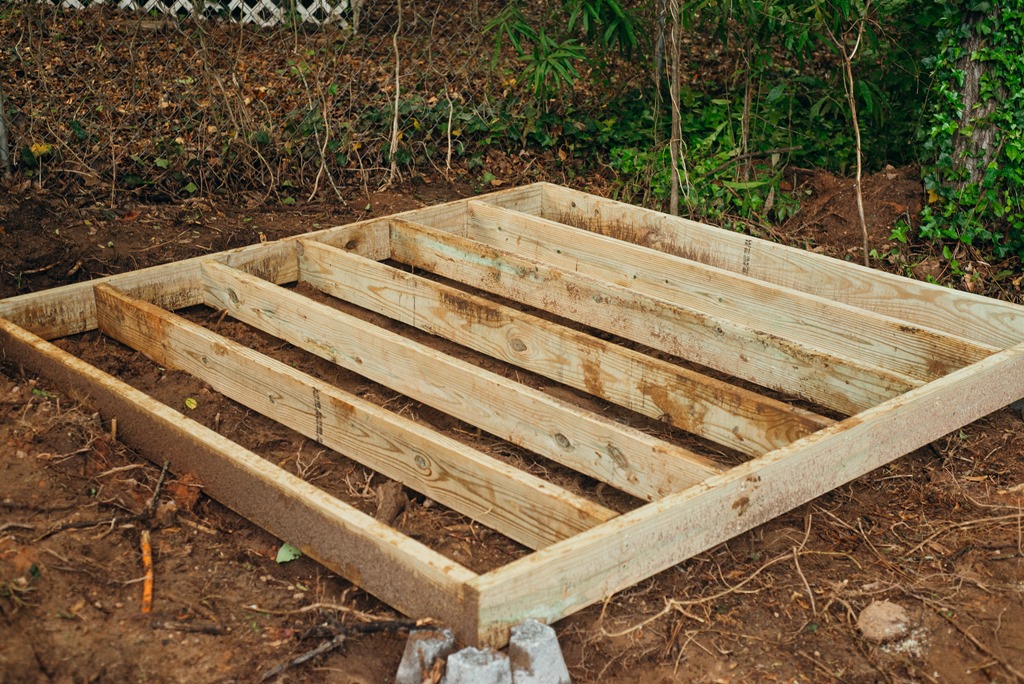
Step 2: Dig holes for the posts. Dig them at least a foot deep and three feet long so that they are firmly embedded in the ground. You should also place some gravel at the bottom of each hole as this will help with drainage.
Step 3: Mark out where each post should go using stakes and string or chalk. Once you have done this, start digging holes for them as well as putting gravel into each one before pouring concrete into it.
Step 4: Mix up some concrete according to instructions on the packet and pour it into each hole until it’s about half-full (this is so that there is room for expansion). Then place posts into position on top of this concrete base before covering them completely with more concrete mix until it reaches ground level (you may need some help with this).
Building a wooden base for shed, is one of the most important steps in building a shed. The shed base is the foundation of your shed and it must be built properly.
Building a wooden base for shed can be done by anyone with basic carpentry skills.
You should follow these steps when you are building a wooden base for shed:
1-First thing you have to do is to decide where you want to put your shed. Make sure that it has enough space around it so that you can easily get in and out of the shed. Also make sure that there are no trees or other structures near where you want to build your new wooden shed base.
2-Use stakes or stakes to mark out the corners of your new wooden shed base.
3-Dig holes for each corner stake using a post hole digger . When digging each hole make sure that it’s deep enough so that when you place a 2×4 piece of lumber into them they will be flush with the ground surface . You can also use concrete blocks instead of wood posts if you want but make sure that they’re level with each other so that everything looks professional when finished!
How to build a wooden base for shed
The first thing you need to do is mark out the area where you want your shed to be positioned. Once that is done, dig down a few inches and then lay some gravel or crushed stone on top of it. This will help prevent moisture from rising from underneath the shed and causing problems in the future.
Next, measure out the dimensions of your shed’s floor and make sure that it is square (if possible). If not, then just make sure it is as square as possible. Use some stakes and string to mark out these dimensions and then place them inside of your dug-out area.
Now that you have your foundations laid out, it’s time to start building! Start by placing a layer of strong pressure treated lumber on top of the gravel or crushed stone foundation that you created earlier. Attach these boards together using long screws at least every 8″ along each board’s length and every 16″ along its width. Make sure that these screws are driven into the center of each board so they don’t split when they get wet later on down the road.
Once your first layer has been secured in place properly with long screws, attach another layer directly on top
Building a wooden base for your shed is a great way to get started with your project. It’s also the best way to ensure that your shed is level and can be properly secured to the ground.
Building a wooden base allows you to make sure that the shed is positioned in the right spot, and it will help you create a solid foundation for your new structure.
The first step in building a wooden base for your shed is to find out how much it weighs. This will help you determine how large of a base you need. If your shed weighs less than 2,000 pounds, then you should be able to build a base with basic tools and skills.
If you’re building a shed, you’ll need to know how to build a wood shed base. A sturdy, level foundation is essential for ensuring that your shed won’t sag or crack over time.
Build a wood shed base with these steps:
1. Dig out the area where you want to build your shed. Make sure it’s big enough to accommodate the size of your structure and the materials you’ll be using (e.g., 4 feet by 8 feet).
2. Lay down cardboard or plywood to cover the ground where you want your shed to sit. This will protect it from becoming muddy or waterlogged during heavy rains.
3. Mark off where your floor joists will go on either side of the foundation — about 16 inches apart is standard — then install them with concrete nails or screws through their top edges into the foundation blocks below them so that they’re flush with each other on both sides of the shed’s floor space (that way, you won’t have any gaps between slabs). You may also want to install cross braces between these joists in order to provide extra support for your structure
Building a wooden base for shed
Building a wooden base for shed is a huge job. You must be very careful about this and make sure that you have all the right tools, materials and skills to get the job done. You might want to consider hiring a professional contractor to do this for you if you don’t feel comfortable doing it yourself.
Here are some tips on how to build a wood shed step by step:
1. The first thing that you should do is measure your shed and make sure that the proper measurements are taken so that your base can be constructed using these measurements.
2. You will need to construct the floor frame before building the walls of your shed. Once you have built the floor frame, use steel beams or treated lumber as wall framing material for your shed walls by nailing them down into place with 16d nails every 8 inches apart from each other. The top plate should run from one corner post to another corner post across your entire base so that it creates a perfect rectangle shape when viewed from above.
3. After building your walls, secure them together by nailing in place 2x4s at 12-inch intervals along each side of each wall until they reach about 4 feet high.
Step 1. Prepare the wood for the shed base
The first step in building a wooden shed base is to prepare the wood for the project. The best way to do this is by cutting each piece of wood to an appropriate length with a circular saw or reciprocating saw. You can also use a miter saw or table saw if you prefer, but make sure that you cut each piece as accurately as possible. This will ensure that your shed base is level and square when it’s finished.
Step 2. Lay out the floor frame
Before you start building your shed base, make sure that you have all of the tools and materials needed for this part of the project on hand so that you don’t have to stop working if something goes wrong with one of them in mid-build. Once you have everything ready, lay out the floor frame using pressure-treated lumber and nails or screws depending on what kind of fastener you’re using. Make sure that all of your joints are tight so that there aren’t any gaps between them where moisture could seep in and cause problems later on down the line.

Step 3. Build up from there
From here on out, building a wooden shed base is pretty straightforward: just follow these steps until
How to Build a Shed Base
Step 1: Prepare the foundation
To build a shed base, the first thing you should do is prepare the foundation. This can be done by digging down at least 8 inches deep and filling up with gravel. You can also use concrete blocks to create a solid base for your shed.
Step 2: Set up your post supports
The next step would be to set up your post supports. These are usually made out of 2×4 or 2×6 boards which can be attached together using screws or nails. The post supports should be placed on the ground where you want it to stand and then fastened into place by drilling holes into them and inserting bolts through them. The height of the post supports depends on how high you want your shed to be so make sure that it is high enough so that it doesn’t fall over when someone walks by or when something heavy is placed inside it.
Step 3: Attach plywood sheets to one side of each post support
You may want to consider attaching plywood sheets to one side of each post support for added strength and durability. This can be done by screwing 4×4 lumber into both sides of each plywood sheet so that they will go
When it comes to building a wooden base for your shed, there are many things that you need to consider. This is because you want to make sure that it is sturdy enough to support the weight of your shed. This will ensure that you do not end up with a crooked shed as well as ensure that it does not fall over.

In order to build this wooden base, you will need:
A level area where you can build your wooden base on
A tape measurer
A saw (such as an electric saw)
Wooden boards (depending on how big or small your shed is going to be)
How to Build a Shed
Building a shed is a good project for any homeowner. It can provide extra storage space, and it’s relatively easy to build. The only tools you need are a hammer and nails.
Here are some tips on how to build a shed:
Measure the area where you want to put the shed. Make sure that there is enough room for the shed, with at least 3 feet around all sides.
Dig holes for the posts — usually 4-5 inches in diameter — deep enough so that they go below ground level by at least 6 inches. Place them about 2 feet apart from each other and make sure they are straight up and down (not leaning). Place a concrete block in each hole and fill it with concrete until it’s level with ground level (make sure there is no dirt left).
Attach the studs or joists to the posts; use nails or screws. The studs should be placed on 2 inch centers (8 inch spacing). Toenail them into place for added support and stability if necessary. Make sure that both sides of each post are even with each other and tight against the inside edge of each joist or stud board.