Building a wooden sawhorse is a rewarding project as they can be used for more than just holding wood. Learn how to build one from scratch in this article.Saws are for cutting, and horses are for support, so how about some sawhorses? Also known as saw horses or sawhorse frames, these starter props are simple yet effective.
As anyone who has ever used a sawhorse will tell you, how to build a log sawhorse, how to make a wooden sawhorse for logs, these valuable woodworking aids are pretty handy. But did you know that constructing a wood saw horse is quite simple to do?

How to build a wood sawhorse
The sawhorse is a classic woodworking project. It’s easy to build, it’s portable and it’s useful as a workbench or for holding lumber while you’re cutting it. You can even buy pre-made sawhorses, but it’s more fun (and cheaper) to make your own.
Step 1: Cut the legs
Cut two 2x4s into three pieces each: two legs that are 16 inches long and one crossbar that is 18 inches long. The distance between the top edges of the legs should be 4 inches less than the distance between the bottom edges of the legs. This will give you room for your saw blade. Mark this distance on both ends of each board before cutting them apart so they’ll all be the same length when you’re done cutting them.
Step 2: Mark where to drill holes in each leg
Use a pencil to mark where to drill holes in both ends of each leg piece so you can attach them together later with screws or nails. Make sure these holes are drilled perpendicular to the long side of each leg piece — otherwise, their tops won’t line up when you assemble them into a sawhorse!
A sawhorse is a very simple and inexpensive workbench. They are usually made of wood, but you can also make them out of metal. They have many uses besides just holding up logs; they are great for storing items or even building something like a shed roof. If you have ever wondered how to make a saw horse, then this article will answer all your questions!
To get started, all you need to do is measure the length and width of the sawhorse that you want to build. Then cut these measurements into two pieces of wood using a circular saw. Make sure that the wood is thick enough so that it will be strong enough to hold whatever weight you need it too. You also need to make sure that the wood is long enough so that it will not break when you put weight on it (such as an entire log).
Next, place one piece of wood on top of another piece of wood so that the ends are touching each other with no space between them at all. This will create what is known as “lap joints” which help strengthen the sawhorse from falling apart if there is too much pressure put on it from above (such as having a large load sitting on top).
How to Build a Log Sized Saw Horse
The sawhorse is an essential tool for any woodworking or carpentry shop. It’s used to support workpieces while they’re being cut and to support the weight of heavy objects. If you’re looking for a way to build your own sawhorse, here are some tips on how to make a log sized saw horse.
Step 1: Choose Your Wood
Saw horses are usually made from softwoods like pine or fir but you can also use hardwoods such as oak or maple if you prefer.
Step 2: Cut Your Wood into Boards
You’ll need two boards that are at least as wide as your log and about half as long as the length of your log (you’ll cut these down later). You’ll also need four pieces that are twice as wide as your log and about half as long (these will be legs). These pieces should be about 1/2″ thick so that they’re strong enough for their purpose but still light enough for easy handling by hand.
How to build a wood sawhorse
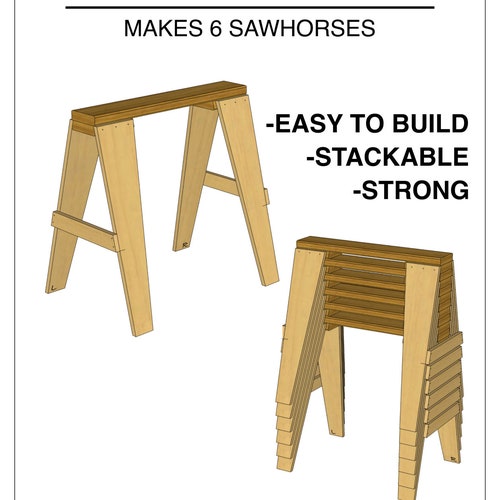
1. Cut the 2x6s to length and rip them down to 2-3/4″ wide. You’ll need two long runners (14-1/2″), two short runners (7-1/2″), four legs (3-3/4″) and six braces (1-1/2″) per sawhorse. This is a little more than the minimum width required by the plans, but we like the added strength it gives the legs and braces.
2. Drill holes for 3″ deck screws through each leg and brace. Use an angle drill for this step, if you have one available.
3. Before gluing up all of your pieces, take some time to sand them smooth and get rid of any rough edges that might cause problems later on when you’re assembling everything together.
4. Lay out your pieces on top of each other so that you have one long runner, one short runner and four identical leg assemblies laid out in front of you in their final positions before gluing them all together
Sawhorses are often used in construction and carpentry to support long pieces of wood. They’re also useful for supporting heavy items while you drill or hammer nails in them. The best sawhorses are built from wood and are sturdy enough to carry heavy loads. To build your own wooden sawhorse, start with a pair of 2x4s and cut them into four equal lengths. Then, attach the ends together with a couple screws and finish it off by attaching a piece of plywood to one end as a top surface.
If you don’t have any spare lumber lying around, you can buy a pair of sawhorses at most hardware stores for about $20 each.
How to build a log sawhorse
This is a great project for those who love to work with their hands. If you have access to a chain saw and a miter box, then this should be no problem to build.
In this video I show you how to make a wooden sawhorse for logs that is sturdy enough to hold up heavy logs when they are being cut by a chainsaw or handsaw.
How to Build a Log Sawhorse
Many of us have had the experience of trying to move logs from place to place, but it can be extremely difficult. If you don’t have a truck, the best way to move logs is by hand. This requires that you build your own sawhorse for logs. The first thing you will need to do is find two trees that are about 15 feet apart and about 6 to 7 feet high.
These trees will be the base for your log sawhorse. Once you have found two trees that are approximately 15 feet apart, use your saw to cut each tree down near its base. You should leave at least five inches of wood on each side of the stump so that they will be sturdy enough to hold up your weight while you are carrying logs around with them. You can then cut off any limbs or branches off these stumps with your handsaw or chainsaw and leave them in place if possible because they will help keep your log sawhorse stable when you are carrying heavy loads on top of it.
Take one of these stumps and stand it upright so that it will form the back leg of your log sawhorse.
How to Make a Log Sawhorse
Sawhorses are a great tool for helping you support long pieces of lumber or other material you want to cut on your table saw. They can also be used as a base for other tools and materials, such as long boards that need to be sanded or planed.
How to Make a Wooden Sawhorse
A sawhorse can be made from almost any type of wood, but the best option is usually hardwood. You will also need nails or screws in order to hold the sawhorse together. If you want your sawhorse to last longer than just one project, choose nails instead of screws so that you can replace them later if necessary.
There are two different ways to make a sawhorse: by using four legs or using two legs with braces underneath them. The latter method is more stable, but it does take up more room since there are two additional pieces needed for each leg.
A sawhorse is a cross-legged support for a log. It can also be used as a tool rest, fence post or temporary workbench. The traditional way to make a sawhorse is with a log and two trees. The log should be about 2 inches in diameter and long enough to reach from the ground to your chest when you are standing on it. For example, if you are 5 feet tall, cut the log at least 6 feet long.
Step 1: Cut the Log to Size
Cut away the bark from the top of your log about 1 foot down from one end (see Figure 1). This will allow you to place it on top of two trees so that it sits upright. You want about 8 inches between the bottom of the log and where it touches the ground; this will give you enough clearance for your saw blade when cutting through large pieces of wood.
How to Build a Log Sawhorse
The word sawhorse is derived from the Latin “saxum” (stone) and “horses”. These are, indeed, made of stone. The earliest sawhorses were made from logs and called “T-shape” or “T-shaped”. They were used for sawing lumber into planks as early as 1820s. After that, they were used in carpentry shops, woodworking factories and even in military camps.
Today, there are many different styles and designs of sawhorses available on the market. But if you want to build your own sawhorse using wood logs, here’s how:
1) Cut two 1 inch thick by 8 inch long pieces of wood at an angle on one end with a handsaw or power miter saw. Make sure that each cut piece will have exactly the same angle cut on both sides so that they fit together perfectly when assembled later on.
2) Mark 1″ down from the end of each piece so that it measures 7 inches from tip to mark. This mark will be used as support for a log seat later on so make sure it’s at least 1 inch away from each corner for safety reasons.