Building a wood ramp for your shed is totally possible with basic tools and materials, you will spend a lot less and come out of it with a much better result than hiring someone who constantly keeps coming back to “fix” things you didn’t like, or worse yet damage your home while they were tearing down the old shed.
I’ve built my fair share of sheds, and have learned a thing or two about how to build a wood ramp for shed. With the right planning and advice, how to build a shed ramp with pavers, how to build a shed ramp for riding lawn mower, you can build a safe and sheltered shelter for your yard tools. This is what I have learned.

How to build a wood ramp for shed
Building a shed ramp is a pretty straightforward project, but there are a few things you need to keep in mind. This article will walk you through the process of building a shed ramp with step-by-step instructions and photos.
Building A Shed Ramp With Pavers
The first thing you need to consider when building a shed ramp is the material that you will use for the ramp itself. There are several options available, including plywood, composite materials such as particleboard or even metal. The most common choice however is concrete pavers because they are extremely durable and easy to work with.
In addition to the material used in constructing the shed ramp itself, you should also plan ahead for how you will protect it from moisture and other elements that could cause damage over time. One way that many people choose to protect their shed ramp from these elements is by installing an asphalt roof over it so that rainwater does not destroy its integrity over time.
How to Build a Shed Ramp
A shed ramp is an important addition to your shed. You may already have a driveway that leads up to your workshop, but access is much easier when you have a ramp leading up to the entrance of your shed. A shed ramp will also prevent wear and tear on your lawn or driveway by preventing vehicles from driving over them.
Building a shed ramp is not as difficult as you may think. You can build one yourself by following these instructions:
Planning the project
Choose how many feet long and wide you want your shed ramp to be. The longer it is, the steeper it will be. Consider whether or not you want your shed on an incline and move forward accordingly. Make sure that the ground beneath where you will be building is level enough for the structure. This will help keep water from pooling beneath it and eventually rotting out its supports and foundation.
Building materials
You will need plywood for this project because it is strong enough for heavy objects such as cars and trucks, yet light enough for easy carrying by hand if necessary. Plywood comes in standard measurements so make sure that what you buy fits with your plans exactly before cutting down any pieces of wood yourself
How to build a wood shed ramp. This is a good project if you are not very handy with tools. The ramp will only cost around $100, and it will be a lot better than having the lawn tractor or riding mower sitting in the front yard.
Here are some things to consider before building your own wood shed ramp:
1) The size of your shed
2) How much weight will be on the ramp
3) If you want it to be portable or permanent
How to build a wood ramp for shed.
If you’re looking for a way to make moving things into and out of your shed easier, this simple ramp design may be the solution. It’s not just for sheds either — it can be adapted to work with lawn tractors, lawn mowers, snowblowers and even boats.
The most common material for building the ramp is 2x4s and plywood. You’ll also need some outdoor decking screws or nails and some outdoor-rated glue like Gorilla Glue or Titebond III.
You can build this ramp as wide or narrow as you like, but I would stay away from anything less than about 18 inches wide. This width should give you enough room for your vehicle tires to roll over without sinking into the ground too much.
For those of us who don’t have a sawmill handy (and don’t want to pay someone else to cut their lumber), we’ll use dimensional lumber that’s been pre-cut at the home center or lumberyard. The widths listed below are what they sell in standard lengths at my local store:
6x6x6 (1-inch thick) – Used for posts in this project
How to build a wood ramp for shed
If you are thinking of building a shed, you probably also want to consider building a wooden ramp for it. This is because the ramp will make it easier for you to load and unload your items from the shed. In addition, the ramp will also ensure that your items remain safe during transportation. The following are some of the tips that you should consider when building your own wooden ramp:
The first thing that you need to do is to make sure that you have enough space in front of the shed so that you can build a ramp. You should also make sure that there is enough room behind the shed so that you can drive your vehicle up to it without any problems.
In order to ensure that everything goes according to plan when building a wooden ramp, it is important for you to have an idea as to how high or low it should be. In addition, if possible, make sure that there is enough space between each plank so that they do not come into contact with each other when using them for loading purposes.

How to build a shed ramp with pavers
This video will show you how to build a shed ramp with pavers. The materials you need are:
The first thing you want to do is lay out the pavers on the ground where you want your ramp to be. Then mark off where the end of each paver will be. Now dig a trench about 4 inches deep and about an inch wide. You may want to use a shovel or just your hands for this step.
Next, place each paver into the trench, making sure they line up with each other. Once all of your pavers are in place, fill in around them with dirt. Make sure that when you’re done you have at least 2 inches of dirt on top of them so they don’t move around as much when someone walks on them.
Now comes the fun part – adding some grass seed! Just sprinkle some on top of your pavers and watch nature take its course!
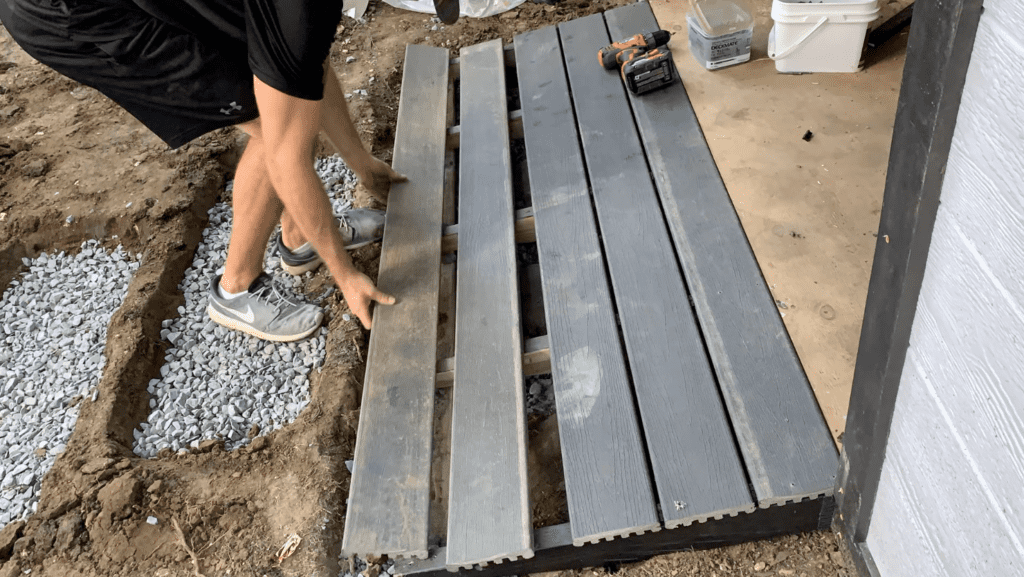
A shed ramp is a wood structure that provides access to the shed from the ground. The ramp can be built with 2x10s, 2x12s or plywood. The size and design of a shed ramp depends on the size of your shed and how much traffic it will receive. You can build a ramp for riding lawn mowers, ATVs and other vehicles by adding steps or risers to your shed ramp design.
Step 1: Design your ramp
Use graph paper to draw a scale drawing of your shed with dimensions written on it. Measure the distance between the bottom edge of the door frame and the ground. Write this measurement down on your drawing so you know how high to raise your ramp above ground level. This height is known as the rise and fall of the ramp, which is typically equal to 3 inches per foot (about 1/2 inch per inch). If you want to add steps or risers to your design, use a tape measure to find their widths at different heights above ground level before writing them down on paper next to each other in order from highest point down to lowest point.
How to Build a Shed Ramp
A shed ramp is essential for anyone who has a riding lawnmower, snow thrower or any other piece of equipment that needs to be kept in the shed. It provides an easy way for you to roll these machines out of the shed, so you don’t have to worry about damaging the lawn or driveway.
A shed ramp can also keep your equipment from sinking into soft ground and becoming stuck during wet weather. You may already have some wood lying around that can be used as a ramp, but if not, there are many different types of wood available at home improvement stores that are suitable for building this type of structure.
Step 1 – Determine the Length of Your Ramp
The width of your ramp will depend on how wide your door opening is or how far apart your posts are set in place. You want enough room on each side so that it’s easy for you to walk up the ramp with your lawn mower or other piece of equipment without tripping over it. If you need help deciding how long your ramp should be, think about how much space is needed between the front wheels and rear tires on your riding lawn mower or other piece of equipment before deciding what length to
Here are some tips for building a ramp for the shed door.
The shed is a great addition to any home, but it can be difficult to access if there’s no proper ramp. Fortunately, building a shed ramp isn’t that hard and it only takes a few supplies and tools to complete the job.
Here are a few things you should know before you start building your own shed ramp:
The slope of your shed ramp should be 1 inch per foot (1:12). This allows for adequate drainage in case of rain or snow.
You can build your own shed ramp by placing six inches of gravel underneath it. This will prevent weeds from growing up through the gravel while also providing excellent traction underfoot.
If you live in an area with freezing temperatures, use concrete instead of asphalt for your shed ramp as asphalt can crack when its exposed to cold temperatures over time.
Sheds are wonderful places to store all sorts of things, but they can be a bit difficult to get into if you’re disabled or just not very mobile. That’s why we’ve put together this guide on how to build a ramp for your shed.

Ramps are a great way to add accessibility to any small building, and it’s possible to build one out of just about anything. If you have access to some lumber and know how to use a few simple tools, this project should be well within your ability.
The most important thing is that the ramp be sturdy enough so that it doesn’t break under pressure from anyone who might be using it. You’ll also want something that isn’t going to rust or rot away over time — metal is typically a good choice for this reason, although wood can work too if it’s treated properly.