So you’ve decided to install a wood awning, but have no idea how to go about it. You are not alone in your confusion. There is a lot to consider when choosing an awning for your home. This article will help simplify the process and make it easy to find the right kind of awning for your needs.
How to build a wood awning, how to build a wood awning over a patio, how much does it cost to build a wood awning, starting from selecting the right frame, to installing the deck brackets and bracket covers.

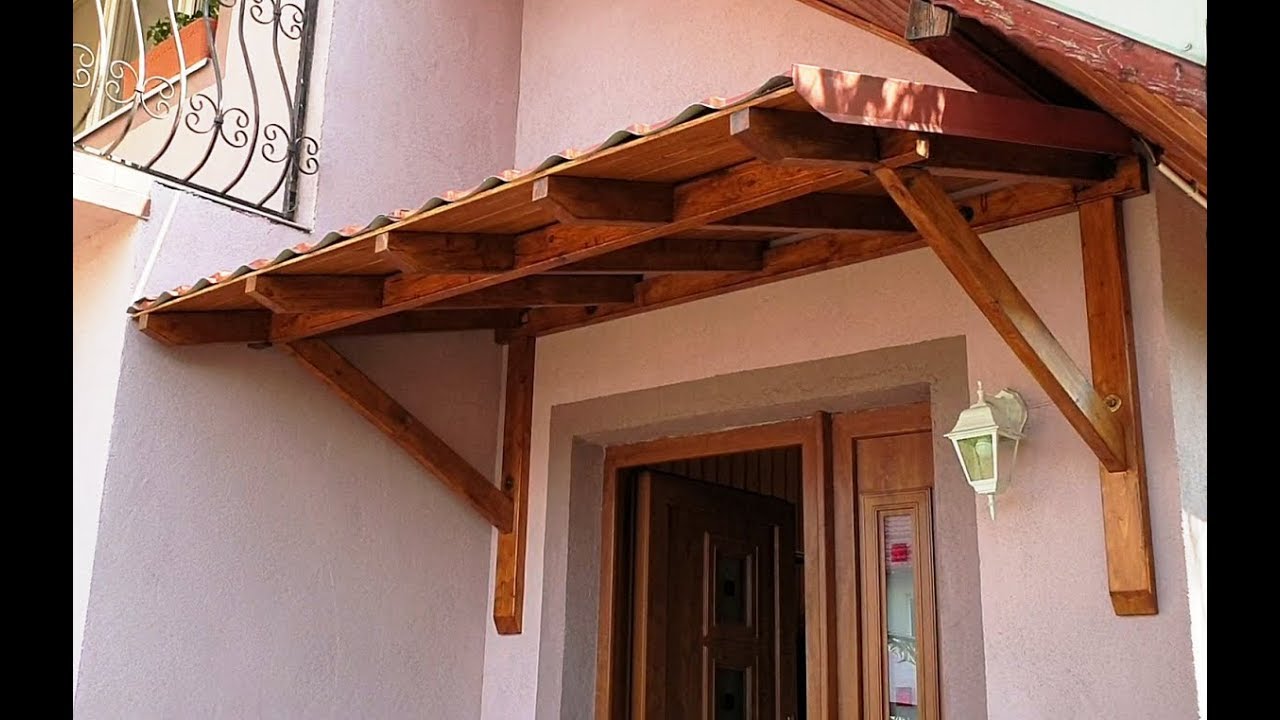
How to build a wood awning
If you are looking for an easy way to add some shade over your patio, then a wood awning is a great choice. You can build this project in just a few hours and enjoy it for years to come.
A wood awning is very easy to build, but it does require some carpentry skills and tools. If you don’t have any experience working with wood or power tools, then consider hiring a professional contractor to help you with this project.
This type of project is great for homeowners who want to create their own unique design without having to spend a lot of money on materials or hiring someone else to do the work for them.
How Much Does It Cost To Build A Wood Awning?
The cost of building a wood awning depends on the size of the structure and the materials that you use when building it. For example, if you want an 8 x 10 foot structure that has two sides that are open and two sides that are covered by panels, then you will need at least four 2 x 6 boards cut into 16-foot sections and two 2 x 4 boards cut into 14-foot sections (or use screws instead).
A wood awning is a great way to add an extra layer of protection from the elements. It can be used on a patio or deck, or even as an entrance to your home. It can be built in any size and customized to suit your needs. You can make it with wood, aluminum, or PVC pipe.
The cost for building a wood awning will vary depending on the materials you use. You can purchase all the materials at your local hardware store or online. For example, you could spend between $300 and $600 for one that is 8 feet wide by 10 feet tall with a single door opening. If you want to install it over an existing patio, then you’ll need to factor in the cost of removing any old decks or patios first before installing the new one
Building an Awning Over a Patio
A wood awning is an attractive and functional way to cover a patio, deck or other outdoor area. The material used to build the awning depends on the location of your project. If you live in a dry climate, you can use wood as long as it’s treated to resist rot. In rainier areas, use pressure-treated lumber or cedar if you want to prevent the wood from rotting prematurely.
Before you begin building your new awning, consider how much shade you want and how large an area it will cover. You’ll need to install posts at each end of the structure so that it will be supported properly and evenly.
Step 1 – Post Installation
Measure and mark off where your posts will go using stakes or measuring tape as guides for placement. Dig holes for each post about 1 foot deep and fill them with concrete according to the directions on the bag. Let them dry overnight before proceeding with installing them upright in their holes.
Step 2 – Laying Out Your Awning Posts
Lay out your posts into an even pattern using string lines between them as guides for placing the stringers (vertical boards) that support your roof panels).

A wood awning is the perfect way to add shade and style to your patio or porch. It can be built in a weekend and will last for years. The cost of materials varies depending on the size of your project and whether you purchase them new or secondhand, but expect to spend around $150 per 10 feet of awning.
The easiest way to build an awning is to buy a kit that includes everything you need except the lumber. These kits generally include frame parts, brackets, hardware, fabric and instructions. If you want something more customized than what’s available from a kit, you can build one from scratch using standard lumber sizes and hardware store materials.
Step 1: Cut the Frame Parts
Measure out two lengths of 2x4s for each side of your frame (including the center piece) that are as long as you want your finished product to be (minus about 1 inch). Cut these pieces with a circular saw or jigsaw at least 1/2 inch longer than needed so they can be trimmed flush later on — this will make them easier to handle while cutting around their curves.
Cut four pieces of 2x4s for each end at 45-degree angles on both ends so they fit together into right angles when assembled
Awnings are an easy way to add shade and style to your patio or porch. While they can be purchased, building your own awning is both cost-effective and rewarding.
If you’re looking for an inexpensive way to add some shade to your outdoor space, consider building an outdoor awning. An outdoor awning is simply a structure that provides shade from the sun while allowing breezes to pass through.
The materials needed to build an outdoor awning vary depending on the type of material used. For example, if you use PVC pipe as part of your design, you’ll need different tools than if you’re using wood or aluminum piping. The same goes for fabrics — if you choose canvas or vinyl instead of polyester or nylon fabric, you’ll need different sewing machines and needles.
The design of your awning will also affect how much it costs to build one yourself. A basic design can be created with simple tools and materials that won’t cost much at all; however, if you want something more elaborate or custom-designed, it may take some extra time and money
How to build a wood awning over a patio
A wood awning is a great way to add shade over your patio. It will invite you outside on sunny days and keep you from getting too hot in the summer. You can also use it as the perfect place to hang out with friends and family.
If you’re interested in building an awning for your home, here are some tips for how to build one:
Measure your patio and pick out the right size lumber. You don’t want it too large or too small because it won’t be effective at shading your space. Also, measure your roof height so you know how high up the rafters should be and whether or not they need additional support to hold up an awning this large.
Build rafters out of 2×4 lumber. Use metal braces at each corner of each rafter so that they stay sturdy and have enough support when you attach them to the house later on during construction. If you are worried about their strength, you can use larger pieces of lumber instead (such as 2×6 or 2×8).
How to build a wood awning over a patio
How to build a wood awning over a patio: add architectural interest to your outdoor living area.
Whether you’re looking for a way to shade your patio, or just want to add some extra visual appeal, building an outdoor wood awning is easy and affordable. The best part is that there are so many different options for this project. You can use any type of lumber as long as it’s durable enough for the job.
If you don’t have the tools or skills necessary, check out our list of contractors in your area who can help with everything from design through installation.
How to Build a Wood Awning Over a Patio
If you’re looking for an easy way to add shade to your patio, this DIY wood awning is the project for you. It’s super simple, and you can build it in just one day.
1. Measure the width of your patio and cut one piece of plywood to that length and another piece for the height. The height will be determined by how low you want your awning to hang. Use a table saw or circular saw with a carbide blade to cut both pieces of plywood into straight sections.
2. Measure the length of the top piece of plywood and cut it at an angle using either a miter saw or jigsaw with an abrasive blade like those used for cutting tile or stone. Make sure that both ends are cut at exactly 45 degrees so that they fit together when attached vertically on each end.
3. Use 2-inch deck screws to attach two 2-by-4s (or whatever size you need) between the two angled pieces of plywood as shown above right so that they create an A-frame shape when viewed from above
A wood awning is a great way to add shade and protection from rain or snow. It can be added to almost any patio, balcony or porch. The awning will also provide some privacy for your outdoor space as well as adding a decorative touch that will enhance the overall look of your home.
A wooden awning is perfect for patios that are not covered by any roof or overhang because it will protect you from the elements while still allowing plenty of sunlight into your yard or garden.
It’s important to note that building an awning is not difficult, but it does take time. You’ll need to know how much wood you need before you start building so that you can purchase enough materials ahead of time.

The first step in building an outdoor wood awning is deciding where it should go. You should decide whether you want your new outdoor space to be on the side of your house or in front of it. Once you have decided where it should go, mark out the area where you want your new structure to be built and measure the length and width from corner to corner so that you know how much lumber you will need for each piece of
Awnings can be a great addition to any home. Whether you’re looking for something to shade your patio or porch, or to add style to your front door, an awning is a great option.
Awnings are made from either wood or canvas and are attached to the wall of your home with brackets. They can be built at any height, but most people choose between six and eight feet tall for their awnings.
The cost of building an awning depends on how much work you want to do yourself and what kind of materials you use. If you’re looking for something simple that doesn’t require much work, then it will only cost around $150-$200 depending on how big your space is and how many windows or doors you want covered. However if you want something more elaborate and complex it could cost upwards of $1,000 or more!