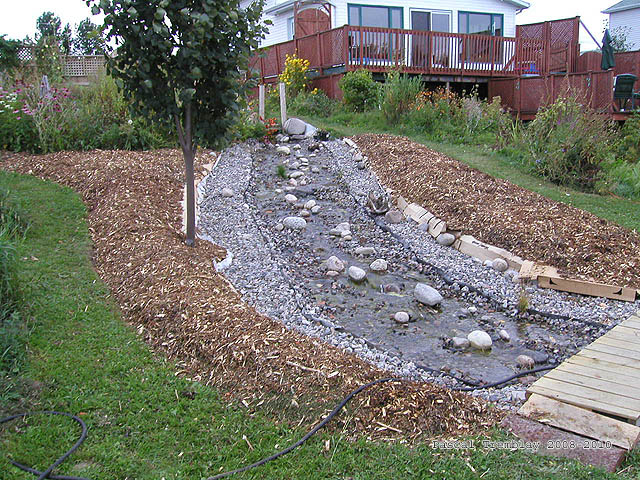
People have often asked the question, “How do I build a wet creek bed?” Well I am here to answer those questions! A wet creek bed will create interest and enhance your backyard. The only difficult thing about building one is understanding how it’s done and making yourself do it. Today I’m going to show you step by step instructions on how to build a wet creek bed.
When most people think of a creek, they picture a large body of water flowing though tall mountains and into a valley. Little do they know that some creeks are closer than we think, how to make a creek bed for drainage, dry creek bed ideas for drainage, often times right in our own back yards.

How to build a wet creek bed
Dry creek beds are a great way to add interest to your yard, and they can also help with drainage. They’re easy to make, but you’ll need some tools and supplies.
Creek beds are usually made with rocks, pebbles and gravel. You can also use sand or soil instead of rocks if you don’t have any available. You can also use small plants like ferns and mosses in your dry creek bed if it’s not too deep.
How to Make a Dry Creek Bed
Step 1: Lay Out the Pattern for Your Creek Bed
Step 2: Dig Out the Bottom Layer of Your Creek Bed
Step 3: Lay Your Rocks in the Bottom Layer of Your Dry Creek Bed
Step 4: Place Pebbles on Top of the Rocks in Your Dry Creek Bed
A dry creek bed is a channel dug into the ground that allows water to flow through it. This type of landscaping can be used for both drainage and decoration.
A dry creek bed is essentially a trench that’s been dug into the ground to allow water to pass through it. Dry creek beds are typically shallow, with a depth of about 1 foot (about 30 cm). They’re also usually very wide, so that large amounts of water can be diverted through them if necessary.
Dry Creek Bed Ideas for Drainage
A dry creek bed is often used as a means of draining excess rainwater away from an area. If your property is prone to flooding during heavy rains, especially if you live in an area where there are steep hills or mountains nearby, then you might want to consider building a dry creek bed as part of your landscaping plan.
The main advantage of building a dry creek bed is that it allows you to direct water away from specific areas on your property, such as driveways and patios. For example, if you live in an area with very steep slopes then it would be difficult for rainwater to run off naturally without some kind of intervention like this.
How to build a dry creek bed
A dry creek bed is a great way to add drainage to your yard. It’s also a great way to add value to your home, by adding usable outdoor space.
The process of building a dry creek bed is pretty simple, but there are some tricks that you need to know before you start digging. This guide will walk you through the entire process of making your own dry creek bed for drainage purposes.
Step 1 – Decide where you want your creek bed
The first step in building a dry creek bed is deciding where you want it. You’ll want to choose an area that gets at least a little bit of sun each day, because this will help keep the grass healthy and green even in winter months when sunlight hours are low. The best place for your creek bed is along the edge of your property or underneath trees that provide shade during hot summer months and protection from wind during cold winter months.
Step 2 – Dig down into the ground
After deciding where you want your new dry creek bed, dig down into the ground until the top layer of soil is just above grade level (about 6 inches below ground level). This will allow water runoff from rainstorms or other sources
If you live in a flood-prone area, or if you have a wet yard that needs to be drained, you might want to consider building a wet creek bed.
A wet creek bed is a shallow trench that has been dug into the ground and lined with rocks. It can be built on any slope and is used for collecting water runoff and directing it away from your home.
In this article we will show you how to make a dry creek bed for drainage. Before starting your project, check with your local government to see if they have any regulations regarding the construction of this type of garden feature.
Here are some basic steps:
1) Choose the location where you want to build your dry creek bed
2) Remove all vegetation from this area so that bare soil remains
3) Dig out earth using a shovel or trowel until you reach the desired depth (usually about 24 inches deep)
4) Line the bottom of your trench with large stones so that there are no holes for water to seep through
5) Fill in any remaining gaps between stones with smaller ones until they are approximately one inch apart from each other
A dry creek bed is a great way to add some natural beauty to your garden. They’re also great for drainage. The best part is that they’re easy to make and maintain!
Here are some steps to make your own dry creek bed:
Step 1: Make sure the area where you want the creek bed is level. If it’s sloped, use some landscaping blocks or another material that can be stacked up to create level areas for planting.
Step 2: Dig out an area about 12 inches deep, if possible, and as wide as you want it to be. You can dig out as many areas as needed for different plants or features in your yard.
Step 3: Line up bricks or rocks along the bottom of the trench so they form a ledge along the inside edge of the trench (they will need to be taller than the depth of your trench). Also, line up bricks or rocks along the outer edge of each section of trench so they create little “walls” on either side of the trenches (these will help stabilize them). You may need help doing this step if there aren’t many people around who can help with heavy lifting (like me!).
How to make a creek bed for drainage
One of the most important parts of landscaping your yard is making sure that you have proper drainage. If you have a slope in your yard, it is likely that you will need to create a dry creek bed for drainage.
A dry creek bed is a trench dug into the ground to allow water to flow downhill. This is important because it allows water to drain from your property without causing damage to your home or landscaping.
If you are looking for an inexpensive way to get rid of excess water on your property, then creating a dry creek bed is a great choice.
Dry Creek Bed Ideas for Drainage
There are many different types of dry creek beds and each one works differently depending on where you live and what type of soil you have available to dig into. Here are some ideas for how to make a dry creek bed:
1) Use Concrete Blocks or Bricks – You can use concrete blocks or bricks when creating a dry creek bed; however, this can be expensive depending on how large your project is going to be. You will also need someone who knows what they’re doing if you decide this method because digging the trench won’t be easy with concrete blocks since they weigh so much!
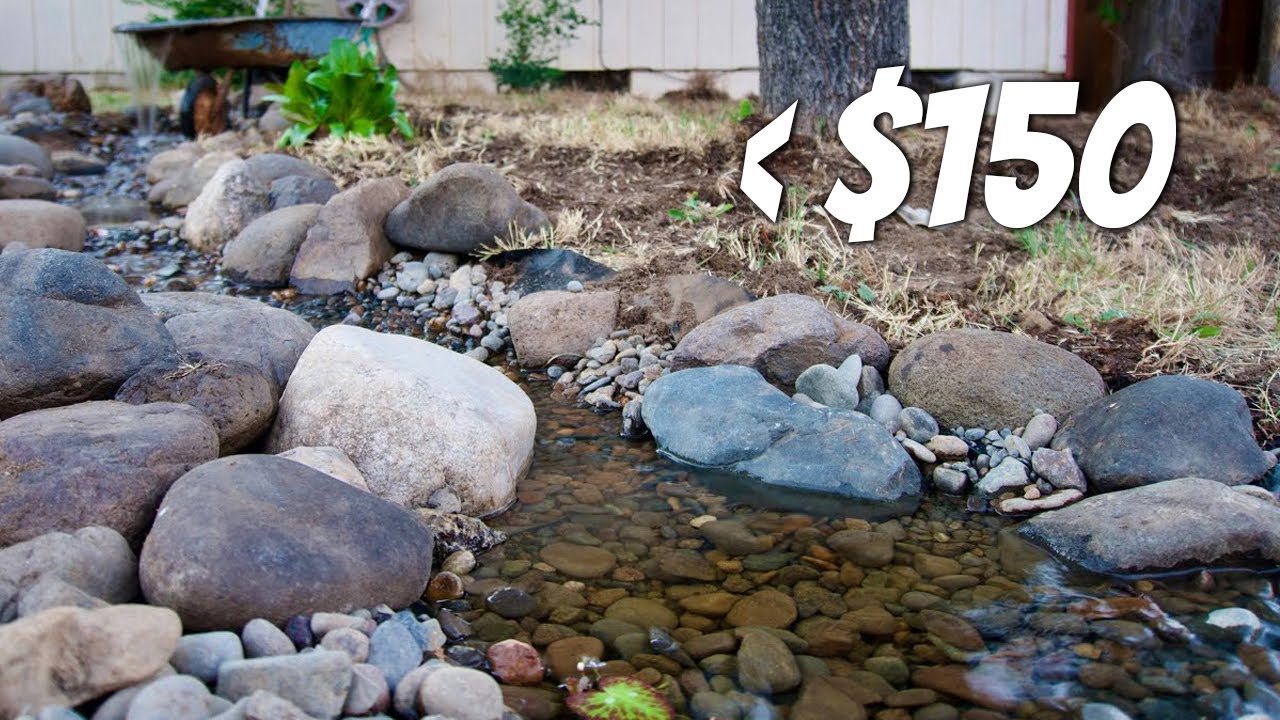
A dry creek bed is a drainage system that can be used to keep the water in your yard from flooding into your house. It’s made by digging a channel through your lawn, and lining it with gravel or other stones. The water will flow through this channel, instead of pooling up around your home.
A dry creek bed is also called a swale or micro-irrigation channel. You can find many types of DIY tutorials online for how to make one of these channels. Here are some ideas on what materials you’ll need, and how much work goes into building one:
Materials: You’ll need some sort of stone material for lining the channel (gravel works well). You may also want to use some type of soil or sand as filler material between the stones. For the top layer, you could use bark mulch or wood chips if you want an aesthetic look. But if you’re just going for functionality over aesthetics, any type of natural stone material works well in this application.
How much work? It depends on how long your dry creek bed is, but overall this project should take less than one hour per foot
Dry creek beds are a great way to add drainage to your property. They can also be used as beautiful landscaping features, or even as small ponds.
Here’s how to make one:
1. Dig out the area you want to be your dry creek bed. This should be at least 12 inches deep and at least three feet wide (though if you want your dry creek bed to look more natural, make it much wider). If you’re adding a dry creek bed to an existing landscape, make sure that there is a large enough hole for the water from the surrounding areas to drain into it.
2. Dig out the center of your dry creek bed until it’s level with the ground around it. The depth of this hole will depend on how much water needs to drain into it; if there’s too much water flowing through your yard, you may need to dig this hole deeper than usual.
3. Cover up all sides of your dry creek bed with rocks or gravel so that they’re flush with each other and don’t have any gaps between them where water can escape through them instead of going into the dry creek bed itself

A dry creek bed or dry streambed is a place where a stream has been diverted and the path of the water is now empty.
A dry creek bed can be created by removing the vegetation that would normally grow along the edge of the creek. This allows dirt to wash into the creek bed, which eventually fills it up.
Dry creek beds are used for drainage purposes because they allow rainwater to run off easily without being trapped in one place. The straight edges also help prevent erosion, which is why many gardeners prefer them over natural streams and creeks.
If you have a problem with standing water in your yard, then you might want to consider creating a dry creek bed for drainage purposes. The following steps will show you how to do it:
1) Remove any plants from around your yard that might impede drainage. The best plants for this job are those that need lots of water, such as grass and flowers.
2) Dig out any areas that have become soggy or boggy due to poor drainage. This will help prevent further problems with standing water later on down the line when you’re creating your new dry creek bed.
The creek bed is a great way to add an extra feature to your garden. It can also serve a functional purpose by helping to drain water away from your house or other buildings.
You can create a dry creek bed by digging out the ground and then covering it with gravel, bricks or rocks.
If you want to make a wet creek bed, you will need to dig out the soil, put in some plants and then fill the space with water. This is more difficult than making a dry creek but it can be done if you have enough time and money.
A dry creek bed is useful for gardens that are close to houses or other buildings because it helps to prevent flooding in these areas during heavy rains. It also helps to prevent rainwater from pooling on flat surfaces like patios or driveways.