Water wall is a feature that helps in high-rise buildings to eliminate the noise generated. This wall partitions the air into two streams. A hard stream goes up at high speeds, making a sound similar to rain and providing a sense of moist natural wind. This portion depends upon the velocity and pressure of the water sprayed from the top of water wall.
The name of the article above is “How to build a water wall”. Okay, but what exactly is a water wall? A water wall or water feature as it’s also known is quite simply, how to build a water wall feature, how to build a water wall indoor waterfall fountain, a vertical stream of falling water that is normally based on gravity. We’re going to learn how to build one!

How to build a water wall
A water wall feature is a great way to add a touch of nature to your garden, and the sound of trickling water can be soothing. The best part is that it’s easy to make your own.
One way to build a water wall feature is with a wooden frame. This method involves cutting the wood and assembling it into a box shape. You’ll then need to drill holes in the bottom of the box for drainage, place rocks inside and fill with dirt or sand.
Another option is to use pre-made kits that come with all the materials needed, including pre-cut pieces of plywood, screws and connectors. These kits are available at most hardware stores.
Steps:
1) Cut plywood sheet into two pieces measuring 11 inches by 22 inches each
2) Measure and mark 1/4 inch from each edge on both pieces then cut using circular saw (or jigsaw)
3) Place one piece on top of another so that their edges line up flush together (you should have two identical faces without any gaps between them), then place one 1/4 inch screw through each hole in both pieces as shown in figure A
The first step is to build a wooden frame for the water tower. Cut the wood pieces to size and use them to construct a square box that is about 3 feet tall and 5 feet wide. The top of the box will be open, so use a piece of wire mesh to cover it.
Next, make sure that all of your plumbing is in place. You’ll need PVC pipe for the outlet and inlet lines, as well as flexible tubing for connecting them together. The easiest way to make this work is to set up the plumbing so that it comes out of one side of the tower, goes through the wall and into another side of the tower. It’s important not to put too much pressure on your piping or it will burst!
Once everything is installed correctly, fill up your tank with water until it reaches about 6 inches below where you want your waterfall to start falling from (this will depend on how high above ground level you want your waterfall). Then spray down your waterfall with white paint so that it blends in with its surroundings better when finished (if desired).
Water features are a great addition to any garden or backyard. They add a touch of elegance and make your garden look more beautiful. Water features are also very useful in making your garden more lively and interesting.
In this article, we will tell you how to build a wooden water tower. This tower is made from wood and will be a great addition to any garden. The tower can be built using ordinary wood and does not require any special tools or equipment.
The materials needed for this project are:
Wooden planks – 2 pieces
Wooden posts – 4 pieces
Wooden dowels – 4 pieces
This is a step by step guide on how to build a wooden water tower. This is a fun project that can be done in a weekend and will become the focal point of your garden or yard.
This project uses 2x4s, which are very inexpensive, so you can make this project for around $100-$200 depending on what kind of materials you use. The 2x4s are easy to cut and they come in various lengths. You also don’t need any special tools to build this project; just basic hand tools like a saw, hammer, drill and screwdriver will do the trick!
1) Cut all of your 2x4s based on the dimensions shown in the plans below:
Top Beam: 14″ x 14″ (Cut To Length)
Bottom Beam: 14″ x 14″ (Cut To Length)
Column: 12″ x 12″ (Cut To Length)
Cap Blocks: 9½” x 9½” (Cut To Length)
Rafter Blocks: 7½” x 7½” (Cut To Length)
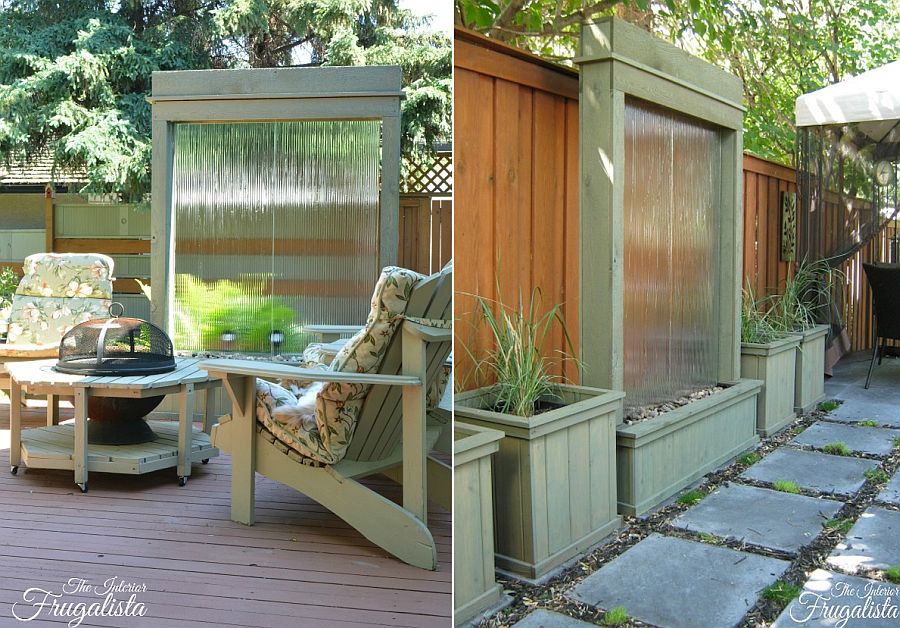
How to build a water wall feature
Step 1: Select the location for your water feature. Put it somewhere that is easy to get to and where there are no obstructions in the way.
Step 2: Dig out the area where you want to place your fountain. Make sure that it is deep enough and wide enough so that no part of it will be visible from above ground. You don’t want someone tripping over your buried treasure! Dig down about two feet and then dig out six inches around the edge of the hole.
Step 3: Build up the sides of your hole with rocks, bricks or other heavy materials so that they are stable and will not collapse when you fill them with soil. You want them sturdy enough to hold up whatever you put on top of them but not so heavy that they weigh too much for you to move around easily. Use pieces of concrete blocks if possible since they are heavy enough but also easy enough for most people to handle by hand. Stack them in whatever pattern looks best to you until they form walls around three sides of your hole with only one open side left open toward the back (not toward where people will see it).
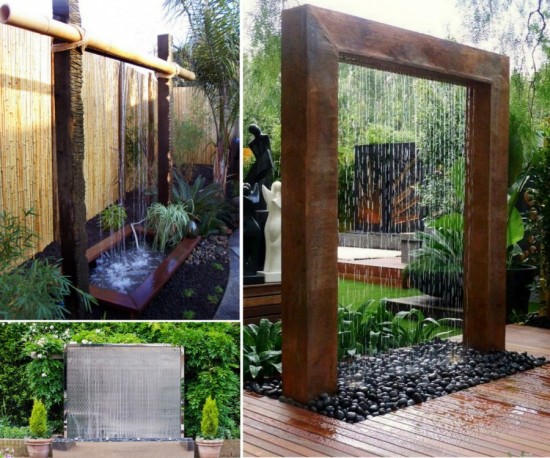
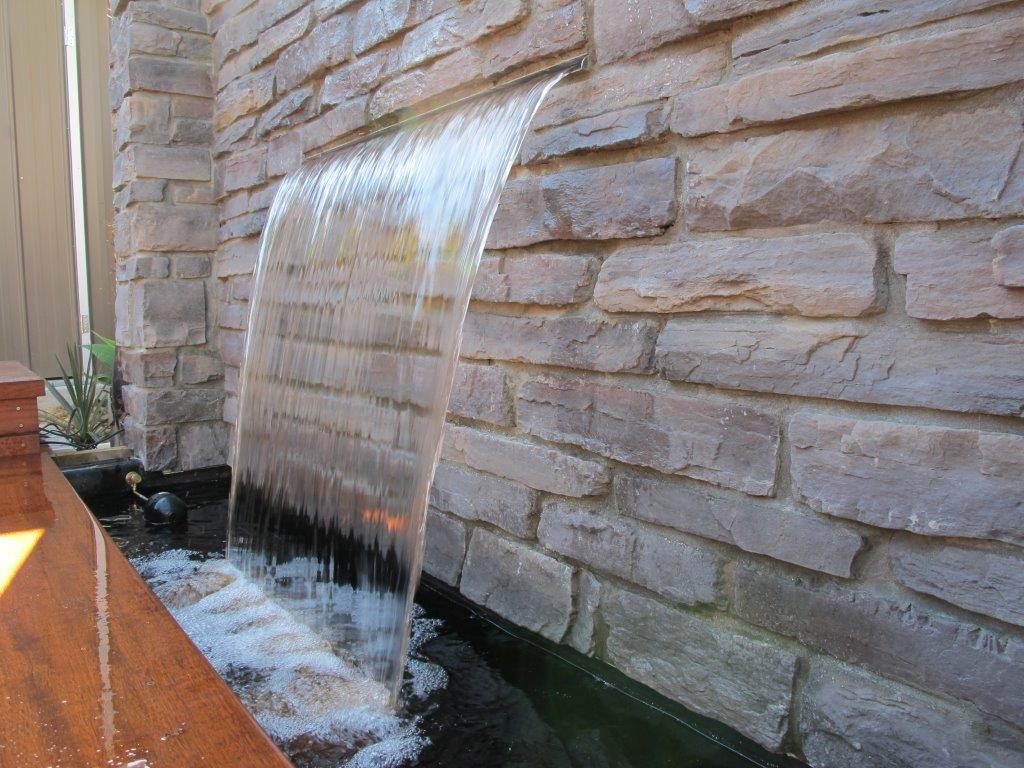
A water wall is a waterfall that flows down a vertical surface. The wall can be made of stone, metal or glass and can be placed indoors or outdoors.
Water walls are found in many different types of buildings. They can be found in hotels, office buildings, restaurants and private homes. Water walls can also be used in commercial spaces such as malls, casinos and shopping centers.
If you want to build your own water wall feature there are some things you need to consider before starting the project. The first thing to do is decide where you want to put it and what kind of look you want for your home or business. Once you have decided on these two things then you can start choosing materials for your project.
The next step is putting together an estimate for how much it will cost to build a water wall feature based on the materials that you have chosen for it. You may want to hire someone else to do this part of the project if you don’t know how much it will cost or if it would be better not knowing how much money is going into this project until everything is finished and ready to be used by whoever will be using it when they come over or go into your home or business location
Step 1: Build the Base
The first step in building a water wall feature is to build your base. The base will be the foundation for your water wall and must be sturdy enough to support the weight of the rocks, as well as any additional materials that you might decide to place in your waterfall.
To begin, use a ruler and pencil to draw a large square on the ground. Next, measure 2 feet out from each corner of this square and make another mark with your pencil and ruler. Connect these four points using straight lines to form an octagon shape within your original square outline. Use stakes or nails to pin down four corners of this octagonal shape at equal distances apart. Then, use a hammer and nails to secure those four corners of your frame together until it is rigid enough to stand up on its own without falling over or moving around when you walk by it or bump into it accidentally.
Once your frame is securely fastened together, use more stakes or nails and hammer them into each corner of your frame until they poke through the outer layer of wood at least 3 inches deep into the hard ground beneath where you want your water feature to be located. Be sure not to pound these stakes all the way through
How to Build a Water Wall Feature
Step by step instructions with pictures on how to build a water wall feature. This project is perfect for the DIYer or someone who wants to add some color and interest to their backyard.
Building a water wall is not that difficult if you have the right tools and materials, which you can get at your local hardware store. The first step is to decide where you want the water feature and make sure you have enough room for it. Next, gather all of your supplies together so everything is ready when you start working on the project.
Materials Needed:
-Pressure treated wood (2x4s)
-Pressure treated plywood (2x8s)
-Cedar shingles (enough for your desired length)
-Concrete blocks (enough for desired height)
-Gravel or sand (use as a base for bottom of fountain)
The water wall is a great feature for any garden or landscape. This type of feature is an excellent way to add beauty and entertainment to your yard.
Waterfalls are also great for cooling down your yard during the summer months, or for adding sound that can drown out other noises in your neighborhood.
A waterfall can be built to be as simple or as complex as you want it to be. If you want something simple and easy, there are many kits available that will help make the job easier. If you want something more complex, then you may need to hire professionals to help with the construction process.
The best way to build a water wall is by digging out a hole in the ground large enough for the pump and filter system to fit into it. You will also need enough space around this hole so that you can place rocks around it so that they form a wall around the edge of the hole (see picture). This will give off an appearance similar to what you would see when looking at nature’s natural waterfalls which helps create a relaxing environment for anyone who visits your yard or garden area