Building your own walk in shower is not as easy as it sounds. In fact, before you start tearing out the old tile and starting to build the new floor, there are quite a few things you should consider which will make your project run a lot smoother.
Building a walk-in shower, how to build a walk in shower on a concrete floor, how to build a walk in shower on a wood floor? It isn’t as easy as in laying down tile, believe me. There are many steps and factors to consider, one of which is the subfloor. In these words, we’ll discuss exactly how to build one.

How to build a walk in shower floor
Building a walk-in shower can be a great way to add extra space to your home. Depending on the size of your bathroom, it may even be possible to convert the entire room into a bathroom just for the shower. However, it’s important that you know how to build a shower floor properly so that you don’t run into any problems down the road. A good quality shower pan is essential for both safety and comfort. If you haven’t installed one before, here are some tips on how to do it right.
Preparation: First things first, you need to prepare your bathroom and get ready for installation. You’ll need some basic tools like hammers, screwdrivers and wrenches (that will come in handy later), as well as some other items like a leveler, plumber’s tape and silicone sealant (tape/sealant). Make sure there are no exposed electrical wires or pipes within range of where you’re planning on installing your new shower pan; otherwise, call an electrician or plumber if necessary.
Measurements: Measure your existing bathroom floor area and make note of any obstacles such as drain pipes or electrical outlets that might interfere with installation. Take accurate measurements
If you’re planning a bathroom remodel, chances are you’ll want to include a walk-in shower. Most homeowners find that this type of shower provides comfort and convenience. Not only is it easier to bathe in a large stall than in a tub, but there are also many ways to make your shower design more attractive.
A walk-in shower can be built on top of an existing floor or on top of a new concrete slab. The installation methods are slightly different for each situation and both require some planning ahead.
If your bathroom has tile walls, but no tiling on the floor, you may want to consider using backer board as the base material for your walk-in shower pan before installing the tiles. This will prevent any moisture from seeping through the tile joints and damaging the subfloor below. It also makes it much easier to install tile because it acts as a level surface for laying out tiles during installation.
How to Build a Walk-In Shower on Top of Existing Tile Walls:
If you’re building a new shower or remodeling an existing one, you may want to install a walk-in shower. Walk-in showers offer convenience and comfort to people with mobility issues, but they can be tricky to build. Although it’s possible to simply lay out the shower floor in a rectangular shape and pour concrete directly over it, this method lacks reinforcement and requires more time for curing than other options.
Instead, consider one of the following methods for installing a walk-in shower pan:
Use plywood sheets as a base. Cut two sheets of plywood into rectangles that are 36 inches wide by 72 inches long. Nail 3/8-inch plywood strips onto the top edges of these rectangles so they create an L shape on each sheet. Once you’ve nailed on the strips, screw them together so they form one thick piece of wood that is 72 inches by 36 inches when viewed from above. Place this piece of wood on top of your existing flooring so that it covers the entire area where your future shower will be located (the sides of your walls must remain visible). Screw through the bottom side of this piece of wood into your subfloor using 1 1/2-inch screws spaced no more than
The first step in building a walk-in shower is to lay out the dimensions of the room on the floor.
The best way to do this is with a chalk line. Set up a chalk line and extend it across the entire room, making sure it touches both walls and extends past them. Then mark off each corner of your walk-in shower with a large X.
You can use tape instead of chalk if you want, but make sure it won’t leave marks on your new tiling.
Next, measure how much space you need between the centerline of your new shower pan and each wall. This will help determine how much tile you need to buy for your project as well as how far into the room you need to excavate so that there isn’t too much weight on one side of the shower base when it’s filled with water.
You’ll also need to decide whether or not you want any built-in cabinets in your new shower area or if you want everything to be freestanding furniture pieces that can be moved around easily when needed (like when cleaning). If built-ins are what you’re after, then take measurements for those as well so that they fit perfectly within
If you’re building a new shower or bathroom, you might be wondering how to build a walk-in shower. A walk-in shower is one that is large enough for someone to walk in and stand under the spray. It can also be installed in an existing bathroom as an alternative to a tub or to make the most of space.
If you’re going to install your own walk-in shower, it’s important that you know what kind of materials are required and how to install them properly. This article will show you how to do it.
Step 1: Measure Your Space
Before you begin installing your walk-in shower, take some measurements of the area where it will go so that you can have everything cut and ready before you start work on this project. Take measurements from corner to corner, along each wall and across the ceiling if applicable as well as around any other obstacles like pipes or vents which may be in the way when installing your new shower flooring system. Once all of these measurements have been taken down, add them up together into one big square number (never round off!) which will equal the total number of tiles needed for your new tiled shower flooring system!
How to build a walk in shower on a concrete floor
This article will show you how to build a walk-in shower on a concrete floor.
Step 1: Locate the drain and make sure it’s level. The drain should be located in the center of the room and flush with the floor. Use a level to check that it is level front-to-back and side-to-side. If it isn’t, use shims under one wall of the shower pan until it is level.
Step 2: Cut out the old drain stub out with a reciprocating saw if possible or a hole saw if not. Make sure you wear eye protection when doing this. If your drain stub is already exposed, skip this step and go straight to Step 3. If there is no exposed pipe remaining in your old shower pan (which there should be), then cut through any tile around where the pipe would have been with a reciprocating saw or hole saw and remove any pieces of tile that may have broken off from cutting through them. Again, wear eye protection when doing this! Also, wear gloves because sharp edges can cut your hands as well as fingers!
Step 3: Drill holes in the side walls
If you’re building a new home or remodeling an existing one, chances are you’re going to need to know how to build a walk in shower. The process of installing a shower pan is pretty straightforward and easy to do with the right tools. Here’s what you need to know:
Build the frame for your shower pan. Make sure it’s level and level with the rest of your bathroom floor.
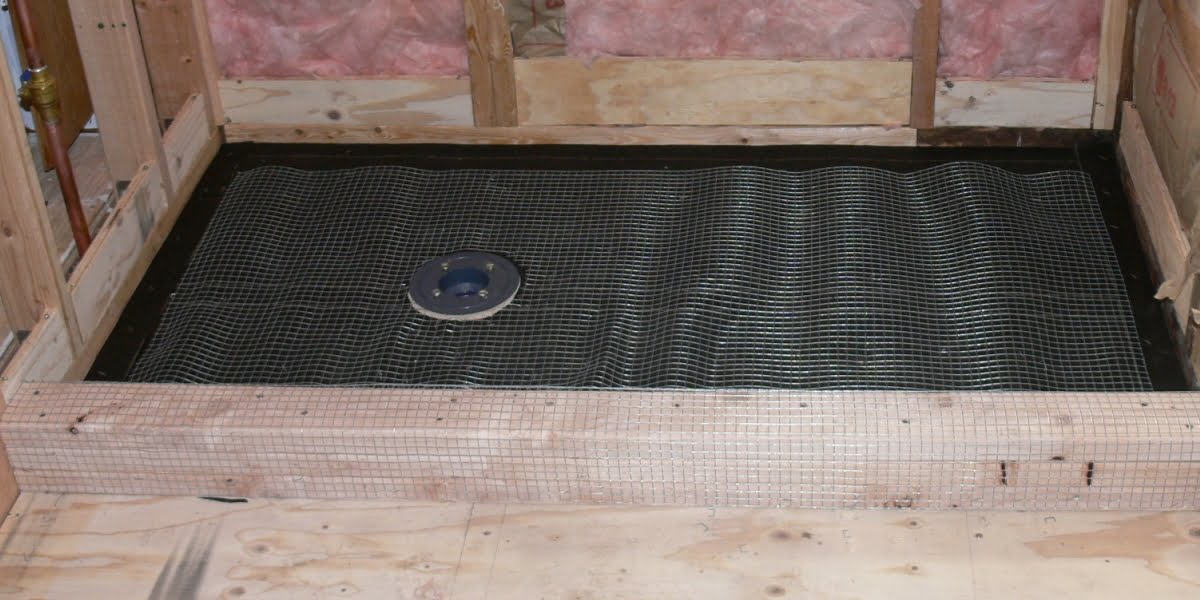
Cover your concrete floor with waterproofing membrane. This will prevent water from leaking through your subfloor and into the basement below!
Cut 2x4s to fit around the perimeter of your shower pan (this will be a temporary form). Cut them so they overlap by 1-2 inches at each end and screw them together into place using sheetrock screws (make sure they’re long enough so they don’t go through the other side of the framing).
Install plywood sheets between each stud on top of the joists (1/2″ plywood will work just fine). Make sure this is level with the outside edge of your framing above it so no wires or pipes show through after tiling is complete!
Step 1: Build a Floor Frame
The first step to building a walk-in shower is constructing the floor frame. This can be done in two ways: with wood or concrete. If you’re using wood, cut the 2x4s and lay them on top of the existing floor. For concrete, dig out the area where your new shower will go and pour a new slab.
Step 2: Install the Walls
The walls should be built to match the dimensions of your current bathroom walls (if they’re not already). If there’s an existing wall that needs to be knocked out, do so before installing any new ones. Use drywall screws to attach each section of wall to the studs behind it and seal with silicone caulk wherever possible.
Step 3: Install Shower Hardware & Tile
Use silicone around all exposed edges and corners of your new shower pan to prevent cracks from forming later on down the road. Then install any fixtures like faucets, lights or shower heads before tiling over everything!
The first thing you have to do is make sure the floor is level. If you have a concrete slab, make sure it’s flat and level. If there are gaps in the flooring, use a level to see if there are any high or low spots. If there are high or low spots, fill them in with concrete.
If you don’t want to use concrete because of cost or other reasons, you can use small pieces of plywood to cover up any uneven areas on your existing flooring.
Next, measure the area where you want your walk-in shower pan to go. You’ll need at least 30 inches of space on both sides for access when installing the walls later on.
Once you’ve measured your space and know that it’s big enough for your project, it’s time to start building! The first step is making sure that there are no leaks around where you’re going to install your pan. Leaks will cause mold growth and damage your walls over time so make sure everything is sealed tightly before moving forward with this project!
Walk in showers are a luxury that most people cannot afford. However, you can easily build one for less than $500 by using concrete and tile. A walk in shower is a great way to add value to your home and make it more comfortable.
You can build the structure with concrete blocks or other materials, but I recommend pouring a concrete slab. Concrete slabs are durable and easier to install than wood or other materials. You can also make modifications later by cutting holes in the slab without damaging your walls or ceiling below, making it easy to install fixtures like towel racks or soap dishes that would otherwise require extensive remodeling work.
Before starting any construction project, always read your local building codes so you know what is required for safety purposes.
Materials Needed:
Concrete mix (refer to local building codes)
Tools Needed:
Shovel with handle
Wheelbarrow (if mixing your own concrete)