How To Build A Small Bookshelf – If you want to make a bookshelf for your home office or kids room, at the beginning you face a question how to build a bookshelf? We suggest to use our tips describing basic stages of bookcase construction.
Building a small bookshelf doesn’t have to be difficult. This tutorial shows you how to build a simple, standard sized bookshelf that holds all your stuff. These instructions should be accurate for just about any small size of bookcase you’re trying to build.

How to build a small bookshelf
Building a small bookshelf can be a lot of fun and it is not that difficult either. You will need to plan ahead, however, so you have enough time to build the bookcase properly. When building this type of bookcase, there are several things you will need to consider before starting construction.
Here are some tips on how to build a small bookshelf:
1. Measure your space before purchasing materials
2. Buy the right size lumber for your project
3. Use wood glue and screws when building this type of shelf
The bookshelf is one of the most basic and practical items that you can build yourself. It’s also a great way to add some character and personality to your home, as well as providing you with extra storage space. This article will show you how to build a small bookshelf out of wood.
Materials Needed
The first step in building a small bookshelf is gathering all the materials that you will need. You will need some wood — pine boards work best because they are inexpensive and easy to work with — as well as nails, screws, glue and sandpaper. You may also want to purchase some stain or paint at this point so that you can finish off the project nicely
Cutting the Boards
Once you have all the tools needed for cutting down your pieces of wood, it’s time to cut them into appropriate sizes for building your shelf unit. Make sure that each board has at least one flat side so that it will be easier for nailing them together later on
Nailing Together Your Boards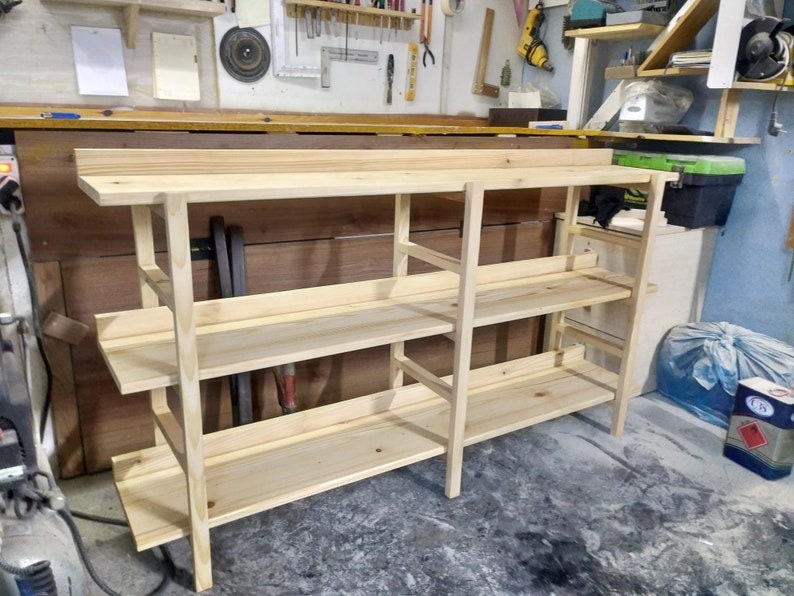
Now it’s time to start putting everything together! First off, lay down two pieces of wood next to each other (make sure they fit perfectly)
Building a bookshelf is an easy woodworking project that can be done by almost anyone with a few simple tools. You can build a bookshelf in one afternoon, so it’s great for beginners, especially if you’re looking for your first real woodworking project.
Building a small bookshelf is a good way to learn how to use basic tools like hammers and saws. If you’re new to woodworking, start with a small project like this one before moving on to bigger projects like tables or chairs.
Materials:
1/2-inch plywood or particleboard
Wood glue
Wood screws or nails (for attaching the sides of the bookshelf together)
Wood finishing supplies
If you’re building a bookshelf, the easiest way to get started is by building a simple box. The box can be any size you like, but it should be at least 2 feet deep and 4 feet wide. This will allow plenty of space for your books and other item
The first step is to cut your pieces of wood to size. You’ll need one piece of 1×8 pine board that is 36 inches long (or whatever length fits your wall). You’ll also need two pieces of 1×4 pine board that are 24 inches long, as well as one piece of 1×2 pine board that is 24 inches long. These pieces should fit snugly inside the 36-inch piece so that they form a rectangle when placed next to each other.
Next, you’ll attach the three smaller boards to each side of the 36-inch board using pocket screws or nails (nails work best if you have limited tools). To do this, place all four boards together so that their ends are touching and all surfaces are flush with one another. Drill holes through each end of each piece of wood so that they line up perfectly with each other (these holes should be about an inch from the top edge). Put a nail or screw through these
This article will show you how to build a bookshelf step by step. It contains detailed instructions with images for each step of the process.
How to build a bookshelf:
1. Measure the space where you want to install your bookshelves and cut the wood accordingly.
2. Assemble all the parts together, fixing them with screws or nails.
3. Use sandpaper to smooth out any rough edges on the surfaces of the assembled pieces and give them a nice finish.
4. Paint or stain your wooden bookshelf in any color you like, using primer first if necessary.
How to build a small bookshelf
If you love the idea of having a small bookshelf in your home, but don’t want to devote space to a large piece of furniture, then this article is for you. In it, we’ll show you how to build a small bookshelf that’s perfect for storing all your favorite books, CDs and DVDs.
The best part about building your own small wall bookshelf is that you can choose any style or design that you like. For example, if you want something simple and elegant, then why not try building one out of cedar? Cedar is relatively inexpensive and easy to work with.
Or maybe you’d like something more ornate? You could make one out of pine or oak — both are classic hardwoods that look great when finished with stain or paint.
This article will show you how to make both types of shelves
If you’re looking for a way to add some extra storage space to your home, a wall bookshelf is a great option. It’s easy to install and can fit in almost any room. The best part? You can make one yourself!
If you’re interested in building your own wall bookshelf, we’ve got the instructions for you. We’ve even included a free printable PDF template so you can get started right away.
How to Build a Small Wall Bookshelf
Before you start building your bookshelf, you’ll want to decide what size it will be and what kind of material to use. Here are some tips:
Measure your wall before buying materials. This will help ensure that your shelves are the right size and fit nicely along your wall.
Choose solid wood over plywood or particle board; this will ensure that your shelves are sturdy enough to hold heavy items like textbooks or textbooks without bowing or warping over time.
Use metal brackets instead of nails when attaching the wooden shelf brackets to the wall studs so they don’t split over time due to stress from weight being placed on them constantly (like when students put heavy textbooks on them).
Woodworking plans for a small wall bookshelf. This simple bookshelf is easy to build and will look great in any room.
This is an easy project, but it does have some specialized tools needed to make the process go smoothly. These include:
Table saw (to rip the 2×4s down)
Miter saw (to cut the angles at the ends of the 2×4s)
Drill press with a hole saw bit that can cut 3-1/2″ holes
Router table (for rounding over all edges)
The trick to building a small bookshelf is to make it visually larger than it really is. The same goes for wall shelves, which can be built using the same techniques as smaller bookcases.
The first step in building a bookshelf is to decide on the size of your project. Measure the space where you want to place the shelf and make sure that your measurements are accurate. You don’t want to build something that won’t fit or will be too small for its intended use.
Once you know how big you want your bookshelf to be, choose the type of wood that best suits your needs. For example, if you’re going for a rustic look, then pine would be an ideal choice because it’s inexpensive and easy to work with; however, if you want something more formal and elegant, then oak would be better suited for your project.
Next, cut four pieces of plywood (or other material) so they’re long enough and wide enough to meet your requirements — meaning that they should be at least 2 inches longer than your desired height when it’s assembled (but not necessarily longer). This will allow for extra space around the edges so that no one gets hurt when walking by!
The next step involves marking off squares
How to Build a Small Wall Bookshelf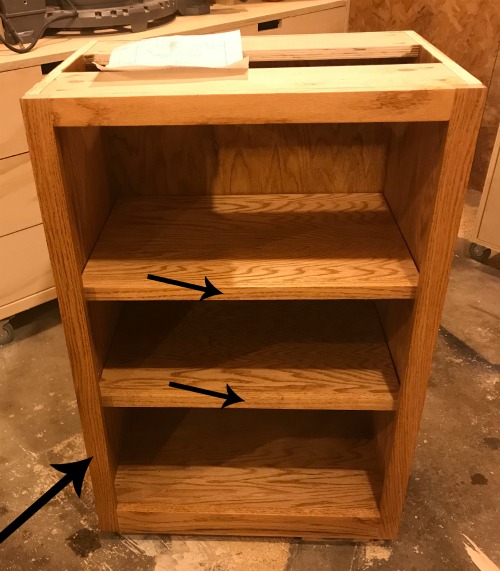
I’m going to show you how to build this bookshelf in just a few steps. You don’t need a lot of tools or experience to build it, either. If you have basic carpentry skills and some basic tools, you’ll be able to make this project in no time.
Step 1: Cut the boards
You’ll need four 2x6x8′ boards for the sides of your bookcase. To cut these down, measure 9 1/2″ from one end and make a mark. Then place another board on top of the first board with the two marks lined up. Cut along that line with your circular saw or jigsaw until both ends are smooth and flat.
Step 2: Assemble the sides
To assemble the sides of your bookshelf, place two pieces together with their ends facing in toward each other (so that they form an angle) and clamp them together with a bar clamp or c-clamp as shown above. Then screw them together using 1 1/4″ screws spaced every 8 inches or so along each edge of each board (see image). Make sure that each part has at least one screw close to its outer edge where it meets