Walk in coolers are great for businesses that sell perishable goods. But building them can be challenging. I wanted to share what I’ve learned over the years about building walk in coolers, so you can understand the ins and outs of walk in cooler construction. Then you’ll be better prepared to put your own plans into action.
What would you do if you lived in a building where the boiler broke and your apartment got up to 100 degrees and you couldn’t cool it off? Or, what if it was 60 degrees out and the heater went out — how could you stay warm, how to build a walk in cooler with coolbot, how to build a walk-in cooler floor?

How to build a walk in cooler
Walk in coolers are a necessary addition to any restaurant. They keep food at the proper temperature and prevent customers from getting sick. When you’re ready to build your own walk in cooler, you’ll need to know how much it costs, how to build one, and what materials you’ll need.
Building a walk in cooler can be done by anyone with the right tools and a little bit of knowledge. This article will teach you everything you need to know about building a walk-in cooler including how much it costs and what materials are required.
The first step in building a walk-in cooler is to determine where you want to place the cooler. The cooler should be located in an area that is easy to access and has enough room for it.
The next step is to build the floor of the walk-in cooler. The floor can be made out of concrete or other materials, depending on what you prefer. Once you have decided on a floor, build supports around it so that it can support the weight of the cooler and any other items that will be stored inside it.
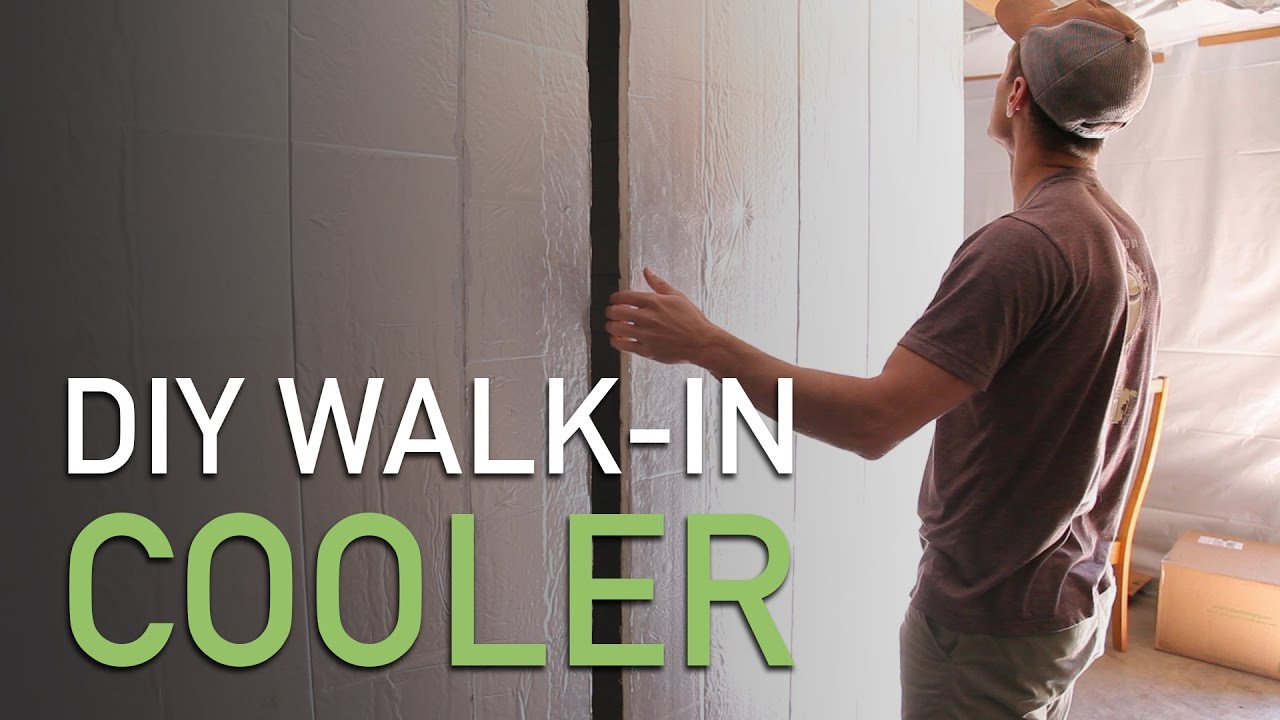
Next, build the walls for the walk-in cooler. These walls should be thick enough so that they will not bend under pressure from their contents. To ensure that this happens, make sure that you use sturdy materials when constructing them such as steel or wood planks. Also make sure that there are no holes in these walls as this could cause mold growth within your cooler due to moisture entering from outside sources such as rain water or spills from food products inside your cooler
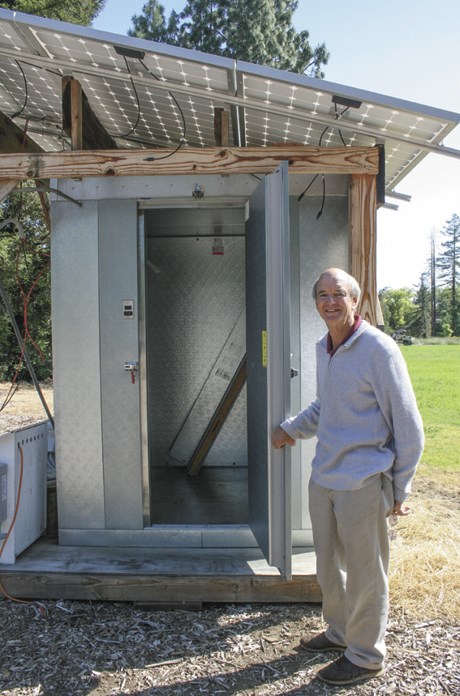
To finish up your walk-in cooler construction project, install doors into each side of your new walk-in coolers using hinges and door handles so that they can open and close easily when needed
A walk-in cooler is a large refrigerated room that’s used for storing food and other items at a temperature below freezing. Walk-in coolers are typically used in restaurants and grocery stores, but they can also be found in residential settings. Although they’re usually built off-site, you can construct a walk-in cooler in your home or garage if you have the right tools and experience.
Step 1 – Prepare the Floor
When building a walk-in cooler, you’ll need to lay down a floor before you start building walls. If you’re working on concrete or asphalt, use a jackhammer to remove enough material so that the floor of your walk-in cooler will sit flush with the ground. If you’re working on grass or dirt, dig down at least several feet until you reach solid ground.
Step 2 – Build Walls
To build walls for your walk-in cooler, start by framing them out using lumber such as 2x4s or 2x6s depending on how high you want them to be. You’ll want to make sure your walls are straight and level before securing them into place using screws or nails through pre-drilled holes in each corner of each piece of wood.
A walk-in cooler is an essential commercial kitchen appliance that keeps food at the right temperature. Walk-in coolers are used in restaurants, grocery stores, and other places where food needs to be stored safely.
Walk-in coolers come in many sizes and shapes to fit any space or need. There are also many different types of walk-in coolers, each with its own advantages and disadvantages.
The most common type of walk-in cooler is the “box” style. Box coolers are usually rectangular with a door on one side and an open front with shelves inside for storing food items. They can be insulated with foam or metal panels and have a refrigeration unit inside that keeps the air cold inside the box.
The next most common design of walk-in cooler is called a “cabinet” style. Cabinet coolers are smaller than box coolers and have no opening on the front. Instead, they have doors on either side so that you can access both sides equally well without needing to open both doors at once (which would waste energy).
Walk-in coolers and freezers are the most popular type of commercial refrigeration equipment because they are used to store and display food items. Walk-ins come in many different sizes and shapes, but most have the same basic features. A walk-in cooler is essentially a large box with one or more doors that open into a room that is kept at a temperature between 32 degrees Fahrenheit and 40 degrees Fahrenheit. The door may be fully enclosed or have an opening that allows you to see inside but not enter the room.
A walk-in cooler can be used for anything from storing fresh produce to displaying frozen desserts at your ice cream shop. They’re also used by restaurants, grocery stores and bakeries to keep food cold until it’s time to be served or sold.
How to build a walk in cooler with coolbot
A walk-in cooler is a large insulated room used to store food at low temperatures. Walk-in coolers are commonly found in restaurants, grocery stores and other food businesses. They’re also called coolers or refrigerators, but they’re not the same as refrigerators designed for home use.
Coolbot is a cooling system that uses an evaporative air cooling panel to lower the temperature inside your walk-in cooler. This article will show you how to build a walk-in cooler with Coolbot so you can keep your products fresh longer and save money on energy bills.
How to Build a Walk-in Cooler
The first step in building your walk-in cooler is to decide where to put it. The most common place is in the basement, but you can also build it in an existing room or move the kitchen area if possible.
Once you have chosen a location, measure the area and make sure that it will fit properly. A walk-in cooler should be about 8 feet wide, 10 feet long and 7 feet high. This size will allow for two rows of shelving and still leave enough room for people to walk around inside of it.
Once you have decided on a size for your walk-in cooler, you must install flooring inside of it. You can use concrete blocks or tiles, but make sure that they are heavy enough to support all of the weight from your food products and shelving system. Concrete blocks are easier to work with because they can be cut into different shapes very easily; however, tiles are often cheaper than concrete blocks so they may be a better option for some people who are trying to save money on their project
How to Build a Walk-In Cooler
A walk-in cooler is a must for any restaurant, bar or grocery store looking to make and sell fresh food on a large scale. These large refrigerators keep food cold enough to prevent spoilage and are used in conjunction with other kitchen equipment like freezers and ovens. If you’re interested in building your own walk-in cooler, this guide will walk you through the basics of planning, designing and building one of these essential pieces of equipment.
Cost: The price of building a walk-in cooler varies depending on what type of materials you use and how big your unit needs to be. You can expect to spend between $30-$50 per square foot for a simple design that doesn’t include any special features like lighting or insulation. The cost goes up from there if you want more bells and whistles like stainless steel doors or extra insulation for energy efficiency.
Space Requirements: A basic walk-in cooler will take up about 250 square feet of space in your home or business but this number can vary depending on how much storage capacity you need and whether or not you plan on adding features like lighting or ventilation systems later on down the road.
The CoolBot is a small-scale refrigeration system that uses no freon, no compressors and no moving parts. It’s designed to be installed in a standard kitchen cabinet and to operate silently.
The CoolBot is available as an indoor or outdoor unit. The indoor unit has two fans and a solid state Peltier cooler module. The outdoor unit has two fans, an evaporative cooling pad and a water pump. Both units are designed to cool to between 45F and 65F depending on ambient temperature and humidity levels.
Both units are available with either propane or electric heaters for heating purposes, but the primary function of this device is cooling.
The indoor CoolBot has an adjustable thermostat so you can set it to whatever temperature you want it to maintain in your cabinetry – typically between 45F and 65F depending on ambient conditions. The outdoor CoolBot uses evaporative cooling pads which are inexpensive and easy to replace, but they do require some maintenance.

A walk-in cooler is a refrigerated room or chamber used for storing perishable food products at temperatures below ambient (room) temperature. The temperature may be set to just above freezing (for meat and dairy products), or as low as −18 °C (0 °F) (for produce).
A walk-in cooler is typically used in restaurants, grocery stores, convenience stores and other food businesses. Walk-in coolers are also often found in health care facilities such as hospitals and medical clinics. Walk-in coolers require constant monitoring and maintenance to ensure that they are operating properly and safely.
The most common types of walk-in coolers are general purpose, temperature controlled and specialty coolers:
General purpose walk-in coolers are commonly used for storing food items that do not require specific temperatures or humidity levels. They are often used for dry goods such as canned goods, cereals and snacks . These types of coolers often have large doors that can be opened from the inside or outside so customers can reach inside without having to open it completely.
Temperature controlled walk-ins have precise temperature controls that allow them to maintain a specific temperature regardless of outside conditions.