A trench drain is a great way to protect against the buildup of water at the edge of a garden or other low-lying areas. This guide goes in depth into the design, assembly, and installation of trench drains.
Are you looking to build a trench drain, how to build a concrete drainage channel, how to build a rock drainage ditch? this guide is for you. In this guide, I’m going to discuss several aspects of building a trench drain. The process and system that you will set up will depend on how long your trench is and the number of people you have helping you.

How to build a trench drain
Steps for digging a trench drain:
1. Dig the trench and remove the excavated soil. The trench should be about 4 inches deep and wide enough to accommodate the size of your pipe. To make sure that your channel is straight, use a level to check for evenness as you dig.
2. Lay down landscape fabric or weed barrier cloth over the area where you will be installing your trench drain. This will prevent weeds from growing up through the concrete later on.
3. Mix concrete according to package instructions and pour into trench until it is filled up to within 1/2 inch of top surface of concrete.
How to build a trench drain
A trench drain is a concrete channel that runs perpendicular to the flow of water. They are most often used to divert water away from buildings, driveways and other areas. Trench drains are relatively easy to install if you follow these instructions.
Step 1: Dig the trench
Begin by digging a trench along the length of your desired drainage channel. The width of this trench should be slightly wider than the width of your trench drain pipe. For example, if you’re using 4-inch pipe, dig a 6-inch wide trench.
Step 2: Measure and cut plywood sheets
Measure and cut plywood sheets into 4″x4″ squares with a circular saw or jigsaw. These will serve as spacers for your rocks once they’re placed in the trench.
Step 3: Place rocks around perimeter
Place rocks around the perimeter of your desired drainage channel so that they cover about one-third of its surface area (about 2 inches) on either side of the trench. This will provide enough surface area for water to flow through without getting clogged up by large rocks or debris.
A trench drain is a type of French drain that allows water to seep into the ground by covering the trench with gravel, rock or sand. If you want to install a trench drain at home, there are a few things you’ll need to know.
Trench drains are more common than French drains because they’re less expensive and easier to construct. They’re also less prone to clogging if you use larger rocks instead of smaller gravel.
Digging your trench
To dig your trench, start at the lowest point on your property where water tends to pool and work your way up so that each section drains into the next one.
If possible, dig along property lines rather than through them so that each section is connected to another section rather than having a gap between them.
If you’re working in an area where grass or other vegetation has grown over the ground, use a mattock or pickaxe to break up the soil before digging it out with a shovel or spade.
The trench drain is a type of below-ground drainage system that removes excess water from a property. The trench drain is also called a French drain, which is an accurate description of how it works. When water flows over the surface of your lawn or garden, it runs down through the soil until it reaches an impermeable layer of rock or clay. At this point, it can’t pass through and instead builds up in front of the barrier in a pool of water.
If you’re planning to install a new lawn or garden on your property, you should consider installing a trench drain first so that future landscaping projects aren’t ruined by standing water. Trench drains are also useful if you live in an area prone to flooding because they prevent excess rainwater from flowing into your home’s basement or crawlspaces.
A trench drain is a type of underground drainage system that is installed in the ground to direct water away from your home. It is typically made of concrete or plastic and comes in various lengths. A trench drain keeps water and other debris away from your foundation and protects it from damage.
A trench drain can be installed by digging a trench at least 6 inches deep around the perimeter of your home and pouring concrete into it. The depth of a trench drain depends on its location; deeper trenches are needed for areas where there are high water tables, such as near streams or ponds, or for areas with sandy soil that drains slowly.
The top of the trench should be level with the ground around it so that runoff doesn’t flow into or over it when it rains. You may need to raise the height of your yard if there isn’t enough slope for adequate drainage. You’ll need about 2 feet of fall per foot of length for adequate flow, so if you have an area that is 900 feet long, you’ll need a drop of about 18 feet (900 x 2 = 1,800 divided by 18 = 100).

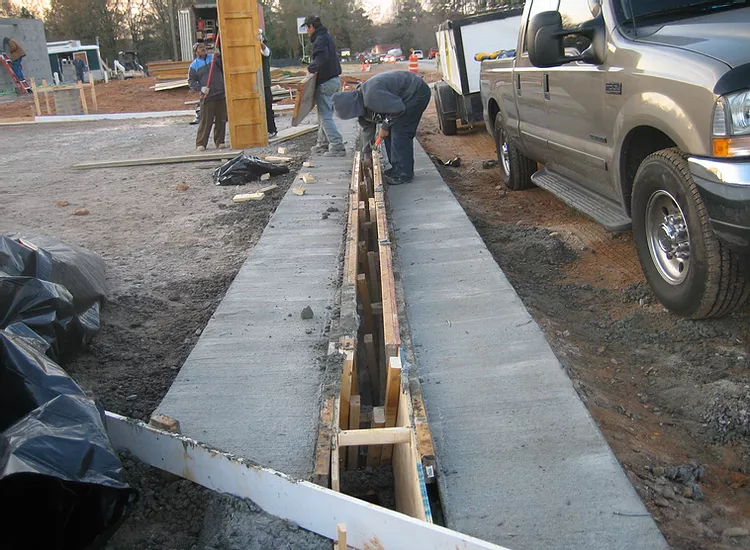
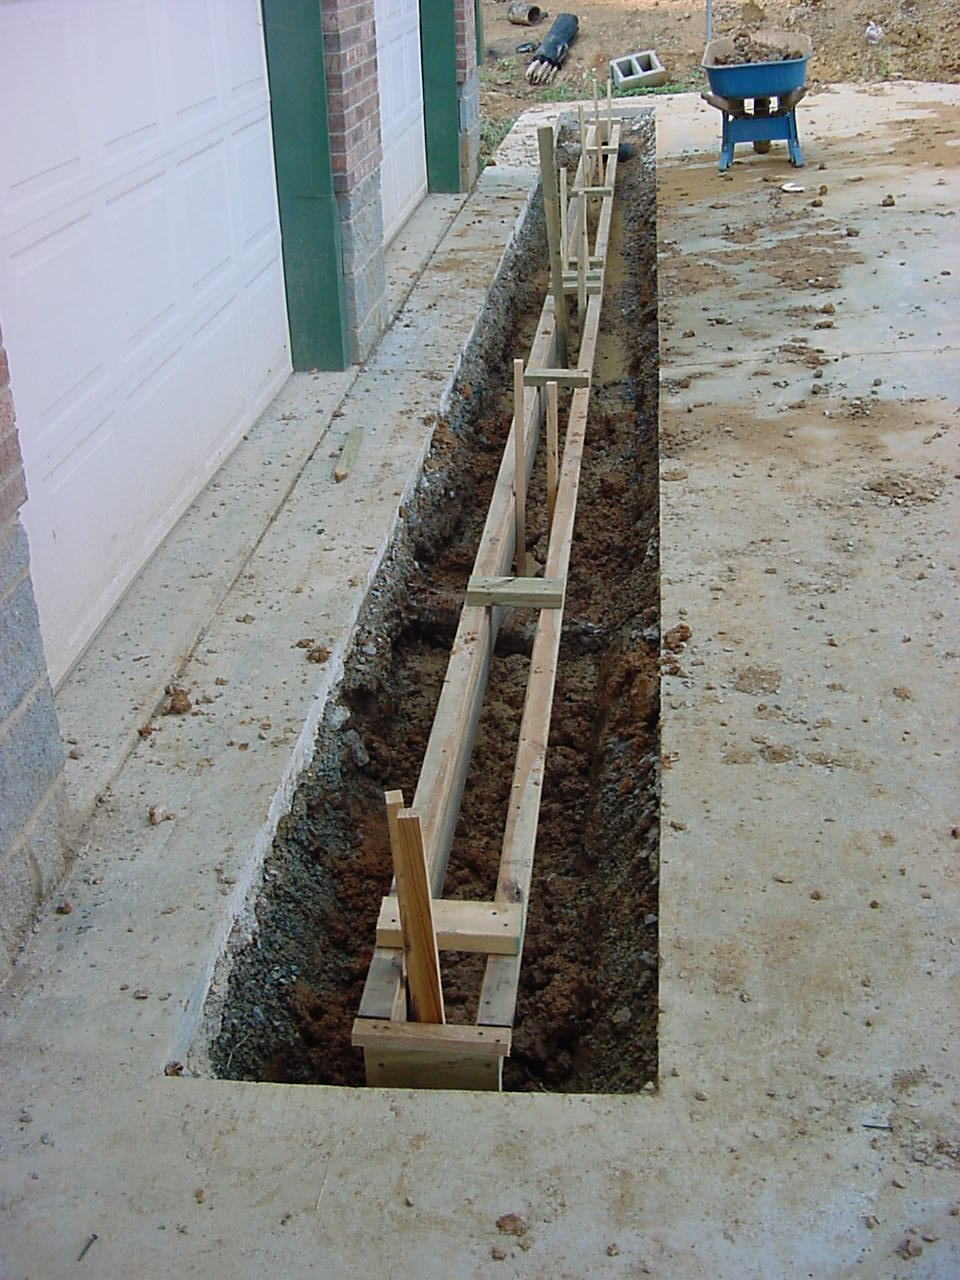
How to build a concrete drainage channel
A concrete drainage channel is an excellent way to redirect water that’s flowing over your property. The best time to build a concrete drainage channel is in the fall, when the ground is dry and firm. You can also use the same techniques to build rock drainage ditches.
Step 1 – Set Posts
Set posts every 6 feet along the length of the trench. The posts should be set 2 feet into the ground with 4-by-4s or 6-by-6s on top of them for support. Use stakes as markers for where you want them placed.
Fence Posts Work Best
If you’re building a long sloped channel, fence posts work well because they are easy to install and remove if necessary. Use 3/4-inch plywood or two by fours as templates to mark where the posts should go, then dig holes for them.
The most common types of concrete drainage channels are the french drain and the rock drain.
The french drain is used to remove excess water from around a house foundation. It consists of a perforated pipe that is buried in the ground, with a layer of gravel or crushed rock on top of it. The water drains into the pipe, which collects it and carries it away from your house.
The rock drain is similar to the french drain, but instead of having a perforated pipe, there’s just an open channel where water can flow freely through.
The best way to build a concrete drainage channel is to dig it out by hand. However, if you have a lot of land to cover, it can be time-consuming and hard on your back. The good news is that there are several other options for building a concrete drainage channel.
If you have access to a tractor with a post hole auger attachment, this might be the best way to go. You can use this machine to dig out the trench in just a few minutes and then set the posts into place in preparation for pouring the concrete.
Another option is using metal forms that can be filled with concrete. This method works well if you want to create a curved shape or if you don’t want any sharp edges where the dirt meets the concrete.
You can also use plastic forms that make it easier than ever to create curved shapes or corners without having to worry about leaks or cracks forming at those points during installation or later on when heavy rains come along.
With plastic forms, all you need do is pour in your concrete mix and let dry overnight before removing them completely from your yard so that you are left with a beautiful new drainage system ready for use!
A concrete drainage channel is a great way to direct water away from your home. If you’re planning on building a new home or remodeling, it’s important to consider where your foundation meets the ground. The easiest way to do this is by installing a concrete drainage channel.
A concrete drainage channel is an excavation that allows water to pass through the foundation of a structure. It carries the water away from the structure and into a larger area where it can be absorbed by vegetation or dry up naturally. This prevents water from standing around in large puddles that can damage your home or create unsafe conditions on your property.
Concrete drainage channels are typically installed during construction as part of an overall grading plan for the site but can also be added later if you discover that water is pooling near your foundation after you’ve completed construction. Your contractor should be able to advise you on whether or not this option is viable for your situation.
Installing A Concrete Drainage Channel Yourself: Step-by-Step Instructions
A concrete drainage channel is a permanent underground structure that collects surface water and directs it away from your property. It’s often used in conjunction with French drains, which are trenches that collect and remove water from the ground.
Concrete drainage channels can be installed by anyone with basic DIY skills and some simple tools. They’re ideal for homeowners who want to add a bit of curb appeal to their property or protect against erosion, but they can also be used for commercial purposes such as parking lots or driveways.
Even if you don’t have experience building structures like concrete drainage channels, it isn’t hard to get started as long as you follow a few basic guidelines:
1.) Plan ahead before beginning construction so that you know how much material you’ll need and where all the pieces will fit within your budget.
2.) Create a detailed drawing of your design so that you can visualize how the finished product will look when complete before starting work onsite.
3.) Use proper safety equipment during construction to avoid injury from falling objects or other hazards common on construction sites (e.g., heavy equipment).