Depending on the age, condition, and size of your house, a subfloor may not be needed. However, a subfloor is an important part of any structure, and if you are building a new shed or home, you need to know how to build a subfloor correctly from the start.
Looking for an article on how to build a subfloor in your home? Here it is! Learn how to build a subfloor in 4 easy steps, including the materials you’ll need and where to locate the subfloor joists.

How to build a subfloor over concrete
A subfloor is the base of any flooring system. It’s the layer of wood, plywood or OSB (oriented strand board) that lies underneath the finished flooring material, such as carpet or vinyl. Building a subfloor is a fairly easy project and can save you hundreds if not thousands of dollars over hiring a contractor to do it.
Materials and Tools
There are many different materials that can be used for subfloors, but OSB and plywood are the most common due to their affordability and durability. For this tutorial we’ll be using 1/2″ OSB sheathing with an optional vapor barrier layer installed on top of it. This combination will provide plenty of support for your shed, but if you’re building a house then please refer to our article on how to build a house subfloor before continuing with this one.
DIYers can buy all the materials needed from their local home improvement store or lumberyard, but if you want to save some money then check out our guide on how to buy lumber from salvage yards. You’ll get quality materials at rock bottom prices!
Subfloors are the first layer of support for the structure of a building. They provide a solid foundation for the entire floor above them. A subfloor can be made from many materials, but the most common are plywood or OSB (oriented strand board). You can install a subfloor over concrete by laying it directly on top of your concrete slab and screwing or nailing it into position. The process is similar for both sheds and houses, but requires some modifications depending on your project.
1 Measure and cut your plywood to fit your new subfloor. Take measurements from one corner to another, then add 2 inches onto each side so you have enough room to screw it down securely without overlapping the edges. Use a circular saw to make straight cuts, or use a jigsaw if you need more complicated angles.
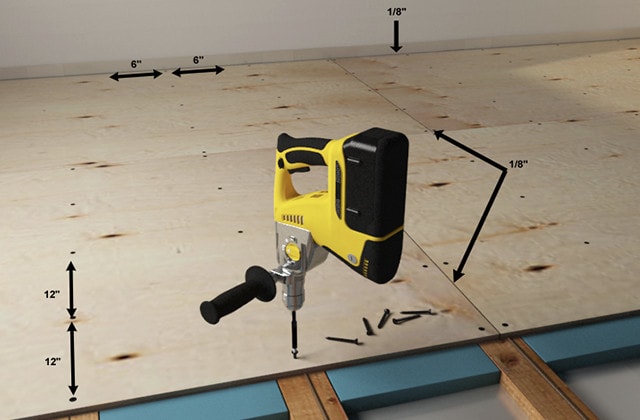
2 Mark where all of your joists will go using your measuring tape as a guide. Use chalk lines if necessary to mark straight lines across the boards with an X where they intersect with each other so they line up exactly when you put them together later on in the project; this ensures that everything is level and even throughout your home or shed’s structure
When building a shed or small structure, it’s often easiest to lay the floor directly on top of a concrete pad. But if you want to build a larger structure like a shed or garage, you’ll need to create a subfloor for your structure. A subfloor is used under the main floor joists to provide support and insulation from the cold concrete below. You can also use plywood as a subfloor if you don’t want to install OSB or other material.
Step 1: Cut 2x6s into 4-foot lengths and place them over the concrete pads on your first level. Place the 2x6s so that they’re perpendicular to each other (forming an X) with equal amounts of space between them (about 12 inches). Check your measurements before cutting any boards so that they fit together properly once assembled into an X shape.
Step 2: Use nails or screws to secure each piece of wood together at each corner and in between each gap where there are no pieces of wood touching each other.
Step 1: Start with a level surface
The first step in building a subfloor is to make sure that your concrete slab is level and flat. A small amount of variation won’t be noticeable once the flooring is installed, but large variations can cause problems. If your slab isn’t perfectly level, use a laser level to find the high and low spots, then fill them with concrete or wood shims until they’re even.
Step 2: Prepare the subfloor
Once you’ve leveled your concrete slab, it’s time to prepare your subfloor framing. A good rule of thumb is that every joist should be at least 16 inches on center (OC), so if your house is 40 feet long by 20 feet wide, for example, you’ll need 10 joists across the width and five joists down each wall.
To make sure everything fits together properly and fits snugly against the walls and ceiling, cut some 2 x 4s into pieces that are exactly as long as one side of your floor plan plus an extra inch for each joist end. These will help keep everything in line when you install them later on.
Step 3: Install joist hangers
If you plan to build a shed or garage, you must first prepare the concrete slab. The most common subfloor method is to place 2x4s on edge every 8 feet and attach them together with joists. The joists should be spaced 16 inches apart from one another and placed on top of the concrete slab.
When choosing materials for your subfloor, remember that pressure-treated lumber will protect the wood from rot and insect damage. It is also available in a variety of lengths and widths. But because it can be expensive, it may not be the best choice when building a large garage or shed where there will be a lot of traffic on the floor.
If you are building an above-ground structure such as a deck, porch or patio, use pressure-treated plywood for your subflooring instead of 2x4s because these areas will receive more wear than a garage would receive.
How to Build a Subfloor for a Shed
The subfloor of your shed is the first layer of wood that sits above the ground. It’s often built from 2×8 lumber, but if you’re building a small shed, it can be built with 2x6s or even 2x4s. The subfloor should be treated with preservative before you install it and then again after it’s in place. This will help prevent rot and insect damage.
How to Build a Subfloor for a House
If you’re building a house, you’ll need a subfloor to support the floor joists. The floor joists will support the weight of the rest of the structure — including walls, ceilings and roofing — so they have to be sturdy enough to handle this kind of stress. Lumber sizes vary depending on what type of home you’re building: An apartment might use 2x6s while an estate home might use 2x12s.

A subfloor is the first layer of support for a floor in your house that you will lay on top of the foundation. The subfloor will give you a sturdy place to put your flooring, tile or carpet. The subfloor also provides insulation from the cold concrete slab underneath your home.
Step 1: Measure the Floor Area
Measure the area that you want to cover with your subfloor and make sure you have enough material to complete the job. It’s best to buy extra material so that you don’t run out in the middle of construction and have to wait for more supplies before finishing the job.
Step 2: Install Joists
Install joists parallel to each other over every wall stud every 16 inches apart if possible and screw them into place with 2-inch screws. Make sure they are level with each other and straight across the floor area so they provide even support for your subflooring material later on.
Step 3: Install Rafters Along Walls
Install rafters along all walls where possible using 2×4 lumber and attach them securely into place by screwing them directly into the joists above them or use metal connectors which can be purchased at any hardware store or home improvement center in
Subflooring is a layer of plywood or oriented strand board (OSB) that’s installed on top of a concrete slab or on the ground, before siding or flooring is installed. It serves as a base for the flooring materials, and it’s the base for any walls that will be built with the help of framing lumber.
Subfloors are typically made from 2x4s, which are nailed together to create a solid surface for attaching sheet goods such as OSB or plywood. The sub-floor also provides an even surface for attaching joists and trusses to when building an attic space or a full-size second story.
A sturdy subfloor is the foundation for a quality home. It should be flat, level and consistent in size and thickness.
A subfloor can be made from plywood or OSB (oriented strand board), or it can be built up by attaching 2x4s together to form a solid base. The most common method is to use 3/4-inch tongue-and-groove OSB panels that are 4 feet wide and 8 feet long. The panels are connected to each other with nails driven through the tongue on one edge of each panel, so the panels fit together like a puzzle. Once you have the panels nailed together into a single sheet, you can install them over your framework.
You’ll need a few tools: a hammer, tape measure, saw (circular or jigsaw), drill/driver and compressor if you’re nailing down plywood or OSB panels (see below).
The first step is to build your frame.
The floor joists are the most important part of your house’s structure. The joists support the weight of the roof, walls and floors. When building a new home, it is important to use joists that are strong enough for their intended purpose.
Wooden subfloors are common in older homes, but if you are building a shed or garage, you may choose to use concrete slabs instead. Concrete slabs are less expensive than wooden subfloors and can be installed more quickly.
Before installing the concrete slab, however, you should make sure there is adequate support underneath it. You will need to install joists underneath the patio area where the concrete slab will be installed.
1) Mark out where your joist will go using stakes and string line. Make sure that each joist runs perpendicular to its neighbor so that they do not interfere with one another when pouring concrete over them or installing other materials such as sheetrock or tile on top of them later on in the project.