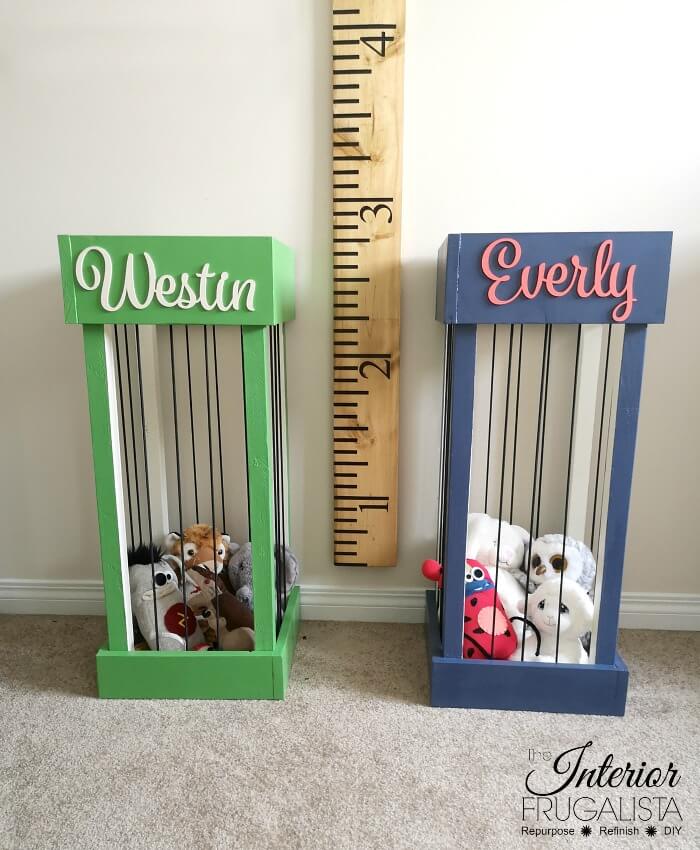
A stuffed animal zoo is an engaging, fun and colorful display that can be set up in a corner, or against a wall in any room. It can be made of anything small enough to fit the space.
Hey there, my name is Catherine and I’m here to teach you how to build a stuffed animal zoo. I’m going to walk you through the process and show you some tips & tricks along the way. You’ll be ready to start building in no time. Let’s get started!

How to build a stuffed animal zoo
Step 1: Pick your location. If you want to build a corner stuffed animal zoo, choose a place that gets some sunlight. The animals need to live in a temperature-controlled environment, so you’ll want to set up your zoo near an outlet.
Step 2: Find the right materials. If you’re building a small stuffed animal zoo, you can use cardboard boxes as habitats for your animals. For bigger zoos, you may need to buy some wood or metal tubing for cages and other structures.
Step 3: Make sure all the pieces fit together nicely before you start gluing anything down or attaching any wires or cords. This will make it easier later if you need to take things apart or reposition something.
Step 4: Glue extra cardboard boxes together if needed so they’re long enough to hold the largest animals in your collection. You may also need extra wire or rope if there are spaces where small animals can escape through the cracks between pieces of cardboard or wood.
Step 5: Attach wires or cords where needed so children can hang toys from them (for example, if they have a stuffed dinosaur hanging from their ceiling).
A stuffed animal zoo is a fun way to teach children about animals, and it can be as simple or elaborate as you want. For example, if you have a small room and want to build a corner stuffed animal zoo, you might hang some shelves or hooks on the wall and arrange your teddy bears in zoo-like habitats. If you have more than one room or are planning to expand, keep reading for tips on how to build a small stuffed animal zoo.
Choose Your Theme
When building your stuffed animal zoo, choose a theme that fits the size of your space. If your child loves animals but doesn’t know much about them, consider starting with just three or four species of animals and gradually add more as they learn more about each one. You could also choose a theme based on color or size — for example, all of your tigers might be black with white stripes or all of your giraffes might be yellow with brown spots.
The most common type of zoo is the corner stuffed animal zoo. It’s made up of three basic elements:
1. A building with a roof
2. A fence or wall around the perimeter of the playground
3. Stuffed animals scattered around (inside and outside the enclosure)
The best way to build your own corner stuffed animal zoo is to start by choosing a site where it will be safe for kids to play and have fun. You also need to choose an area that’s big enough for everyone to have plenty of room, but small enough so that you can still see all of your animals from one spot in the zoo. The ideal size for a corner stuffed animal zoo is around 10 square feet per child, but it may take some trial and error before you get it just right.
Once you’ve found the perfect spot, start building your zoo by laying down cardboard boxes or pieces of plywood as paths between each exhibit area (these should be wide enough for kids to walk on, but not so wide that they could fall off). The paths will also help keep people from stepping on any animals that are outside their cages! Once all of your paths are laid down, scatter some stuffed animals around them (you can add more later
If you’re looking for a fun project to do with your kids, then building a stuffed animal zoo is an excellent idea. It’s easy to do and the animals are very cute. The best part is that you can build it however you want.
Building a stuffed animal zoo doesn’t have to be difficult or expensive. All you need is some basic craft supplies and a little bit of time. For example, if you don’t have much experience sewing, you can use glue instead of stitching for many of the projects.
Here are just some of the things that you can include in your zoo:
1. Trees (with leaves). You can use anything from cardboard to fabric leaves for this project if you want to make it look realistic.
2. Rocks (for boulders). These are also easy to make out of cardboard or fabric scraps. You can paint them or cover them with glue so they look like stone when dry!
3. A pond/lake/puddle (made out of blue paper). This will make your zoo look even more realistic!
A stuffed animal zoo is a great way to display all of your stuffed animals. We’ve found a few different ways to make a stuffed animal zoo, but here are the basic steps:
1. Choose an area where you can hang or display your stuffed animals. It’s easiest if the area is already set up for hanging items, like a wall in your house or even a tree branch outside. If it isn’t already set up for hanging things, you might want to use some command strips or other adhesive hooks to hang your stuffed animals.
2. Decide how big you want your zoo to be and how many animals it will hold. You don’t want it too big or too small!
3. Plan out how you’re going to arrange all of the stuffed animals on their branches (or whatever you’re using) so that they look like they’re in an enclosure together.
4. Add accessories like trees, bushes, rocks and other things that would be found in nature as well as food bowls and toys for each animal (if they have them). Make sure there are enough so that each animal has one!
5. Hang everything up! You can use command strips or other adhesive hooks if necessary or just hang it all by itself
How to build a corner stuffed animal zoo
I have a corner in my room that I wanted to use to display some of my favorite stuffed animals. This is a pretty easy project, and it doesn’t take too much time or skill to make.
What you’ll need:
-A box that has a lid (I used an old shoe box)
-Scissors or exacto knife (for cutting out the shape)
-Marker (for making your cuts)
-Stuffing for your animals (optional – if you want to stuff them)
The corner stuffed animal zoo is a great way to display your child’s favorite animals. It’s also a good way to keep them contained and organized. With just a few supplies and some basic sewing skills, you can make this project in no time at all.
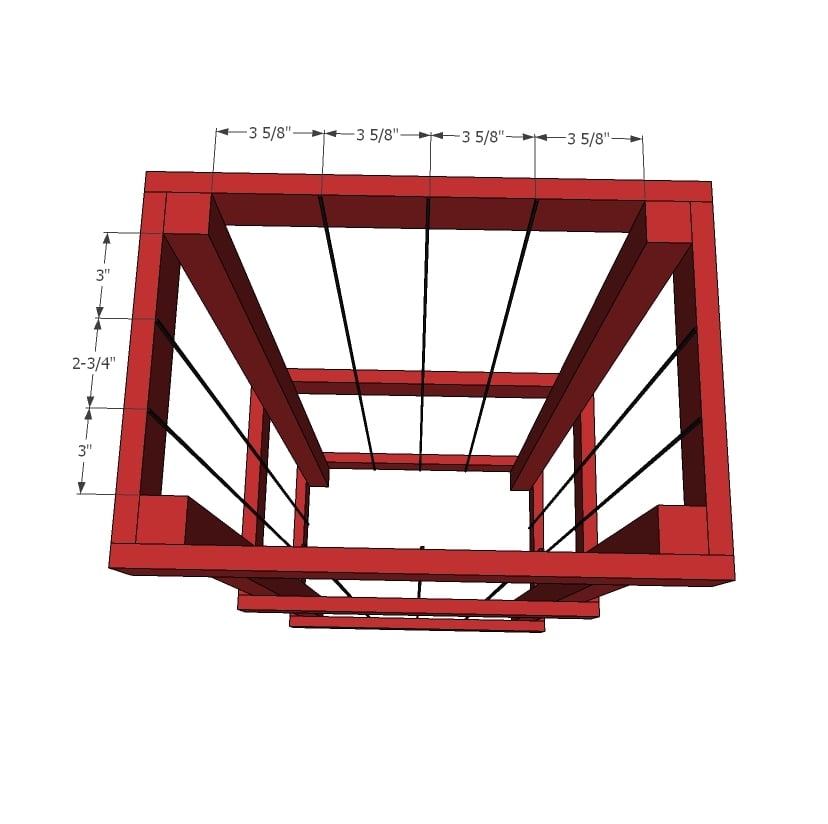
The first thing you’ll need is a wooden frame that will fit on the wall. You can buy one at any craft store or online. The frame I used was about 2 feet wide and 2 feet tall, but make sure it’s big enough for all of your stuffed animals!
Next, measure out how many rows you want in your zoo display and cut two pieces of fabric for each row (four total). These will be the backings for each row of animals. Then measure out how much fabric you’ll need for each animal (fronts) and cut two pieces per animal as well (four per row).
Sew one piece of fabric onto each backing piece with an edge-stitched seam along both sides (not top or bottom) so that when it gets turned over, the seams will be hidden on the back side of the zebra backing piece. Then place one backing piece against one front piece (right sides together), pin in place and sew around three sides with an edge-stitched
How to Build a Small Stuffed Animal Zoo
Materials:
Wooden pallet
Saw (jig saw or coping saw)
Wood glue
4 pieces of wood for corners, about 1×4 inches each
Picture hanging wire or picture hanging hooks (optional)
A stuffed animal zoo is a great way to display your collection of stuffed animals. The zoo can be created in any room, but it’s best if there is enough space for the animals to move around freely. The zoo can be built by hand or by using a kit from a craft store.
If you want to make your own zoo, start with a large box that’s at least 18 inches wide and deep. Cut holes in three sides of the box so that the animals can easily get in and out of the enclosure.
The easiest way to decorate your zoo is by using construction paper or poster board. You can also use fabric scraps or other materials you have lying around the house. Attach these decorations using glue or tape so they don’t fall off when anyone touches them.
Once your enclosure is decorated, arrange all of your stuffed animals inside it using twine or string as barriers between each pen. If you’re using multiple types of animals, make sure they are separated into different pens so they don’t fight with each other while they’re being handled by visitors to your zoo!
You can build a stuffed animal zoo in your house and let your kids play with the animals. This will help them to learn about different types of animals.
The stuffed animal zoo is easy to build and all you need are some soft toys, cardboard boxes and glue.
You can make this toy for your children so that they can understand about different types of animals.
Materials required:
Stuffed animals (a variety of different kinds)
Cardboard boxes (choose one that fits your room)
Glue