How to build a recording studio desk – is not an easy task.You must have the right tools and techniques.Otherwise, you will get a lousy result and even get frustrated after trying to build your own studio desk.We’ll show you what not to do and how to build a custom recording studio desk by using the best tools for the job.
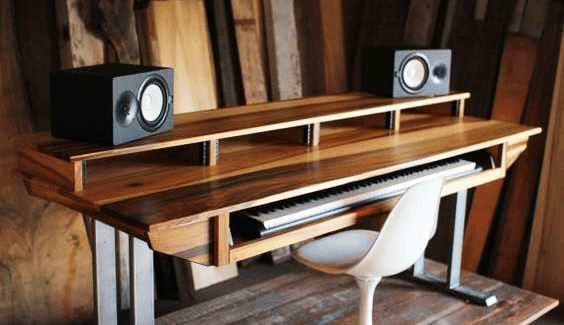
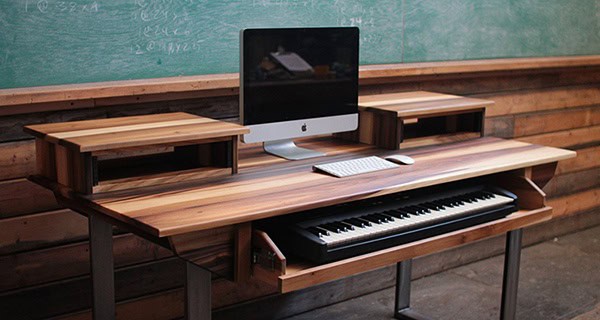
When building a professional recording studio desk you need a very sturdy table that can withstand the weight of the keyboard. During our discussion we will cover all kinds of tips and trick involved in building like drawing your own template so that you can make sure that every piece is square, how to choose the right material for your custom studio desk, as well as take a look at what attachments you can have. I hope this will help provide you with tips to consider when it comes to building a custom desk for professional recording.

How to build a studio desk
A desk is an important part of a home recording studio. It can be used as a workstation or a place to mix and master your music. It’s also a great place to store all your equipment, so you don’t have to worry about them getting knocked over when you’re mixing.
Here are some tips on how to build a custom studio desk:
Choose the Right Desk for Your Needs – Make sure that you choose a desk that is large enough for all of your equipment. You’ll want to consider how much space you need for your monitors, speakers, computer and other components. Also, make sure there is enough room for cables and wires running between each piece of equipment.
Choose the Right Size – The size of the desk will determine how many pieces of gear can fit on it comfortably without being crowded together. A smaller desk might be better if you only need space for two monitors or speakers at most since there won’t be much room left over for other items like computers or keyboards. However, if you plan on using multiple monitors at once or want more space then go with something larger like an L-shaped desk which gives you more options in terms of placement and size combinations.
If you have a home studio or a small recording space, you may need to build your own desk. A lot of people find that it can be quite a bit cheaper to make their own furniture than to buy it from a store. You can also customize your own desk to fit your needs exactly. This article will show you how to build your own studio desk by using inexpensive materials and tools that you probably already have in your garage or toolbox.
How to Build a Recording Studio Desk
The first step in building your own studio desk is measuring the length of the table top where you want it to go. This will allow you to cut the pieces of wood needed for the legs, sides and top of your table so they all fit together perfectly when they’re assembled together later on. To measure this length, take one end of each piece of plywood (the side pieces) and place them next to each other on the floor with their edges touching one another (photo 1). Then use chalk or marker to mark this edge onto both pieces at once so that they are exactly even with each other (photo 2).
The following is a guide to help you build your own recording studio desk.
There are many different ways to build a recording studio desk, but here we will be using MDF (medium density fiberboard). MDF is easy to work with and can be cut quite easily with a jigsaw or circular saw. It is also very sturdy when finished and painted. The type of wood you use is up to you, but I would recommend something that isn’t too heavy or expensive as it will be sitting on the floor and loaded with equipment so it needs to be able to take some abuse!
The first step is to measure the dimensions of your room and calculate how much material you need. You’ll want some extra length and width so that you have enough space for storage underneath the desk if necessary.
You’ll also need to figure out where your monitor speakers are going to sit on the desk by measuring them up against the wall where they’ll be placed. You’ll want them about 8″ from the wall for optimum sound quality.
If you are looking for a recording studio desk, then this article is for you. We have listed down some of the best tips and techniques to build your own studio desk at home.
The first thing that comes to mind when you think of building a new desk is the cost of the materials and tools required for it. But you can make your own studio desk at home at very low costs if you follow these simple steps:
Get all the required materials together such as wood panels, screws, hinges, nuts and bolts etc.
Make sure that you get every component in perfect condition so that they don’t break while being used in construction.
Use power tools like saws or sanders to cut out holes in panels accurately without any mistakes or errors.
Use clamps while assembling different parts together to ensure they don’t move during construction process.
Building a studio desk is a great way to save money and build a custom desk that fits your needs. The materials you need can be found at your local home improvement store and are relatively inexpensive.
The first step in building any project is to gather all of the materials you will need. For this project, we will be using the following materials:
2x4s (5)
1x4s (4)
1x10s (1)
Wood Glue
Screws (at least 1 box)
Whether you are building a recording studio or a home studio, you need a desk that can accommodate all of your equipment. It is important to have a desk that is functional, but also looks great in your home or office.
Here are some tips for building your own custom studio desk:
Measure the space where you want to build the desk and make sure there is enough room for everything. Think about how many people will be using it at once, and plan accordingly. It’s best to get measurements before buying materials so that you don’t buy too much or too little.
Choose wood that matches the rest of your furniture so that it blends in with other pieces in the room. This will help ensure that it looks professional when finished.
Use screws instead of nails when assembling the pieces together because they will hold better over time and won’t split like nails can do if hit by heavy objects such as speakers or microphones on a regular basis.
A good desk is an essential piece of equipment for any studio, and it can make or break your recording experience. A bad desk will make you feel cramped, tired and uninspired, but a good one can make you want to spend all day in there. Here are some tips on how to build your own custom studio desk.
The first thing to consider is what kind of desk you want. You can go for something simple like a table or shelf, or something more complex like a standing desk with a sliding keyboard tray. The best type of desk really depends on your needs — whether you want something basic that won’t take up much space or something more elaborate that will give you plenty of room to work in comfort. If you’re just starting out and don’t have much money to spend on equipment, then going for something simple might be best. However, if you really enjoy having top-of-the-line gear and want something that’ll last forever then maybe going for an intricate design would be better suited for your needs.
If this is the first time you’ve ever built anything yourself then I’d recommend going for something simple like a table or shelf as it’ll be easier to do than building something from scratch such as a standing desk
You can build a studio desk for less than $100 and have it done in a day.
I’m building a simple recording studio desk that only takes about 2 hours to build.
It’s cheap and easy to build, but still looks great! I’m going to show you how I made mine, and if you’re interested in building your own, then read on.
You can build a custom studio desk yourself. It’s a great way to save money and get exactly what you want.
To start, you need to decide what you want your desk to do for you. There are lots of different desks out there that can help with specific things. For example, if you need more space for equipment, you might want to consider building a console table or adding on an extension part. If you want a desk that is easy to move around and store away when not in use, consider building a nest of tables or nesting tables.
Here are some things to consider when building your own studio desk:
Size – Measure the length of the room where you plan on putting the desk and then look at the size of gear that will be sitting on it. You’ll also want to consider whether or not you’ll be able to walk around the desk or if it will be in one spot all the time
Material – Most furniture is made from wood or metal but there are other options like glass, plastic and even concrete
Design – You can make almost anything out of wood including curved shapes or intricate designs
Here’s how to build a custom studio desk, step by step.
1. Cut the baseboard and legs to length. Cut the baseboard and legs to length. You’ll need two of each; I used 1x4s for the baseboards and 2x4s for the legs. They should be long enough to span from wall to wall (or from left-to-right in this case) with about 4 inches overhang on each end.
2. Drill pocket holes in the ends of each baseboard piece — one on each end, where the board will butt up against another piece or the wall — then connect them with pocket hole screws (and glue). Use 1 1/4″ pocket hole screws to connect these pieces together, then glue them with construction adhesive before installing them on your wall so they don’t shift around while you’re working on your desk’s structure below them later on.
3. Attach a small cleat to each side of your workbench top; it’ll help keep everything flush and even when you install it later on. Use 1x4s for these cleats; just cut them down from longer boards until they’re about 6 inches long