Stone pillars are a beautiful architectural detail to add to any home. Made of stone, these pillars can be direct and charming, built with simple techniques that don’t require advanced skills. Check out the following steps for ideas on how to build your own stone pillar.
{Building a pillar} – is it easy? Yes and no, it depends on the pillar you want to build, but in general building one is not that difficult for anyone with reasonable abilities. Let’s take a look at different types of stone pillars you can build.
How to build a stone pillar
A stone pillar is an architectural feature that consists of a vertical column of stone, usually formed from a single piece of stone or rock. Stone pillars are often called stelae or obelisks if they are tall and narrow. Other stone pillars can be square or rectangular in shape. The most famous example of ancient Egyptian obelisks was the Cleopatra’s Needles in London and New York City, which were originally constructed as grave markers and only later transported to their current locations.
How to Build a Natural Stone Pillar
Natural stone pillars are made by cutting, polishing, and carving blocks of rock or stone into the desired shape. This process takes some time and effort on the part of the builder, but it can result in beautiful architecture that lasts for many years. In order to build natural stone pillars yourself, you will need some basic tools like hammer drills and chisels along with some patience for sculpting rocks into different shapes.
If you don’t have access to natural stones then you can always make faux stone pillars using concrete and other materials such as plaster or paint.
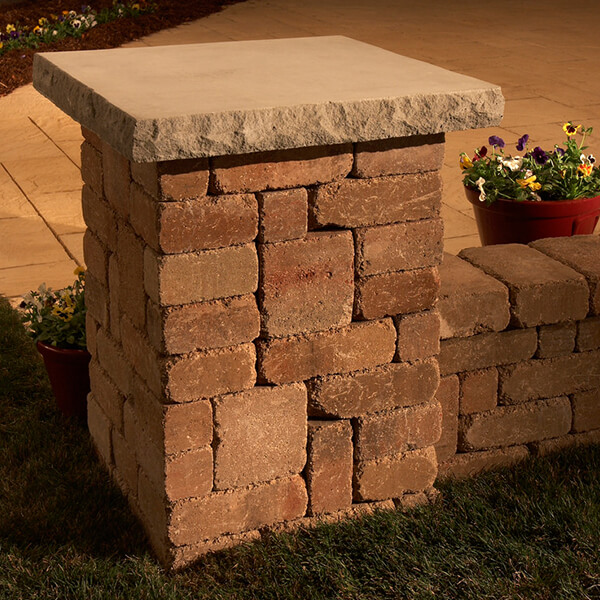
Stone pillars are used in many different applications, from garden and landscape design to home exteriors. They can be used as accents or focal points and can be made from natural stone or faux stone materials. Natural stone pillars are made from real stone and require more maintenance, but they offer a more authentic look. Faux stone pillars use concrete or another manmade material that is cast into the shape of a stone pillar. This allows you to create pillars that look like natural stone but with less maintenance.
Faux Stone Pillars
If you want the look of real stone without the maintenance requirements, consider using faux-stone columns on your next project. These artificial stones come in a variety of colors and textures that mimic real rock formations. They also require less maintenance than natural stone columns because they do not have to be sealed periodically to keep moisture out of the joints between rocks. You can construct them yourself using a kit or buy pre-made units from your local home center store or online retailer such as Amazon.com for about $50 each (as of 2018).
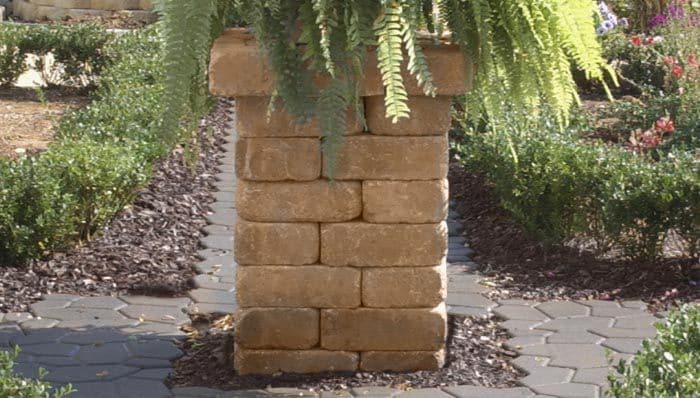
Stone pillars are a great way to add character to your yard. They can be built for use as a gate, fencing or just as a decoration. It’s important to know how to build a stone pillar yourself because it can save you money, and it’s also a great way to learn how structures like this are constructed.
Stone pillars are typically made from natural stone, but if you want something that looks more like faux stone, there are some materials you can use that will give you the same look without being as heavy or expensive.
To build a stone pillar, you’ll need:
The size of the stone (or faux stone) will determine how much work it takes to make your pillar. If you’re using real stones, make sure they’re large enough so that when they’re stacked up, they have enough weight to hold themselves up without any extra support from other materials. Faux stone doesn’t require nearly as much weight because it’s lighter than real stones and doesn’t have any holes in it where water can collect like real ones do.
Stone pillars are a beautiful and timeless addition to any home. They can also be tricky to build, as they require a specific type of stone and expertise in masonry. Fortunately, there are ways to get the look of stone without all the hassle.
Here are some tips for building your own faux stone pillar:
1. Choose your material. The first step is choosing which type of stone you want to use. You can use real stone if you have access to it, but it’s more expensive than faux stone and harder to work with because it’s heavier and harder than plastic or resin alternatives.
2. Get the right tools. You’ll need some basic tools for this project including a drill, hammer and chisel or mallet, screwdriver and power saws if you’re using real rock or granite slabs for your pillar base instead of hollow plastic ones like those used in commercial landscaping projects that you can find at home improvement stores like Lowe’s or Home Depot. You’ll also need gloves, goggles, dust masks and earplugs since this project involves cutting into concrete with power tools.”
Stone pillars are an easy way to create a focal point in your garden. They can be used as a gateway, or simply as an attractive addition to your landscape. Stone pillars can also be used as garden decorations, such as with a bird bath or sundial.
Stone pillars are created from many different stones, such as quartzite, granite and limestone. The most popular types of stone to use in building stone pillars include slate, quartzite, sandstone and marble.
If you’re using natural stone for your pillar, the first step is to choose the right type of rock for the job. You’ll need a strong base material that’s capable of holding its own weight without buckling or collapsing under pressure. After finding a suitable location for your pillar, it’s time to start digging!
Dig down at least six inches below ground level so that there’s enough space for another inch or two above ground level once you’ve finished building the pillar itself. This will allow for proper drainage when it rains so that there are no leaks in your pillar wall structure over time due to water seeping into cracks between rocks and expanding them outwards slightly over time from inside pressure from rainwater over time when heavy rain falls on top of
How to build a faux stone pillar
The easiest way to get the look of real stone is with a composite product. These are made from cement, sand, and other materials that are cast into molds to create the look of natural stone. They are also much less expensive than real stone and can be applied over concrete or wood for an even more authentic appearance.
The following steps will show you how to install faux stone pillars on your patio:
Step 1 – Prepare the Surface
Before you begin any kind of construction project, it’s important to make sure your surface is ready for plastering. This means cleaning off any loose dirt or debris from the area that will be covered by the faux stone pillar. You should also make sure that there is no standing water on the surface; this could cause problems later on when you’re installing your new pillar.
Step 2 – Install Base Plates
The next step is to attach base plates onto each side of where your new pillar will sit. These plates need to be strong enough so they won’t break when pressure is applied from above them (such as when someone leans against them). They should also be sturdy enough so that they don’t bend easily when weight is placed on them from above (such as when someone
Like any project, there are many ways to build a faux stone pillar. I will be showing you my method for this tutorial, but the basic idea is that you need to make sure that the top of your faux stone pillar is flat. You can either use a level or a straight edge to check this as needed. Once you have a flat surface, you will want to use mortar and brick pieces to build it up to the correct height and width.
Materials
You will need the following materials:
Mortar (I used two bags)
Brick pieces (I used two bags)
Faux stone pillars are a popular way to add architectural interest and design detail to a garden space. These faux stone pillars can be made from concrete or plaster and are easy to build.
The first thing you need to do is create the shape of your pillar with wire mesh. To do this, bend the wire so that it forms the shape of your pillar and secure it at the base with bricks or stones. Once you have created this frame, cover it with cement plaster.
You can then paint or stain the pillar to make it look like real stone, or leave it as is for a more rustic look.
If you want a more authentic looking stone pillar, try using natural stones as part of the construction process. Use smaller rocks as filler between larger ones, or use larger rocks as bases for smaller ones so that they appear to be sitting on top of them.
Another option is to use concrete blocks instead of real stone because they are easier to work with and cheaper than real stones would be!
A faux stone pillar is a great way to add character, beauty and interest to any home. They are simple to build and can be made from a variety of materials. A faux stone pillar can be built with either concrete or foam insulation.
Foam insulation is easier to work with because it dries faster than concrete, making it easier for you to shape your pillar. Foam also has a lower cost than concrete and is more durable in cold weather.
Concrete is more durable than foam insulation, but it’s also more difficult to work with because it takes longer to dry and is more susceptible to cracking. If you choose concrete for your faux stone pillars, you’ll need an additional step in the construction process: curing time. Curing time allows the concrete to harden so it won’t crack when its exposed to extreme temperatures or humidity levels.
A faux stone pillar is a great addition to any home. They can be used to add character and interest to a room or even just serve as a decorative element. They are fairly easy to make, but if you have never made one before, there are a few tips that will help you create a beautiful stone pillar with ease.
The first thing you need in order to make your own faux stone pillar is some fake rock. You can find these at most home improvement stores and they come in many different styles and shapes. If you want something very specific, like an Egyptian column or Roman pillar, then it might be best to go with fake rock that is sold specifically for this purpose. However, if you just want something basic then any fake rock will work just fine.
The next thing that you need is some plaster of Paris (or another type of plaster) and some small rocks (these should be smaller than the fake rock). Mix the plaster according to the directions on the package and then pour it into your mold or container so that it fills up about half way full (you can always add more later). Next, put some small rocks into the mixture until it is about 1/4 full and then place your