A stepped garden wall or pathway is a beautiful and interesting way to add texture to your landscape and create highlight features in the garden.
Building a garden wall is a great way to add some privacy to the backyard. There are many ways you can do this. You could build an enclosed wood fence, or an open stone wall. But today I’ll be showing you step by step how to build a simple terraced garden wall in your backyard .
How to build a stepped garden
You can build a stepped garden wall, or even a path, with the right materials. It’s easy to do and can be done by anyone.
Steps are built in layers, each layer supporting the next layer above it. The steps should be as wide as possible to make it easier for people to walk up and down them. If you’re building a wall, you’ll need to add a ledge on top of each step so that people can sit on top of them without falling off.
The first step is to prepare the ground by digging it out to create flat areas where your steps will be built. You can use your shovel or pickaxe for this job.
Next, you’ll need some blocks or bricks for your steps. These should be about 4 blocks high so that each step will have about 1 block thickness on either side of it
A stepped garden wall is a beautiful addition to your landscape. It can be used for many different things, including the addition of a garden path or raised beds for growing plants.
Steps can be made with wood, stone or concrete and will last for years if they are properly constructed and maintained. A wooden step wall is easy to build, but you must make sure that it is well engineered before you begin construction.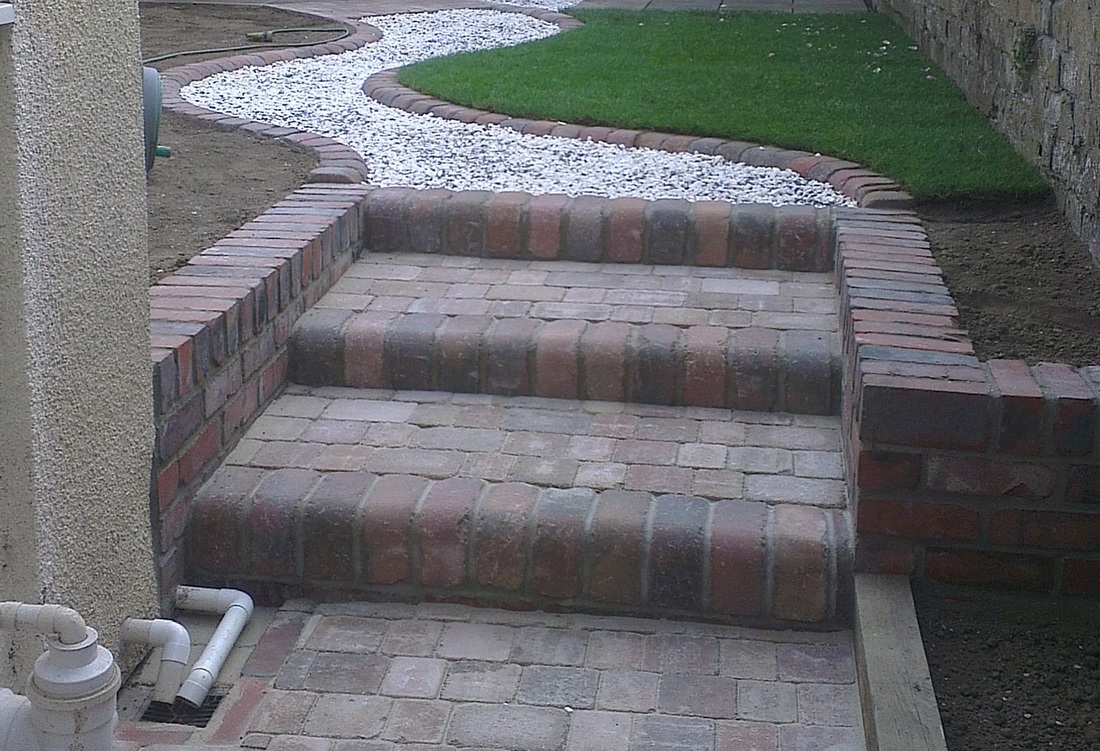
How to Build a Stepped Garden Wall
Step 1 – Plan Your Steps
The first step in building a stepped garden wall is to plan your steps and determine how many levels you want in your wall. Each level should be about 2 feet tall so that you can plant flowers or vegetables at each level. The number of levels depends on how high you want your wall to be, but three to five levels is usually sufficient for most gardens.
Step 2 – Mark Your Foundation
Once you have decided where you want your stepped garden wall located, mark the outline of each level on the ground with stakes and string. This will help keep track of where everything goes while working on this project. Make sure that all stakes are driven into solid ground so they won’t move when digging begins later on during construction.
A stepped garden wall is a great way to add height and interest to your garden. It can be used as a border between two areas or as a focal point in the centre of your garden.
Step 1: Dig out the area where you want the wall to be built.
Step 2: Place wooden stakes into the ground every 30 cm (12 inches), leaving 5 cm (2 inches) above ground level.
Step 3: Attach plastic or metal edging along the top of each stake with nails or screws and attach it with wire or string so that it forms an even line across the area.
Step 4: Measure down from the top of the edging and mark with a pencil at 10 cm (4 inches) intervals along its length. At each mark, drill a hole for your concrete post at least 1 m (3 feet) deep into the ground using an electric drill with a masonry bit attached or by using a manual hammer drill fitted with a masonry bit, until you reach solid ground again. Then clean out any loose material from around each hole using a screwdriver before inserting your concrete post into place through each hole until it comes up flush against the edging on top and then tightening all screws securely on
Steps can be made from any material, but you need to make sure that it will last. Concrete is a popular choice because it is durable and easy to work with. However, it can be expensive, and may not be the best choice if you plan to plant directly in the garden bed.
To build your step wall, first dig out all of the dirt where you want to place your steps. You will want to dig down at least 12 inches deep so that there is plenty of room for drainage. You may also want to add gravel or sand at this point as well. The gravel will help with drainage and prevent weeds from growing in your step area while also adding beauty to your project.
Once the area has been dug out, lay down some landscape fabric over top of the hole so that you don’t have any weeds growing in your new garden bed. You can also use chicken wire instead of landscape fabric if you prefer a more rustic look for your project.
Mix up some concrete according to package instructions and pour it into the hole until it reaches just above ground level (about 1/4 inch). Let this concrete dry for a few days before moving on to step number two!
A step garden path is a great addition to any yard. It can be used as an entrance to your home or as a means of accessing other parts of your property. A step garden path will provide an interesting focal point for your landscaping and add elegance to any area.
Steps are inexpensive and easy to build, so if you’re looking for an inexpensive way to improve the look of your yard, then consider building a step garden path.
Tools & Materials Needed
Carpenter’s level
Hammer
Building a stepped garden wall can add interest to your garden and provide you with an opportunity to get creative with your design. A stepped garden wall, also known as a terraced garden, is a type of raised bed that consists of multiple levels. The steps in this type of garden are created by stacking rocks or building up soil in layers, creating a sloped surface for plants to grow on.
Steps can be built into any existing slope in the yard or on flat ground. Creating steps for your garden means that you can grow more varieties of plants than you could if you had simply planted them in one big bed. Additionally, adding steps allows for easier access to plants that require pruning or harvesting and gives them more room for growth.
Building Steps for Your Garden
The first step in building a garden wall is to mark the location of your wall on the ground. If you’re building a simple straight wall, you can just measure off the length and width of your area and mark it on the ground with stakes and string.
Steps tend to be more complicated than straight walls, because they require some careful measuring before you build them. There are several factors that can affect the height of your steps:
The height of your landscape timbers: Most landscape timbers are 8 feet long, but you may find some 7 feet long or even 6 feet long if you’re lucky. If you’re using shorter timbers, then your steps will be shorter too.
The length of each rung: The rungs should be about 2 inches wide if possible, which would make each step about 13 inches long (or 12 inches if using 6-foot timbers). You could also use 2-inch-wide boards instead of rungs for a different look (and maybe save yourself some money).
The depth of each step: The depth depends on how high up you want your walls to go — 6 inches is good enough for most gardens. If you have tall plants that need support
Step 1: The first thing you need to do is decide what path design you want. This will determine how many steps you need. If you want a straight path, you’ll need only two steps. If you want a curved path, then you’ll need at least three steps because the third step will be in the center of the curve.
Step 2: Dig out a trench for each step and place bricks or stones along each side at the bottom of each trench until it reaches ground level. You may want to make sure that your bricks or stones are level with each other so that your garden path is uniform throughout.
Step 3: Make sure that your bricks or stones are level with one another so that your garden path is uniform throughout.
A garden path is a great way to transition from a lawn to the garden or from one section of your yard to another. A garden path can also be used as an entrance or exit for your home if you have a large front yard. You may choose to use stepping stones or bricks as the material for your path, but it’s important to consider drainage when making this decision.
Step 1
Measure the width and length of the area where you want to build your path. Use these measurements to determine how many stepping stones you need for your project. For example, if you want a 3-foot wide path that is 10 feet long, you will need 30 2-foot long stones.
Step 2
Dig holes in the ground where each stone will go using a post hole digger or shovel. The holes should be at least 8 inches deep so that rainwater can drain through easily. Place each stone in its hole and tamp down around it with a hammer until it is stable on its own without wobbling or sinking into the soil below it too much.
Step 3
Cover each stone with gravel or crushed rock so that there are no gaps between them when viewed from above ground level (or look at them from underneath).
A garden path is an essential element of any garden design—it helps you to get from one area to another without stepping in your flowerbeds, and it looks pretty too. If you are thinking of building a new garden path, here are some tips on how to go about it:
Step 1: Choose the right materials
The material you choose for your new path will depend on where it will be located and what kind of access is available. For example, if you have easy access to concrete then this would be a good choice for your new path. But if this isn’t possible then look at alternatives such as brickwork, stone or tarmac.
Step 2: Plan the layout
You need to plan where each step will go so that you can build them accurately, otherwise they will be uneven and unsafe for people walking on them. A good rule of thumb is that there should be approximately 3 feet (1 metre) between each step if it is going up hill, and 2 feet (60 centimetres) if going downhill