Building a step up box is the best solution if you want to get that extra height you can’t get with two steps. There are many options on how to build a step up box, but the best one is a simple one where you just build it out of wood with a little storage room below also. This article will show you just that.
In this article we will be looking at building a step up box (or its otherwise known as a surge protector). These are great if you find your self in a situation where you only have one plug to use and a lot of electrical devices to plug in.

How to build a step up box
One of the first things to consider when building a step up box is the size. A step up box should be large enough to accommodate your biggest load, but small enough to make it easy to move around. A good rule of thumb is that it should be about one cubic foot for every two square feet of floor space in your shop.
An even better way to determine the right size is to use the “four-foot rule.” This means that if you can’t reach four feet above your head, then you need more than one step up box. If you can reach four feet above your head, then you only need one step up box.
Step up boxes are often built out of plywood or chipboard because they’re strong and inexpensive materials. However, if you’re building a commercial-grade step up box that will be used frequently, consider using steel or aluminum instead of wood. These materials are stronger and lighter than wood and won’t warp over time like plywood does when exposed to moisture.
The next thing to consider is how many steps there should be in your two step up box. For most residential use cases (and even some commercial ones), two steps should suffice — one at waist height and another at chest height (or higher).
How to Build a Step Up Box for Your Car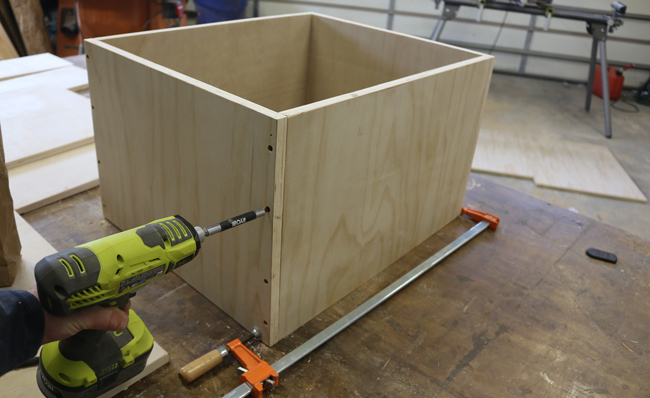
Building a step up box is a simple project that will help you get your car on top of a trailer or other object.
Step 1: Build the Base
Measure and cut two pieces of 2×4 lumber to the desired length of your step up box. Cut four more pieces of 2×4 lumber to form the frame of the base. Screw one piece into each corner and then screw the other three pieces together in the middle. Leave one side open so you can fit your car inside later.
Step 2: Add a Top
Cut two pieces of 2×6 lumber to create the tops of your step up box. Screw them onto each end of the frame you built in Step 1 and then trim them with a circular saw if necessary so they fit flush against each side. Attach one end with screws and leave the other end loose so it can swing open when needed.
Step Up Boxes
Step Up Boxes are used to raise a person up to a higher level. They are very common in warehouses, but also found in retail stores, offices and homes. The step up can be used to store items on shelves that you do not have the ability to reach, or it can be used as an entrance into a building or room.
A step-up box is basically a small ladder with one or more steps. It is usually made of wood and has a handle on each side for easy carrying. Most step up boxes have three or four steps, but there are some models with two steps or five steps available as well. Most of these models are portable so they can be taken anywhere you need them!
There are different types of step up boxes available:
-Standard Stepup: This type consists of several wooden steps held together by metal joints at the top and bottom (or both). These types of units tend to be sturdy and durable while still being lightweight enough for one person to carry around easily.
-Two Step Up Box: This type consists of two wooden steps connected together by metal joints at the top and bottom (or both). These types can be very useful for reaching shelves that are high off the ground because they have
Step up boxes are used to help you get on top of your vehicle. These boxes are very easy to make and very useful. You can also use them as portable ladders or step ladders.
Step-up boxes can be built in many ways, but here is one of the easiest methods:
Step 1 – Gather Materials
You will need a small wooden board (6″ x 4″), 4 nails and a hammer. The wood should be thick enough so that it doesn’t break easily under your weight. It also needs to be long enough so that when you stand on it, there is still enough room for your feet to fit comfortably on the ground.
Step 2 – Cut the Board
Cut two pieces from the board according to the measurements given above (6″ x 4″). This will be used for making two steps in our box. Cut one more piece from the board according to these measurements (2″ x 4″). This will be used for making one step in our box. The piece should be long enough so that when you stand on it, there is still enough room for your feet to fit comfortably on the ground
Step up boxes are a great way to get your workout in at home. The steps give you resistance, so you can build muscle and burn more calories than doing the same exercises on the floor.
Step up boxes are also safer than jumping onto a bench, which can cause injury if you land incorrectly.
You can build your own step up box, or buy one online. If you want to build your own, here’s how:
Materials needed:
– 4 pieces of 2×4 lumber (8′ long)
– 4 pieces of 1×4 lumber (8′ long)
– Wood glue and nails or screws for attaching the plywood top and bottom pieces
How to Build a Two Step Up Box
Step 1: Cut the wood
Cut two 2×4 boards to the desired height of your step up box. If using 2x4s, cut them to about 3 feet long each. This will make a step up box that is about 2 feet tall. You can adjust this measurement based on how high you want your box to be, but it should be at least as tall as your dog’s back is long so that they cannot jump into it from the ground level.
Step 2: Attach the boards together
Place one board flat on its side and then place the other board directly on top of it so that their ends meet. To secure them together, take a hammer and drive some nails into each corner where the boards meet. You should use a nail gun if you have one available because it will make this process much easier and faster than doing it by hand with a hammer and nails, but if you don’t have access to one then use whatever tools you have available and keep driving more nails in until they stay together securely.
How to build a small step up box
This is a simple project that can be completed in a weekend by a beginner woodworker. The plans can be downloaded for free and the materials are inexpensive. If you are looking for something more challenging, check out our step up box plans.
The materials needed for this project are:
(1) 1″x12″x8′ board (for the sides)
(2) 1″x6″x8′ boards (for the ends, bottom, and top)
(1) 1″x4″x8′ board (for bracing)
(1) 1/4″ plywood sheet or OSB panel (for framing inside top and bottom of box)
(20) 2-1/2″ long screws (to attach sides to ends)
(8) 3-1/2″ long screws (to attach bottom and top boards together)
How to build a two step up box
The first step is to decide on the size and shape of your box. The size of your box should be based on your design, but with all things in mind, try to keep it as small as possible.
Step 1: Cut the boards that will be used to make the walls of the box. These boards should be cut to the same length, but by no means must they be uniform in width or thickness. In fact, I would advise against cutting them all from the same board! This will add character and depth to your design. If you are using standard plywood for construction, use a table saw or circular saw to cut them all at once. If you are using reclaimed wood for construction, then you will have to cut each board individually (unless you have access to a bandsaw). Make sure that each piece has at least one edge that is flat and straight so that it can be attached to other panels with ease.
The small step up box is a great project for beginners, because it’s easy to make and can be made from materials that you probably have lying around the house.
The first step is to cut the sides of the box. You’ll need two pieces of wood for each side. The dimensions used in this example are shown in the diagram below:
Once you’ve cut your sides, you’ll want to sand them down to remove any rough edges or splinters from cutting them out. Sanding will also help smooth out any imperfections in your cuts.
Next, you’ll need to attach your hinges to one side of the box. To do this, use a drill bit that’s slightly smaller than the diameter of your hinge rod (which is usually 1/4″). Drill holes through both pieces of wood and then insert bolts through them with nuts on the other side so they stay in place securely.
Next, drill holes through each piece of wood where they’ll be attached to one another at the corners of your box (see diagram). These holes should be drilled so that they’re slightly larger than your screws, which will make it easier for you to put them into place without having too much trouble getting them started or stripping out the threads on
A step up box is a tool that is used to raise the height of a source of electricity. These boxes are made from different materials and can be purchased or built at home.

The main material that is usually used for building a step up box is wood. Wood has been the preferred material for many years because it has good insulating properties and does not conduct electricity. The following are the materials you will need:
Wooden plank – Select a thick wooden plank that is at least 1 inch thick and 12 inches wide. Use a circular saw to cut this plank into two equal pieces that are about 7 inches long.
Wooden board – Cut another board into two equal pieces, each one being about 4 inches long. The exact length does not matter as long as it fits inside the two longer pieces of wood perfectly without any gaps or overlaps when they are placed together side by side. This will become your top part of your step up box.
Wooden dowel – Cut out a dowel which has an outer diameter of 0.5 inches, but make sure that it fits perfectly inside the top part of your step up box so that there are no gaps between them when they are placed together side by side on top of each other