Knowing how to build a wooden step stool is important if you only want to use a prop to animate your interior objects soon. This is because the wood will make you feel more comfortable when you climb on the steps. It can also be used as a material for replacement in case of damage if necessary.
So you have purchased your first home, and as part of it’s renovation you have decided to add a few personal touch. This is great, but what if you need to reach that box at the top of the closet? Or in your basement, there are two shelves that are out of reach for even the tallest person (I know this is gender specific and could be neutralized, but humor me). That’s where a step stool or two comes in handy! Since you’re short and I’m tall, I thought I’d build us two different step stools for each level we work on.
How to build a step stool
The most common way to build a step stool is to make it from wood. The steps are made from boards that are cut to the correct lengths and nailed together. You can also use plywood for the steps if you prefer, but it’s probably better to use wood for this project because it will last longer and is easier to work with.
If you have access to a table saw and miter saw, you can cut the steps out of 1×4 lumber. If not, you can buy them precut at your local hardware store in various lengths or sizes (1×2’s).
Measure out the length of each side of your stool and cut 2 pieces of wood that size. The exact length doesn’t matter as long as they are equal in length.
Measure out how wide each step should be – this will depend on how tall you want your stool to be – and cut two pieces of wood that size (1×4’s work well for this).
Cut 2 more pieces for the back support of your two step stool – these should be about 10″ long, depending on how tall you want your finished product to be
Here’s how to build a small step stool.
This project is easy and inexpensive. It can be completed in less than an hour and will cost less than $20. Here are the materials and tools you will need:
1×4 pine or other softwood lumber (3’ long)
1×2 pine or other softwood lumber (2’ long)
Wood glue
2-inch wood screws (1 1/2 inch exterior grade)
Stain or paint, if desired
Tools:
Tape measure or ruler – to measure the wood pieces for cutting; optional but recommended for layout lines on boards before cutting them with power saw; also useful for marking measurements on wood pieces if you use a hand saw instead of a power saw. If you don’t have one, you can use an online tape measure or ruler calculator to determine the length of your board cuts.
Power saw – circular saw or table saw will work; optional but recommended for making straight cuts in plywood tops; also useful for making curved cuts in plywood bottoms if using something like a scroll saw isn’t convenient for you. If using a circular saw, make sure it has a blade guard so you don’t cut yourself while operating it!
A step stool is a useful thing to have around the house for doing tasks that need a little extra height. You can build one yourself, using common tools and materials.
Step 1 – Cut and Assemble the Frame
Cut two pieces of 2×4 lumber in half, lengthwise. Lay them on your workbench, with their edges flush. Then screw them together using two screws per joint. You now have two U-shaped frames that form the sides of your step stool.
Step 2 – Attach the Legs
Cut two 2x4s into four equal lengths (18 inches). Drill holes into each end of these boards and attach them to the frame with 1-inch wood screws through their holes. The legs should be even with the bottom edge of the frame and protrude about 1 inch past it on either side. This will allow you to place rubber feet or caps on top of them so that they don’t scratch up your flooring or damage your hardwood floors if you decide to use this type of wood for construction purposes.
Step 3 – Attach the Top and Bottom Boards
Measure out approximately three inches from each side of each leg at its base and mark where you want to attach another piece
You might be wondering how to build a step stool. It’s not as hard as you think! Here are the steps:
1. Make sure you have all of the materials you need.
2. Cut the wood pieces to size using a circular saw.
3. Sand down the edges of each piece until they are smooth and round.
4. Use wood glue to attach each piece together, making sure to use clamps so that everything is tight enough to hold together while it dries overnight in your garage or basement (or wherever you want).
5. Once the glue has dried, sand over the entire surface again until it’s smooth and even.
6. Cover each side with stain or paint for protection against water and wear-and-tear if necessary
Step 1: Cut the legs.
Cut four pieces of 2×4 to 39 inches in length. Set your table saw blade to 3/4-inch and rip four pieces from the 2x4s. Do this for each leg so that you have a total of eight 39-inch-long pieces.
Step 2: Make the mortises.
Lay two of the legs flat on your work surface, one on top of another, with the top leg facing away from you and the bottom leg facing toward you. Line up one end of each leg with one end of a stretcher and clamp them together using a bar clamp or pipe clamps. Secure these pieces together using two 3/8″ drill bits, drilling through both the stretcher and one leg at each end. Drill through both sides of each joint so that they align perfectly when you put everything together later on in this project.
Step 3: Cut out the notches for the back support crosspieces (optional).
If you want to add back support crosspieces like I did for my step stool, then you’ll need to cut out notches in all four corners of each leg to accommodate them (see photo above). These notches should be about 1/2 inch deep
Step 1: Cut the Legs. Take your 4×4 and clamp it to your workbench with both ends sticking out over the edge of the bench top. With a circular saw or jigsaw, cut through one side of the 4×4 at a point 7 inches from each end. This will give you four legs that are each 14 inches long.
Step 2: Cut the Sides. Set up your table saw with a dado blade set for ¾-inch width and ¼-inch depth and make two cuts ¾ inch from each end on all four sides of each leg (see photo). Don’t worry about making this cut perfectly straight; just make sure you get close enough to the end so that when you screw it together with screws there won’t be gaps between joints.
Step 3: Drill Holes for Hardware Attachments. Using a drill press or handheld drill, drill holes through each leg in line with the saw cuts you made in step 2 (see photo). Then attach a shelf support bracket to each side of your stool using some flathead wood screws; these brackets should be flush with the tops
A small step stool is a handy tool for any home. It can be used for reaching high shelves, cleaning the ceiling fan and even stepping into your bathtub. It’s not difficult to build your own with minimal cost and effort.
Build Your Own Step Stool
You can build your own two-step or three-step step stool using plywood and wood glue or nails. You may also want to consider using screws instead of nails if you want added stability.
Prepare the Plywood
Measure and cut two pieces of plywood to form the base of the step stool. Use a circular saw or jigsaw to make these cuts. You’ll need at least one piece of plywood that measures 2×8 feet long. The other piece should measure 2×4 feet long but no longer than 2×6 feet long because it will be difficult for most people to stand on a step that is too tall without help from another person or object such as a table or countertop. The shorter piece should be placed at an angle as shown in Figure 1 so it can support the larger piece when it’s not being used as a step stool itself yet still provide comfortable support where people can place their feet while standing on it
A step stool is a small, portable stool that you can use to get up onto counters or tables. Step stools are often made of wood and have four legs, but they can also be made of metal or plastic.
Step ladders, on the other hand, are taller and longer than step stools and are designed to let you reach higher places.
Step ladders come in different sizes based on how many steps they have — most have three or four steps — and can be used as an alternative to a stepladder for reaching high places around your home.
In this article, we’ll show you how to build a two-step stool using common household items. You don’t need any special tools or equipment; just follow along with our step-by-step instructions below.
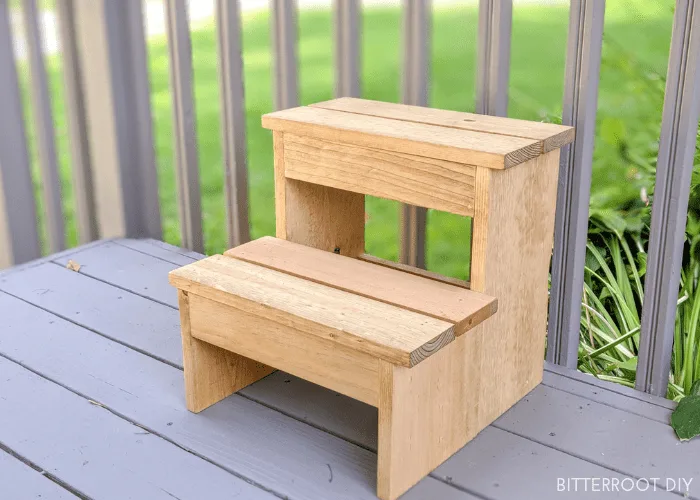
This is a step stool with two steps. This type of stool is easy to build, and it is also very functional.
The first thing you will need to do is to cut the wood into the right size using your table saw or circular saw. You can use any type of wood for this project, but make sure that it is strong enough so that it does not break under pressure. Once you have cut the wood into the right size, you can then drill holes in each board using a drill bit that is slightly smaller than the screws that you plan on using for this project.
You should now take one of the boards and place it on top of another one so that they are aligned properly. Then take a screwdriver and insert its tip into one of the holes that has been drilled into each board earlier on, and then start turning until it goes all the way through both boards at once. Make sure that these two boards are aligned properly before doing this step because if they are not aligned properly then they may end up falling apart when you try to stand on them later on down the line!
Next take some wood glue and apply it onto one side of each board where they meet together in between where they were drilled earlier on with your drill bit
Step 1: Cut the wood

Cut the boards to the appropriate length, width and height. The length of each board should be equal to the distance between your legs when you are standing with your feet together on top of a stool. The width of each board should be about 10 inches less than that distance. For example, if you are 5 feet tall with a leg span of 36 inches, then your boards should be 33 inches long by 9 inches wide.
Step 2: Drill holes in the sides
Use a drill bit that is slightly smaller than the dowel you plan to use as a spacer to make holes in each side piece. You will need one hole per side piece on opposite sides of the board. Drill through both sides at once so they align perfectly. If they don’t align perfectly, simply flip one side over so it matches up with its mate below it.
Step 3: Attach crosspieces
Place two crosspieces across each side piece so that they align with each other and form an X shape when viewed from above (see photo). The crosspieces should also align with each other so that there are no gaps between them when viewed from above or below (again see photo). Screw these down securely using wood screws driven through