Are you looking to build a stair handrail? Are you unsure of the process? Are you installing a stairway and need to know how to prevent accidents with a proper handrail? Then you’ve come to the right place for accurate, helpful and easy-to-understand information about stair handrails. Learn all about handrails for stairs including the basic designs of an inside stair railing or an outside wall stair hand rail, materials and much more at MasterTheHandrails.com
A stair rail (also referred to as a handrail in the UK) is a standardized railing system that is used for stairs and ramps, and is present in many kinds of buildings. It is one of the most important safety elements when it comes to climbing stairs. Stairs are inherently unsafe, but with the proper measures, they can be made reasonably safe for travel.
How to build a stair handrail
Stair handrails are a crucial part of any stairway. They help prevent falls and keep people from slipping on the stairs if they get wet. Stair handrails can be made from wood or metal, but when you’re building a staircase, it’s important to know how to install them properly so that they aren’t dangerous or unsafe.
Handrail Height
The height of stair handrails depends on the location where they’re installed. For example, if you’re installing a stair handrail in a basement, you’ll need a different height than if you were installing one in an attic. Most states have laws about how high the top of your stair rail should be compared to the height of each step.
Before starting any project involving stair handrails, talk with your local code enforcement office or building inspector to find out what regulations apply in your area. You’ll also want to check whether there are any national or state building codes or standards that affect stair rail height requirements before beginning work on this project.
Stair handrails are usually made of wood and can add beauty and safety to your home. You can build a stair handrail from scratch or install one that’s already been built. Either way, it’s best to follow the manufacturer’s instructions for installing the railing. You will need help from someone else if you’re installing a new rail. The steps below show how to build a stair handrail from scratch.
1. Measure the height of each step on your staircase. This measurement will help determine how long the pieces of wood should be when you cut them later on. Cut two pieces of lumber that are 1-inch shorter than this measurement (Example: Your staircase has 16-inch high steps, so cut your two pieces at 15 inches).
2. Lay out all four pieces of lumber so they’re in line with each other and equal in length (about 15 inches). Then drill holes along the edges where they all meet so that they’ll connect together in Step 3 without any gaps between them.
3. Use nails or screws to connect all four pieces together into one continuous piece by screwing them into each other through those holes you drilled earlier — making sure there aren’t any gaps between them
Building a stair handrail is easier than you might think. Follow these tips to build your own staircase handrail quickly and easily.
Step 1: Measure the Staircase
Before you begin building a stair handrail, you’ll need to measure the space it will occupy. This includes measuring from floor to floor as well as between each step. Once you have these measurements, add 2 inches for each side of the stairway and make sure that your total length is within 24 inches of the height of your handrail.
Step 2: Cut the Wood
Once you’ve determined the dimensions for the staircase handrail, cut two pieces of lumber for each side of your staircase using those dimensions. For example, if your staircase measures 24 inches wide by 48 inches tall, cut two pieces of lumber at 48 inches long by 24 inches wide for each side of your staircase (96 inches total). These pieces will be used to create both sides of your stairway handrail as well as its top and bottom supports.
Building a stair handrail is an easy DIY project that will make your stairs safer and more attractive. The steps are simple: cut the top rail, then cut and install the bottom rail. You’ll be finished in just a few hours with a custom-made railing that’s sturdy, functional, and beautiful.
Step 1: Cut the Top Rail
Use a miter saw to cut the top rail to length. Miter cuts are recommended because they look better than straight cuts, and they prevent splintering on rough surfaces like pine or cedar.
Step 2: Cut Cross Members
Cut the cross members to length using a table saw or circular saw. Cross members are typically made from 2x4s, but you can use any wood that’s strong enough to support your weight (or at least 250 lbs.). Measure twice before cutting once so that all of your cross members are exactly the same size.
Step 3: Install Cross Members on Top of Stairs
Mark where each cross member will go on top of each step with chalk or painter’s tape — this will help keep everything in place while you’re installing it. Then screw each cross member into place with deck screws
The most common method for installing a handrail on a staircase is to use a continuous system. This type of handrail typically consists of two balusters mounted between each support post. The balusters are connected together by a stringer (a 2×6 or 2×8 board) that runs parallel to the steps.
The installation process is straightforward and depends on the size of your stairway and whether you’re installing new stairs or replacing an existing set. The first step is to determine what type of handrail system you need: straight, curved or spiral.
Step 1: Measure the length of each step and add 3 inches to determine how long each piece should be. For example, if your stairs have 12 steps and are 20 inches wide, multiply 20 x 12 (240) and add 3 inches (267). This will give you the length of each piece needed for your staircase.
Step 2: Measure from the top step down to where you want your top baluster mounted in order to determine how many sections of stringers will be required for your stairway.
Step 3: Cut all pieces according to measurements determined in Step 1 above, then mount them on the posts using construction adhesive and screws according to manufacturer specifications
How to Place a Handrail on Stairs
Place the handrail against the wall and mark where the top of the rail hits. This is where you attach your railing to the wall studs. Use a stud finder to locate where the studs are in your stairs. You’ll need at least three studs in a straight line for this project. You can use four if you have them available, but it’s not necessary.
Once you’ve marked your top mounting point, measure down from there and make another mark that is 1/2 inch higher than your first mark (for standard 2×4 framing). Now measure from that mark down 1/2 inch and make another mark at that level. These two marks represent where we will be cutting our holes for the lag screws we’ll use to mount our handrail to the studs in our staircase.
If you’re using 2×4 framing like I am here, use an electric drill with a 5/16-inch drill bit to pre-drill holes at these locations before attaching your handrail with lag screws (you can also use wood screws). If you’re using 2×6 or larger lumber, skip this step because it won’t work well
How to make a stair handrail return
Step 1: Mark the cut line on the 2×4 using a pencil.
Step 2: Cut the 2×4 with a circular saw or handsaw.
Step 3: Measure and mark the locations of the vertical balusters on the stair railings. The first baluster should be located 4 inches from each end of the handrail and every 24 inches thereafter.
Step 4: Drill pilot holes in each location where you will be attaching your balusters. The pilot hole should be slightly larger than the diameter of your screw shank so that it can grab onto it easily when you begin driving them into place. If you’re using screws that have nuts on them, drill these holes as close to the top of your rail as possible so that they don’t interfere with your ability to tighten them up properly later.
Step 5: Install screws into all of your balusters using an impact driver or manual screwdriver and pliers if necessary (don’t use an electric drill).
How to Place a Handrail on Stairs
A handrail is a safety feature that helps prevent people from falling down stairs. It’s important that you install the railing correctly and use it properly, so you don’t risk injuring yourself or others.
A stair handrail should meet all local building codes, including height requirements and construction materials. When installing a new stairway, consult with your local building department regarding what types of materials are acceptable for your project.
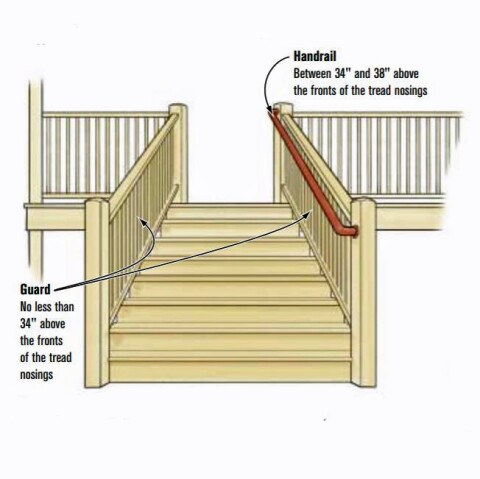
Stair Handrail Height Requirements
In most cases, the required height of a stair handrail is about 36 inches (91 cm). However, this varies from one jurisdiction to another; check with your local building inspector before starting any work on your stairway. In addition to keeping you safe if you trip or slip on steps, handrails also provide comfort by allowing you to hold onto something as you make your way up or down stairs.
Installing a stair handrail is a relatively easy DIY project. The first step is to determine the length and height of your handrail.
Measure the height and width of your stairwell. Subtract 1/8 inch from each measurement, as handrails typically have a 1/8-inch gap between them. This will ensure that your railing doesn’t interfere with other posts or rails in the house.
For example, if you have a 36-inch high staircase, measure up from the bottom tread to determine the correct height for your handrail. Then, subtract 1/8 inch from that measurement so that there’s room for other posts or rails in the future. Your measurement should be 35 inches (36 inches – 1/8 inch = 35 inches).
Measure across at the top and bottom of each stair tread. For example, if your stairs are 32 inches wide at the top and 26 inches wide at the bottom, then you need to have a 40-inch long handrail (32 inches + 26 inches = 58 inches; 58 divided by 2 = 29; 29 plus 7 = 36).
If you’re installing a curved staircase or an open flight of stairs that leads up to another level, then add three inches to each
The standard height for a handrail on stairs is 36 inches above the treads, according to the U.S. Department of Housing and Urban Development’s Fair Housing Accessibility Guidelines (FHAG), which are used by the U.S. Department of Justice to enforce the Americans with Disabilities Act (ADA). According to the FHAG, a handrail should be between 27 inches and 34 inches from the top step of a flight of stairs. A 36 inch handrail will fit between these two measurements and comply with both code and ADA requirements.

Place the first piece of wood under both ends of the stairway and nail it into place with two nails at each end, so that it extends over the edge of each step about 1/4 inch on each side. Measure up from this board to see how far you need to cut your next piece of wood so that it fits between your first piece and each step underneath it. Cut your second piece of wood so that its top edge is level with your first piece’s bottom edge, then nail this piece into place over both ends of each step in order to create an L-shaped railing around all sides of your stairway except for one side where you’ll leave space for walking through without hitting anything when going up