Learn how to build a wooden snake rack from a professional snake keeper. Check out this blog if you want to know how it’s done.
Herpetoculture is the term used to refer to the hobby of keeping reptiles and amphibians as pets. Whether you are interested in a Python, Turtle or Tortoise, this article will help you to build a Snake Rack you can keep your pet.
How to build a snake rack
If you have a snake, or are thinking about getting one, it’s a good idea to get a snake rack. A snake rack is a great way to safely house your pet and protect them from other animals, such as cats or dogs. You also want to make sure that they are safe from other dangers, such as an escape attempt while you are not home.
You can build your own wooden snake rack quite easily, or you can purchase one already built online or in stores. Here are some tips on how to build a wooden snake rack:
Choose the right wood for building your snake rack. You should use something durable and sturdy like cedar. Cedar has natural oils that repel insects and mold, so it is perfect for keeping your pet safe from these types of threats while they are housed in their new enclosure.
Cut all of your pieces to size using a tape measure, saw and leveler. Make sure all of your measurements are exact so that everything fits together perfectly when you’re done with this step!
Use wood glue on all joints before screwing anything together so that everything stays put without having any problems later on down the road!
There are many ways to build a snake rack. A DIY snake rack is easy to build and perfect if you are on a budget and do not have the money to purchase one. If you want something more permanent, then a wooden snake rack would be a good choice.
If you already have a place for your snake, then building your own rack may be easier than moving it. If you don’t have a place for your snake or want something different than what you currently have, then there are many options available for purchase that can be used as a DIY snake rack.
There are some things you should consider before deciding how to build your snake rack:
What type of cage do I want? Will it be portable? Do I need an escape proof cage? Can I find one in my price range? How big does my cage need to be? Do I want glass front doors or wire doors? Will we need shelves or platforms inside the cage? How many snakes will we keep in our cage at once (1-2-3-4)? Should we have separate racks for each species? What kind of lighting do we need (full spectrum bulbs, heat lamps, etc.)? Do we need ventilation holes in the top lid of our cage (yes/no)?
Building a snake rack is a relatively simple task that you can complete with basic carpentry skills and tools. A snake rack is typically made from wood or metal and can be built in any size to accommodate the number of snakes you plan on housing.
The first step in building a snake rack is deciding what kind of material you want to use. Wooden snake racks are less expensive than metal ones and can be made from any type of wood such as oak, pine or cedar. Metal racks are more durable but tend to be more expensive because they require more materials when building them.
Once you have decided on your materials, make sure that they fit together properly before beginning construction so that everything fits together nicely once complete. You may need some help from friends or family members if building an entire rack by yourself isn’t possible.
The easiest way to create a snake rack is to use a piece of plywood and some shelving. A lot of people just take the standard shelving that you can get at any hardware store, but you can also use any other type of wood that you may have lying around.
First, cut your wood pieces to size. Make sure that they are wide enough so that the snakes will be able to move around comfortably. You should also make sure they are long enough so that they can fit in your cage. If you plan on buying a new cage, then use one of the dimensions from the packaging as your guide for how big your rack should be. If it isn’t listed on there, then just measure one side of the tank and double it so that you know how long each section of wood should be (this will help with measuring out where each shelf goes).
Next, take two pieces of plywood for each shelf (or more depending on how many shelves you want) and screw them together into one solid piece (make sure they are level so that they don’t wobble). To do this, take one piece of plywood and place it flat on top of another piece facing up (this will give them something to rest against when
How to build a snake rack, the instructions are simple and easy.
The first step is to get all your materials together, you can use any kind of wood but I prefer cedar because it has a nice smell and will last longer than pine. The second step is to cut your pieces of wood using a table saw or circular saw. The third step is to put them together using nails or screws, whichever you prefer. The fourth step is to put your snakes in their new home!
How to build a custom snake rack
Building a wooden snake rack is a straightforward project that can be completed in a matter of hours. You will need some basic tools, but there are no complex cuts or special skills required. The only thing that may slow you down is deciding whether you want a single level, double level or even triple level rack.
Step 1: Decide what kind of snake rack you want
There are two main types of snake racks: those with levels and those without levels. If you want multiple levels to store your snakes in different sizes, then it makes sense to go with one that has no levels — this allows for more flexibility in terms of how many snakes you can keep at any given time. However, if all your snakes are about the same size and shape, then having one level makes more sense as it will be easier to organize them all together.
Step 2: Choose the size of your snake storage unit
The main consideration when choosing the size of your storage unit is how many snakes you have currently and how many you expect to have in the future (if any). If you have only one or two snakes right now but plan on getting more soon, then it’s best to choose something large enough to accommodate
How to Build a Wooden Snake Rack
Building a wooden snake rack is a great way to add some extra storage and display space for your reptiles. It also gives you the opportunity to create something that’s uniquely yours and unlike anything else in your home or garden.
What you will need:
Wood saw
Drill
Sandpaper (grits of 60, 120 and 220)
Stain or paint (optional)
Wood glue or Titebond wood glue
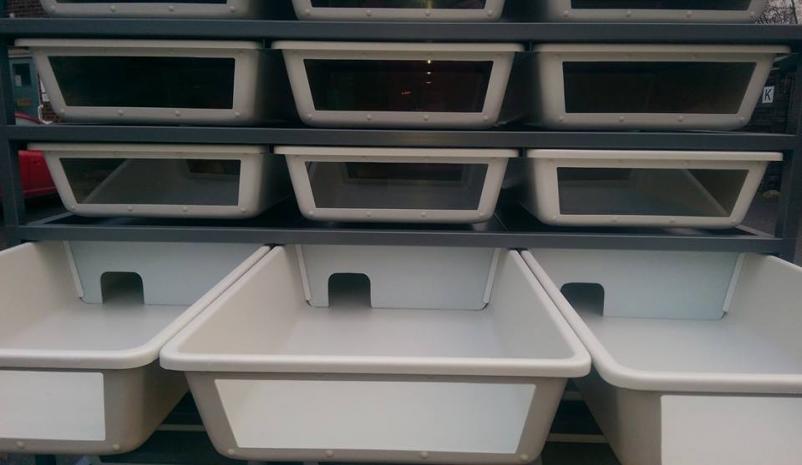
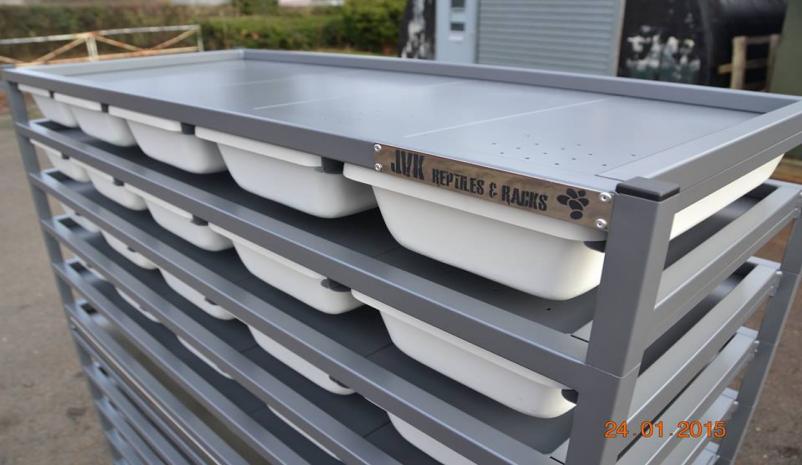
The snake rack is a utility tool that is used to hold snakes in their cages while they are being transported. It can also be used to make sure that the snake is not harmed while being transported. The snake rack is made of wood and it has a design similar to that of a small cage. It has two sides with holes at the top, which allows you to put your hands through them so that you can hold on to the snake while transporting it.
The best thing about the wooden snake rack is that it can be customized according to your needs. If you want to build one for yourself then here are some tips for you:
1) Choose the type of wood based on your preferences – You have many options when it comes to choosing the type of wood for this project. You can choose from different types such as pine, cedar, redwood or any other type that comes close in quality and price as well as appearance wise.
2) Measure the dimensions – You should measure the dimensions carefully before starting off with this project because if something goes wrong then there is no turning back! Make sure you get all measurements right before cutting anything out!
3) Cut out the pieces – Once everything has been measured out then go ahead
The most important thing you need to know about building a snake rack is that it can be done in any size and any shape you want. The only thing that matters is how many snakes you want to store.
Here are some ideas for building your own snake rack:
Use wood or metal. If you’re going to use wood, make sure it’s pressure-treated, which provides protection against rot and termites. Metal can be more expensive than wood, but it also may last longer and look nicer in your home.
Build it yourself or hire someone else to do it. If you don’t have the skills necessary, consider hiring someone who does have them — especially if they have experience building snake racks before.
How to put together a snake rack
A snake rack is a simple, affordable way to keep your snakes in one place and make feeding them easier. It’s also a great way to display your pet snakes. Here is how to build one:
Materials
For this project, you will need the following materials:
16 feet of 2×4 lumber
Four 4-inch wood screws
Two sheets of plywood (for the bottom)
One sheet of plywood (for the top)