How do you build garage storage cabinets?Building garage cabinets has never been easier! StorageMadeEasy.com is a premier provider of garage storage cabinets no matter if you are looking for commercial or residential storage. We understand that your storage needs vary and we carry a variety of sizes, shapes and colors to suit your specific needs. Our DIY garage cabinet projects are straightforward, easy to follow and detailed with numbered pages, pictures and diagrams so there are absolutely no issues when building your own garage cabinet.
How to Build a Cabinet for Storage. Building a simple cabinet is an easy project that can be done in a weekend by most carpenters. The first step when building a cabinet is to measure the space it will fit in and the objects you will store inside it. Make sure the cabinet’s doors are wide enough to accommodate the items you want to store in it.

How to build a small cabinet with doors
This article will give you the steps on how to build a simple cabinet box. This is a very easy project that anyone can do.
The first thing you need to do is buy your materials at the home improvement store. I bought 2 sheets of plywood and 4 oak doors for my project.
You then need to cut all of your pieces so that they are exactly the same size and shape. The easiest way to cut plywood or any other material is with a circular saw with a guide attached to it. If you don’t have one, you can use a straight edge and a hand saw but it will take much longer than using power tools.
After cutting all of your pieces, sanding them down with sandpaper until they are smooth and ready for painting or staining. You will also want to sand down any rough spots on your wood because they will show when you paint or stain them!
Once your pieces are ready for painting or staining, make sure to wipe them down with an oil-based primer before applying any paint or stain so that there is no residue left behind from sanding!
Once everything has been primed, it’s time to start painting! You can choose whatever color scheme
Making a simple cabinet box is a great way to add storage space to your home or office. The project is easy enough for anyone with basic woodworking skills and tools, and it will only take about a half hour of your time.
how to build small storage cabinet
The first thing you’ll need to do is measure the space where you want to install the cabinet. Measure from top to bottom, front to back, and side to side. Then measure the height of the tallest items that will be stored inside the cabinet.
Once you’ve done that, you can cut all of your pieces at once using your miter saw or table saw (if you have one). If not, just cut each piece separately using a circular saw or jigsaw. This project only requires two boards (the sides) and two shelves (the bottom and top), so if you don’t have either a table saw or circular saw, then stop here and buy them! They’re super handy tools that will allow you to make all kinds of projects much easier in the future!
Once all four sides are cut at 45-degree angles on both ends, lay one side on top of another and line up their edges flush with each other. Then drive three screws through both boards into one end of an 8-foot 2x
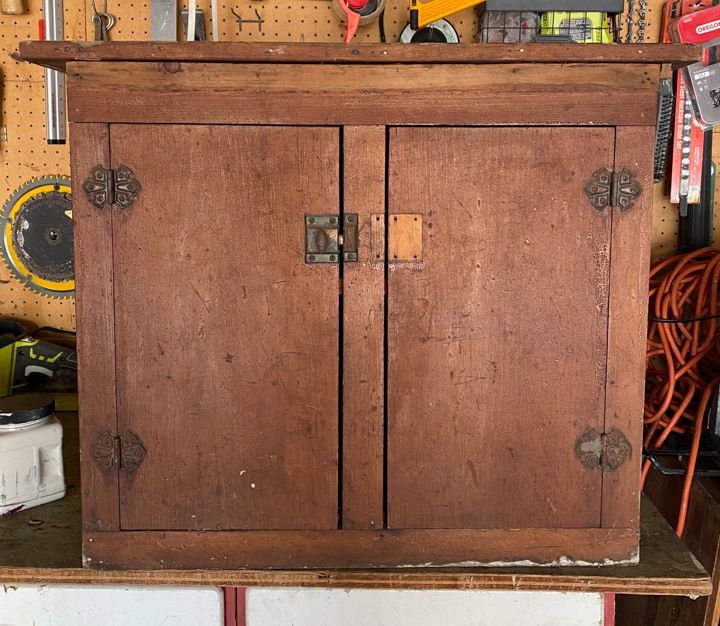
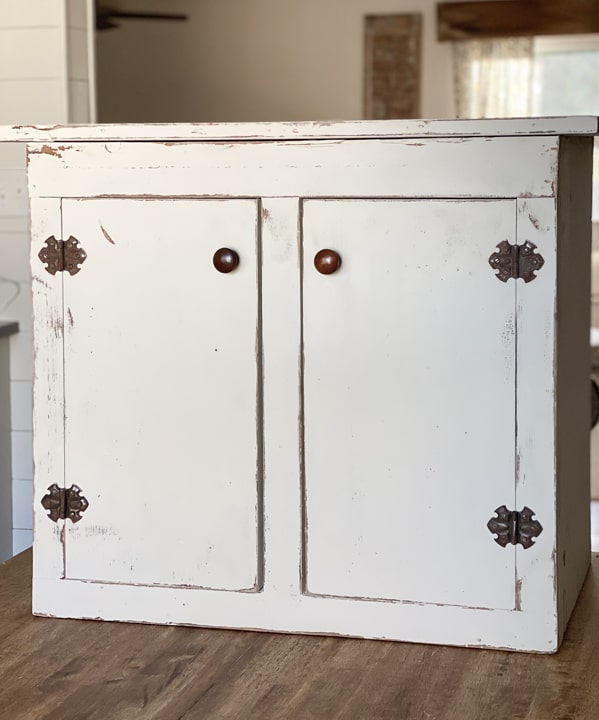
A cabinet is a box with doors, typically used for storing items. It has many uses in the home, including as a place to store kitchenware, household items, and cleaning supplies. People also use cabinets to store personal items such as clothing, shoes and small appliances. The simplest type of cabinet is constructed using boards and nails, but more complex ones can be constructed using woodworking tools.
Step 1: Cut the Boards
Cut the boards to size using a saw or table saw. If you are using plywood or MDF for the sides of your cabinet, cut one side at a time so that it does not warp due to humidity in your workshop before you start working on another side. Use clamps to hold each board together so they do not move around while you are cutting them with your saws. Make sure that each board is level before moving on to the next step so that your project will come together smoothly after assembly.
Step 2: Attach the Sides Together
Attach the sides together by screwing them together carefully with screws in between each joint where two boards meet up against one another at an angle — this will create an angled corner on each side of
There are many different ways to build a cabinet box, but this is one of the easiest. It’s perfect for those who have never made a cabinet before, and it’s also good for getting practice on the basics of building furniture.
The materials used in this project are simple: pine boards cut to size, wood screws and glue. The only special tool you’ll need is a power drill with bits that drill holes for screws.
Step 1: Cut the pieces
Cut all your pieces according to the cutting list. Make sure you get both sides of each board. If you’re using plywood, you’ll only need one side; if you’re using solid wood, use both sides.
Step 2: Assemble the box frame
Assemble the box frame on a flat surface using glue and 2″ finish nails driven into predrilled holes. Make sure all joints are square and tight-fitting so they won’t come apart later when you’re pushing them together with clamps during gluing up.
Step 3: Glue up the panels
Cut out two pieces of ¾” plywood or MDF large enough to cover both sides of each panel (if you’re using solid wood). Apply glue liberally to both sides of each panel (or
This cabinet is built from 1/2-inch-thick pine boards. The frame is made of pine and poplar, while the face frame is made from oak plywood. The drawer box is also made from 1/2-inch-thick plywood. A door pull was installed on the front of the cabinet, but it can be added to any panel or surface.
The cutting list for this cabinet includes:
3/4″ x 4′ x 8 – Pine Board (sides)
3/4″ x 4′ x 8 – Poplar Board (sides)
3/4″ x 2′ x 8 – Poplar Board (rail)
1/2″ x 5′ x 7 – Oak Plywood (face frame)
How to Build a Simple Cabinet Box
Step 1: Cut your pieces. You’ll need one piece of wood for each side, front and back of the box. The piece for the back can be shorter than the rest — it just needs to be wide enough to cover the back of the hinges and have room for a handle on top. For all pieces, cut them about 2 inches larger than your measurements so you can trim them down later.
Step 2: Attach the hinges. Lay out your box on a flat surface and place one hinge 2 inches from one end of each side and one hinge at the center of each side. The other ends should be flush with your pencil marks. Screw in the hinges with screws that are long enough to go through all four pieces of wood (1 inch). These will hold everything together, so make sure they’re secure!
Step 3: Attach handles or knobs (optional). Attach handles or knobs if you want them; this is where I put my handles because they were already on hand from another project I was working on at home! You can do this before or after step 2; just make sure they’re aligned with each other so they appear symmetrical when closed up
This is a simple and easy way to build a cabinet box. You will need the following tools:
1. Jigsaw or coping saw
2. Drill
3. Clamps and vice
4. Square and speed square (optional)
5. Planer and jointer (optional)
Small storage cabinets are a great way to organize your garage, basement or bedroom. They’re also a quick and easy project that anyone can do.
1. Cut two pieces of 3/4-in. plywood to the size you want your cabinet to be. The length should equal the depth of the cabinet plus 2 in., and the height should equal the depth plus 1 1/2 in. For example, if you want a 24-in.-deep cabinet, cut two pieces of plywood that measure 30 in. by 24 in.
2. Measure down from one edge of each piece of plywood 1/2 in., then make marks at every inch along this line using a ruler as a guide (Photo 1). Do this on both pieces of plywood so they match perfectly when attached together later on.
3. Use an angle finder or protractor to draw lines from each mark across all four sides at 45° angles (Photo 2). Make sure your lines all go in one direction so they’ll fit together easily later on! You can even use an electric drill with a spade bit set at 45° for this step if you have it handy instead
A simple cabinet box is a great way to add extra storage space in your home. With easy-to-follow plans, this cabinet can be built in just a few hours. The best part? There is no need for a table saw or miter saw. All you need is a jigsaw and drill.
If you are looking for a simple storage solution, this project might be just what you have been looking for.
Here are the supplies needed to build this cabinet:
3/4″ plywood (1 sheet)
1/4″ plywood (1 sheet)
Drywall screws (50+)
Wood glue
The simplest way to build a storage cabinet is with a box. The box is basically a 4×4-foot piece of plywood or particleboard with two sliding doors. The box can be built in your garage or workshop and then moved into the kitchen or pantry area.
You can buy a ready-made storage box from any home improvement store or lumberyard, but if you’re handy with tools, it’s easy to build one yourself for about $60-$80.
The first step is to measure the space where you want to put the box. Measure from the floor up to the top of the shelf where you want it to stop. Then subtract 2 inches from that number to allow for clearance under the bottom shelf (or even more if there’s a lip around your cabinets).
Next measure how deep you want each shelf to be so you can figure out how long to make each side of your box and what size plywood board will fit inside with no overhang on either end (usually around 24 inches).
Cut three pieces of plywood equal length by adding 12 inches to the overall depth measurement plus 4 inches for overlap at each end (for example, 44x30x12+4=84 inches). Cut two pieces of plywood equal width