sliding gates are one of our most requested types of fence gate. they allow you to be able to drive in and out with ease and automatically close behind you – offering privacy or a level of containment.
Sliding gates are the preferred type of gate for many people. It is easy to open and close them. They are also secure. You will find them in many backyards. They look great, too! Before you begin building your gate, it is important that you measure the area where you want to install it. It should also be durable, strong and beautiful.

How to build a sliding gate
A sliding gate is an excellent way to add privacy, security and beauty to your home. They are easy to install and can be used on any type of fence, including vinyl, wood and chain link. The best part about sliding gates is that you can choose from many different types of materials and designs to create the perfect look for your yard.
Materials Needed:
Fence Support Posts – These posts should be placed every 2 feet along the top rail of your fence. You will need 4 posts per gate. The post should be set into concrete every 6 feet in order to support the weight of the gate.
Sliding Gate Hardware – You will need this hardware (often sold as a kit) to connect your sliding gate hardware to your fence posts. This hardware includes hinges and rollers which allow the gate to slide back and forth easily once installed.
How to Build a Sliding Gate for a Wood Fence
Step 1: Install an Efficient Gate
A good sliding gate should be easy to open and close. A simple way to do this is by building a frame with T-shaped supports and attaching it directly to the fence posts.
Step 2: Attach the Frame to the Posts
Using lag screws, attach the T-shaped supports to the post on each side of the gate opening. Leave enough space between them so that they don’t interfere with each other when opening or closing.
Step 3: Install a Track for Your Sliding Gate
Attach a track along each side of your fence using lag screws or carriage bolts. Make sure that it’s level and sturdy enough to support your gate when it’s open. Use plumb bob lines as a guide for installing these pieces of lumber so that they are straight and even with one another.
Building and installing a sliding gate for your wood fence is a simple project that you can do with just a few tools. The gate will be made from 1x4s and constructed from basic framing techniques.
Step 1: Select the Location for Your Gate
First, decide where you want your fence gate to be located. Considerations include:
How wide you want the opening to be (typically 36 inches)
How much clearance space is needed on either side of the opening (typically 24 inches)
The height of your existing fence (gate should be higher than this)
The amount of privacy you need (you can add a solid board or lattice panel above or below the gate opening)
How to Build a Sliding Gate for Your Wood Fence
1. Use a tape measure and pencil to mark the location of the gate on each post. The distance between the posts should be no more than 10 feet (3 m).
2. Drill pilot holes through each post’s face with a power drill/driver and masonry bit, then hammer in a metal bar that will hold them together while you work on them.
3. Lay out the top rail (top horizontal piece) and bottom rail (bottom horizontal piece). They should fit tightly against each other and be straight from end-to-end. Keep in mind that your bottom rail will need to be at least 2 inches (5 cm) taller than the top rail so it doesn’t slide under it when closed.
4. Attach the top rail to one end of the gate frame by driving 3″ screws through predrilled holes every 6 inches (15 cm), being careful not to drill into any electrical wiring or plumbing pipes that might lie underneath your decking boards. Repeat this step on the opposite end of the gate frame using 2″ screws instead of 3″.
5. Attach two hinges onto both ends of your gate frame, making sure they’re positioned so that they swing freely
Sliding gates are an easy way to enclose your property without having to build a permanent fence. They’re also an extremely effective way to keep animals contained and safe.
You’ll need some basic carpentry skills and tools, but the process is straightforward and simple. Here’s how to build a sliding gate for your wood fence:
Step 1 – Measure Your Fence
The first step is to measure your fence and calculate how much wood you’ll need. For example, if your fence is 4 feet tall and you want it to slide on a track, you’ll need 2x4s for the bottom rail, 2x4s for the top rail, and 4x4s for the posts. The post-to-post distance must be equal to or greater than the length of your sliding gate.
To calculate how much lumber you’ll need, multiply the height of your gate by its width and divide that number by 36 inches (the width of a standard 2×4). Then add 1 inch so that there’s room between each board end when they’re stacked together.
How to Build a Sliding Privacy Fence Gate
Sliding gates are a great option for any home with limited space. They are also a good choice if you have an existing fence that needs to be extended with a gate, as they can be added to any type of fence. If you have an existing fence with no gate, then installing one will require some work but is still relatively simple.
Materials Needed:
2×4 lumber (8) — 36” long and cut into 4 pieces at 30” long
2×4 lumber (5) — 36” long and cut into 4 pieces at 15” long
1×3 lumber (10) — 36” long and cut into 2 pieces at 15.25” long
2×2 wood furring strip — 72” long—used for inside face frame of gate
1/4-inch thick plywood sheeting — 72” x 32”—used for outside face frame of gate**
A sliding gate is a good choice if you want to keep your yard open and accessible. It’s an excellent way to keep your kids safe without sacrificing the open feeling of your home. Sliding gates are also great for keeping pets in or out of areas where they’re not welcome.
You can build a sliding privacy fence gate using a variety of materials, including wood, metal and vinyl. Each material offers unique advantages, but it’s up to you to decide which one is best for your situation. To help with this decision, here are some guidelines on how to build a sliding privacy fence gate:
-Make sure the gate fits the opening properly. If you’re building the gate yourself, make sure that the measurements are correct beforehand by measuring both sides of the opening and making sure they match up perfectly before marking out where everything goes on the wood or metal stock (the length of material used). If the measurements aren’t right, then everything else will be off as well—from how high or low the gate sits in relation to its frame to how tight or loose it fits into its frame when open or closed.
-Consider how much weight your gate needs
How to Build a Sliding Gate for a Wood Fence
A sliding gate is a great way to add privacy to your yard, especially if you don’t want to install a traditional wood fence. They’re also easy to build yourself with basic carpentry skills and some basic tools.
Take your time and measure twice before cutting any pieces of wood. The gate should be at least 24 inches wide and at least 3 feet tall, but you can make it as wide or tall as you want. The frame will include two sides and two ends, which will all be made of 2-by-4s. If you have access to treated lumber, it’s best to use it because untreated wood will rot quickly in the weather.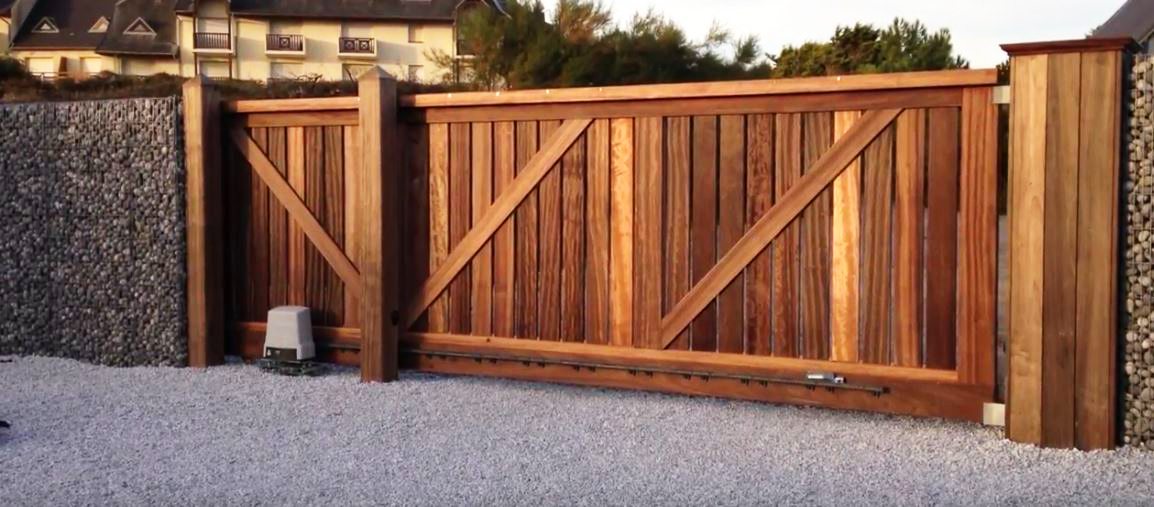
To build the frame for the gate, first mark out where each piece of wood needs to go on the ground using stakes and string. Then take one side (a 2-by-4) and mark out where each notch needs to be cut on top and bottom using a speed square or framing square. Cut these notches using a handsaw or circular saw (if available). Place this side up against one end of your line on the ground so that one edge is flush against the string line and drive four screws through each notch
1. Using a circular saw, cut the bottom rails (1×4) to length at about 4 1/2″ above the bottom of the posts. Set the depth of the blade to 1/2″ and cut each piece from one end to another, so they will butt together tightly when installed.
2. Using a level, mark a plumb line on each post, starting at the top and working down to where you want your gate to be.
3. While holding your level vertically against the top edge of your post, use a pencil to mark along the top edge of your post where it intersects with the plumb line drawn on it. Then draw another line across that intersection point at about 1 1/4″ above it and make another mark on either side of this new line at 4 1/2″ from where it intersects with the top edge of your post (see photo).
4. Place one rail into each notch as shown in photo and drill pilot holes through them into each post using an impact driver or drill/driver set for wood screws and 3/8″ wood screws (if you don’t have access to an impact driver). Secure both rails in place by driving
You can easily build a sliding door for your fence using basic tools. The project requires only a couple of hours and can be done by most people with little experience.
Materials:
2 4x4s, 2-inch thick
2 3/4-inch deck screws
1 1/2-inch finish nails
1 piece 1/4-inch plywood cut to fit (or other material)
1 small piece of wood for the center support beam (optional)