The original camper was built in the 1930s and included a “slip out” for sleeping. Today, RV manufacturers have caught on that more people prefer slide outs to expand living area. While it’s easier than ever to add a slide out, building a motor home slide out is less difficult than you might think.
How to build a slide out is a question people often ask when doing camper conversion. The reason being a slide out increases the livable space by up to 25% and can be slowly extended while traveling. Even better, it’s also cheaper than buying a larger motorhome. But before going into the details of how to do one, let’s first have a look at why you’d want to do such a conversion in my opinion:
How to build a slide out on a camper
If you love camping and want to take your RV with you, then you may be looking for ways to make your life easier. One of the best ways to do this is with a slide out. You can easily install one on your camper, allowing you to have more room inside of your vehicle. If this sounds like something that might interest you, then keep reading for some helpful tips about building motorhome slide outs.
The first thing that you need to do when building a motorhome slide out is learn how to open it. There are two different types of lifts available: manual and electric. The manual lift works by using a crank handle and cable system while the electric lift is powered by batteries or an electrical outlet. Both can be installed on any type of RV and they both offer different advantages and disadvantages that need consideration before deciding which type of lift will work best for you.
Slide out is a mechanism that allows you to extend your camper’s living space. This is a must-have feature if you want to enjoy the outdoors with your family. It also adds more space inside the cabin where you can store some of your stuff. But before buying one, you should know how to build motorhome slide out.
The first step in building a slide out is measuring the length and width of your RV. You will need to know these measurements so that you can find out which brand would fit perfectly on your vehicle. If possible, take note of the height too because it will also affect how much room there is inside the camper once installed.
Next, choose a model that fits with your budget and preference as well as materials used in its construction (aluminum or steel). Some manufacturers offer an option where they can install it for you while others require you to do it yourself by following their instructions included in the package or online manual included on their website or YouTube channel (if they have one).
If it’s DIY-friendly, then make sure to follow all instructions carefully especially on how to open motorhome slide outs because this may be different depending on brands available in stores like Home Depot or Lowe
Slide-out motorhomes are perfect for those who want to have a roomy camping experience. The slide-out system opens up the living space and gives you more room to move around. You can enjoy this feature with your own camper by building your own slide out on a camper.
The following steps will help you build a motorhome slide out:
Measure the length of the deck that needs to be extended, as well as its width. Determine how much room you need to add to each side of the deck by measuring from both ends of the existing slide out opening. Add these two measurements together and subtract them from the overall length of your slide out deck, which is usually about 8 feet long. This will give you the amount of wood that needs to be cut for each side of your new slide-out motorhome extension
Cut two pieces of 2×6 lumber for each side of your new motorhome extension, using the measurements from step 2 above. Cut one piece at least 13 inches longer than its width so that it can be used as a header piece for attaching other boards together
Take one header board and attach it onto one side of your motorhome using either screws or nails through predrilled holes in each end
You can install a slide out on a motorhome by yourself. A slide out is basically a box that slides out of your RV, providing you with more living space. This can be used as an extra bedroom or just provide more room for storage and activities inside your RV.
Slide outs are easy to install but there are some things you need to know before starting this project. Here’s what you need to know:
How do I open my RV’s slide-out?
You can open it manually or electronically by using a remote control device or switch panel inside your RV. If it doesn’t have an electric system, then there will be some type of manual mechanism involved in opening the slide-out.
How do I build my own motorhome slide out?
You’ll need to measure the length and width of each side of your RV before buying anything for your project. You also need to consider how wide each side is going to be when opened up completely so that you don’t buy something too small or too big for what you’re trying to accomplish with this new addition to your motorhome!
Step 1: Make a Sketch
The first step is to make a sketch of your camper. You should include all of the details, such as where you want the slide out and what side it will be on. You can use a piece of graph paper for this step.
Step 2: Cut Out the Opening
Use a circular saw or band saw to cut out the desired opening in your camper’s walls. The best way to do this is to use a jigsaw, but if you don’t have access to one, then use a reciprocating saw instead. You can also use an electric drill with metal bits if you want the edges smooth and clean.
Step 3: Install the Body Lift Support Brackets
Use self-tapping screws or pop rivets and steel tubes to install new support brackets inside your camper near where you made the cutout. These will help support the weight of whatever material you are using to create your slide-out flooring system.
Slide out:
The slide out is one of the most important features on a motorhome. It gives you extra space to store and use items when you’re traveling. Slide outs are also an excellent way to increase the size of your living space without having to buy a new camper.
Camper slide outs are not always easy to open, but they don’t have to be hard. If your slide-out is not working or you want to know how to build a motorhome slide out, there are some things that you need to do first.
Here are some steps for how to build a motorhome slide out:
1. Inspect and clean your camper door tracks and slides. Make sure that all parts are aligned properly, free from dirt and debris, and lubricated with silicone spray or WD-40 as needed.
2. Check your electrical system for proper voltage levels (110 volts AC). If necessary, replace blown fuses or bad wiring connections with new ones before proceeding with any further repairs on your slide-in camper door tracks or slides.
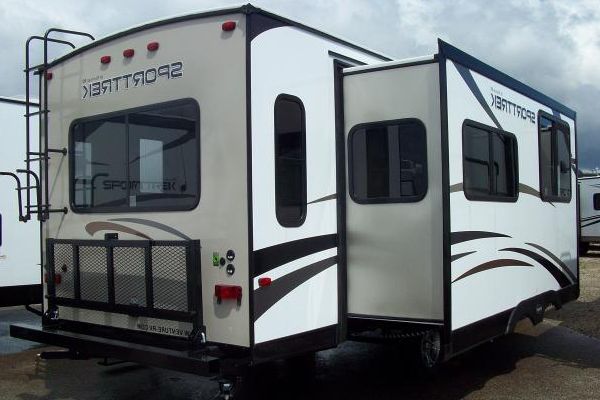
A slide out is a long, usually hinged section of an RV that allows for more living space. They are common in motorhomes, but can also be found on fifth-wheel trailers and travel trailers. The following article will discuss how to open the camper slide out and the different types of slides available.
The first step in opening the camper slide out is to make sure your vehicle is parked on level ground. If it isn’t, you may have difficulty moving the slide or even damage it. Once you’ve ensured that your vehicle is parked level, take note of which side of the vehicle has the controls for opening the slide out. In most cases, they are located on one corner near the foot of the bed area closest to where you enter the cab area when entering or exiting your vehicle. The following steps outline how to open a camper slide out:
1) Check if there is any debris in front of where you want to open the slide out door – often times there will be dirt or gravel that needs removed before proceeding with opening up your trailer’s door (or ramp). You should also check if there are any
A slide out is a motorhome feature that allows you to extend the living space by sliding out the couch or bed.
Here’s how to open a slide out on a motorhome:
Step 1: Remove the latch pin from the end of the coupler tube.
Step 2: Slide out the coupler tube and place it on top of your vehicle.
Step 3: Lower the hitch arm until it’s resting on top of the vehicle.
Step 4: Use a wrench to loosen and remove the nuts holding down each end of the coupler tube.
Step 5: Pull up on one side of the coupler tube until it clicks into place inside its slot in your RV’s chassis frame. Repeat with other side of coupler tube.
Slide-out systems are used in both travel trailers and motorhomes to provide additional sleeping space. The slide-outs consist of a track that is mounted on the side of the trailer or motorhome, and a set of tracks for the slide-out section itself. When you pull out the slides, they form an extension of your living area.
Slide-out tracks are typically mounted on the inside of your vehicle, but if you’re building one from scratch, you can mount them on either side of the vehicle. You’ll need to make sure there’s enough room for them on each side when measuring for this project.
The most common type of slide-out system uses metal tracks with metal brackets that hold up each section of the track. For this tutorial, we’ll be using metal brackets because they’re easy to work with and relatively inexpensive compared to other types of brackets such as aluminum or plastic ones.
Slide-out room extensions are an excellent way to make your RV feel more spacious. They are often used to add sleeping space, or for storage. By adding a slide-out you can double the length of your RV, making it much more comfortable for long trips.
Slides come in two varieties: manual and electric. Manual slides require you to manually pull them out and push them back in every time you want to use them. Electric slides are powered by a battery or an electrical outlet, and they open and close automatically when you press a button on your remote control or wall switch.
Installing an electric slide can be tricky because it requires wiring into your RV’s electrical system. However, most RVs have enough power available in the 12-volt systems that run the air conditioner and furnace blower motors as well as other components that use electricity inside of the RV such as lights and appliances. If you don’t have enough 12-volt power available then there are several options available such as using a small generator or adding solar panels to convert sunlight into usable energy for powering your slide out motor