This article will share detailed how to build a laundry sink cabinet, how to build a corner sink base cabinet. The cabinet is built from plywood, manufactured in Australia which has strict requirement for environment and human health.
Are you looking for the easiest way to build a sink cabinet that’s both beautiful and functional? We all know the importance of having a good-looking laundry room. After all, we spend hours there scrubbing away at dirty dishes, clothes, and other household items.
How to build a sink cabinet
Laundry room sink cabinets are a great way to keep your laundry room organized. You can build your own custom cabinet in any size, shape or configuration that fits your space. The same is true of corner sink base cabinets. They allow you to make the most of your space, while maximizing storage and organization options for these utility areas.
Sinks come in all different shapes and sizes. Some are deep and narrow, others shallow and wide. Some have a single faucet, others have two or three. In addition, there are multiple styles of taps available for these sinks: single lever, dual lever and touch-sensitive faucets. The type of tap you choose will determine how large the sink base needs to be and how far from the wall it should be placed when installed into a corner cabinet.
In this article we’ll look at some simple ways you can build your own custom laundry room sink cabinet or corner sink base cabinet using common tools found around any garage or workshop as well as some plans that show you how it’s done step by step
Build a Laundry Sink Cabinet
The size of your laundry room may have some bearing on the size of the cabinet you build for your sink. But as long as it’s not too small, a simple cabinet can be built with little trouble and expense. You’ll need to decide whether you want the sink above or below your washer before proceeding. If you choose to place your sink above the washer, you’ll need to build a shelf for the top of your cabinet.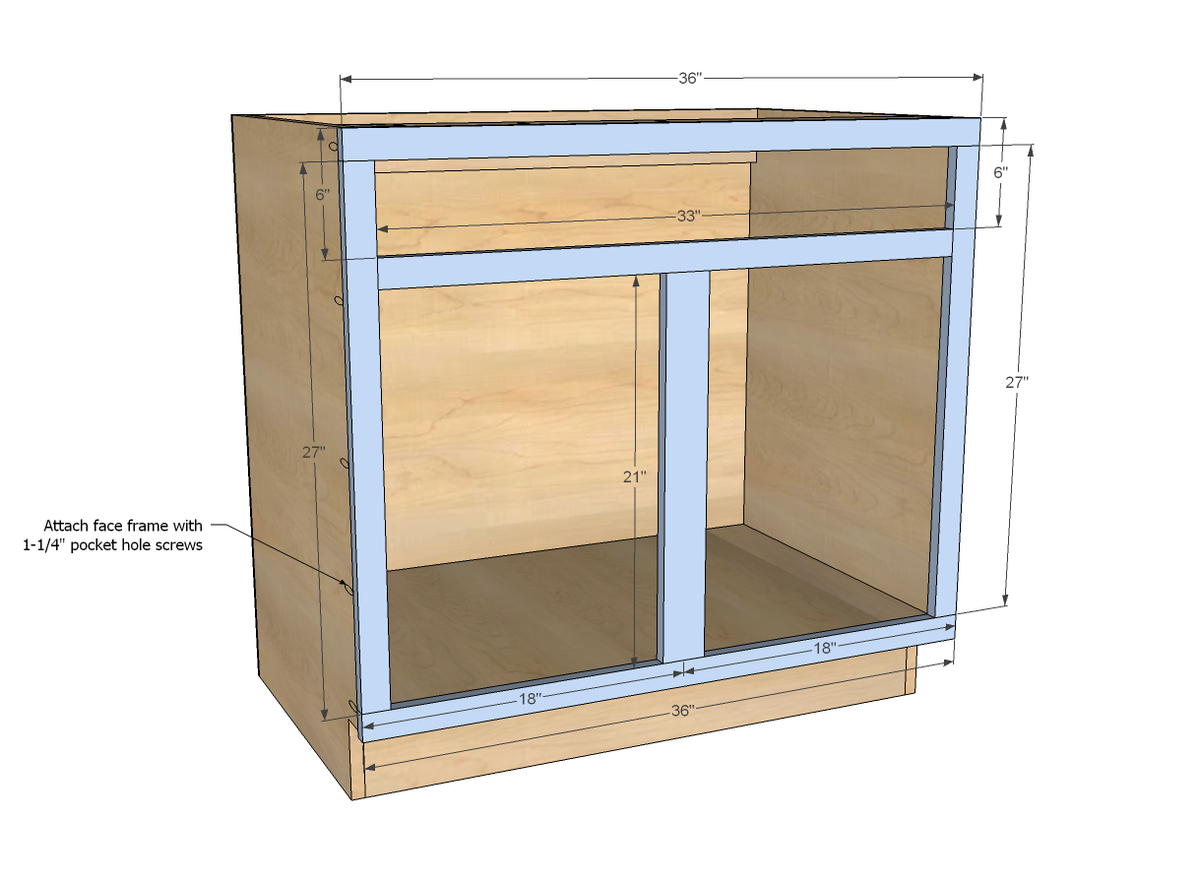
If you choose to place your sink beneath the washer, you’ll need to build another shelf for the bottom of your cabinet. In either case, use 2x4s for all supports and cross members. Be sure to measure carefully before cutting anything so that all parts fit together properly.
In either case, it’s also important to insulate around pipes and electrical wiring that are running through any wall you’ll be building into. Use foam insulation or spray foam insulation in these areas if possible.
A corner sink base cabinet is simple enough that even beginning woodworkers should be able to tackle this project with ease. The only real difference between this style of cabinet and other types is that it has two ends instead of one; otherwise, construction is similar
The best way to build a laundry sink cabinet is to first decide on the size of your cabinet. This will depend on the size of your washer and dryer. Once you have determined the size, you can begin to construct the cabinet.
The first step is to determine your design. You need to decide if you want a single piece of wood or if you would like some sort of customization. If you are looking for something simple, then a single piece of wood is probably best for you. If you are looking for something elaborate, then it may be better to just go with someone who specializes in cabinets and has experience in this field.
Once you have decided on your design, then it’s time to get started with constructing the cabinet itself. You will want to start by measuring out all of the pieces that need cut out from plywood or other materials such as MDF boards or particle board sheets. You will want these measurements taken down accurately so that everything fits together perfectly later on in the project without any issues whatsoever!
You should then use glue gun adhesive along with screws or nails (depending on which material you are using) when attaching each piece together so that they form one solid piece once they
How to build a cabinet for a laundry sink. The laundry room is one of the most frequently used rooms in the house. It is usually small but it can be made more functional by adding some storage space. One way to add storage space is to build a cabinet for your laundry room sink. This article will show you how to build a cabinet for a laundry sink that looks professional and will last for years.
The first step in building this cabinet is to take measurements of the area that it will be placed in, this includes both height and depth measurements as well as width measurements. Once these have been taken, you can cut out the plywood panels that will form the sides of the cabinet with an electric jig saw or hand saw depending on what type of woodworking tools you have available.
Once you have cut out all three sides, place them together so that they form an upside down “T” shape and screw them together with 3 inch wood screws at least every 12 inches along each seam. You should also use glue between each joint to help keep everything together during installation which will make it stronger when finished with screws alone.
Next take one side piece out of its “T” shape and add two additional pieces of plywood (one on each
This is a guide about building a laundry sink cabinet. I built this cabinet for my laundry room, and it works great! It’s easy to install, sturdy, and attractive.
I built the cabinet from inexpensive 1/2″ plywood and used standard woodworking tools. If you’re not comfortable using these tools or have never built anything before, this project may be too difficult for you.
The design of the cabinet is simple: two sides, back, top and bottom. The front edge curves around the faucet and handles to give it a nice appearance. The doors are hinged at the top with a magnetic latch (see photo). The bottom has two drawers with a shelf above them that can be used as extra storage space or even hidden storage space if you want to hide your recycling bin under there somewhere! I also added an extra small drawer at the bottom right of the unit just because I had some scrap left over from another project (it’s not shown here).
Materials Needed:
1/2″ plywood for sides (4) – $10 each = $40 total
3/4″ plywood for back – $10 each = $30 total
1/
Build a Corner Sink Base Cabinet
A corner sink base cabinet is a great addition to any bathroom. It provides much-needed storage space, and it also serves as a transition from the walls of the room to the floor. Corner sinks are also easy to install, making them an ideal choice for do-it-yourselfers.
If your home has an existing corner sink base cabinet, you can use it as a model for building one yourself. If not, you can still build one by following these steps:
1. Measure the dimensions of the corner where you want to install your new cabinet.
2. Purchase wood that is at least 1/4 inch thick and at least 1 inch longer than each side of the cabinet. The thickness of the wood will depend on what type of hardware you intend to mount on top of your new cabinet (for example, if you want to mount two handles or knobs). You also need to make sure that your lumber fits within the space that is available in your bathroom; if it doesn’t fit properly, then adjust your measurements accordingly before purchasing materials.
3. Cut two long pieces of 2 x 4 lumber so that they are each 2 inches longer than each side of your new cabinet (i
If you’re building a laundry room or installing a new sink, this project will help you get started with the right materials and techniques.
The first step is to build the cabinet around the sink. Get your measurements from the manufacturer and cut out the plywood sides and back pieces to size. Then screw them to the 2×4 frame. Next, cut out a hole for your faucet and install it on top of a 1×4 that spans across all four sides of your cabinet.
Now it’s time to add some finishing touches to your laundry room cabinet. Start by adding a piece of crown molding along the top edge of each side panel, then create an edge detail by cutting V-grooves in each piece using a router and 1/2-in straight bit. Now install door hinges on both doors so they can swing open easily when you’re doing laundry inside. Finally, cut out square holes in the bottom of each door so they snap into place when closed
Step 1: Cut the plywood
Cut two pieces of 3/4-inch plywood to size. Use a table saw or circular saw to make the cuts, then sand the edges smooth.
Step 2: Attach the doors
Use a screwdriver to attach one door to each side of the cabinet. The hinges should be on the outside edge of each door. Secure them in place with three screws per hinge.
Step 3: Install the sink
Cut a hole in the back wall that is large enough for your sink’s faucet and drain assembly. Install it according to manufacturer’s instructions, then secure it in place with screws through the back wall into drywall anchors or metal plates on either side of the cabinet.:max_bytes(150000):strip_icc()/cherry-diy-bathroom-vanity-594414da5f9b58d58a099a36.jpg)
The most common type of cabinet is a base cabinet. A base cabinet sits on the floor and supports the wall cabinets above it. In addition to supporting the wall cabinets, a base cabinet provides storage space for items that are used frequently, such as pots and pans, dishes and silverware.
Base cabinets are typically made of wood, but they can also be made of other materials such as metal or plastic. The type of material you choose will depend on your personal preferences and budget.
Building a Base Cabinet
The first step in building a base cabinet is choosing what kind of material to build it from. After choosing the material, measure it out and cut it according to your plans. While this may seem like an easy task, it can actually be quite difficult if you do not know how to use tools properly or if you lack proper safety equipment such as goggles and gloves. If you have never built anything before, then I would recommend asking an experienced friend or family member for help with this step.