If you want a wall cabinet for your garage or basement, the good news is that it doesn’t require the use of a pro, but there are a few steps to follow. As long as you can find the right size pre-made wall cabinet box, you should be able to build one using these simple steps.
Amusing the wall cabinet is going to be much easier than you might feel. If you have the instructions and you follow them closely, then you will just need to pay extreme attention to what you are doing. This is why I strongly recommend for beginners to follow the instructions carefully, so that in case something goes wrong you can return to it, figure it out, and fix it.
How to build a simple wall cabinet box
You can build a wall cabinet for your garage or other room in your home. This is an excellent project for someone with some woodworking skills and a desire to save money.
The key to building a wall cabinet is planning and measuring. You should first measure the space where you want to install the cabinet and determine how much space you have available. Then, you can design a cabinet that fits your space perfectly.
When building a wall cabinet, it is important to use high-quality wood because this will ensure that the piece lasts for many years without breaking down or warping. Wood also looks great and feels good when touched, so it is very pleasant to work with even if you have never done any woodworking before!
One of the most important things when building cabinets is making sure they are level so they do not fall down over time or break while being moved around. This is especially important if you are using glass doors on your cabinets, because glass doors tend to be heavier than normal wooden doors.
The most important thing you need to know about building a wall cabinet is that it’s not difficult. If you have basic carpentry skills and a few power tools, you can build one in a day.
The first step is to decide what kind of cabinet you want. You can build a simple box with nothing more than butt joints, or you can build a recessed cabinet with a plywood back panel and rabbets on the sides. The choice depends on your skill level and whether you want to make the project easier or more complicated for yourself.
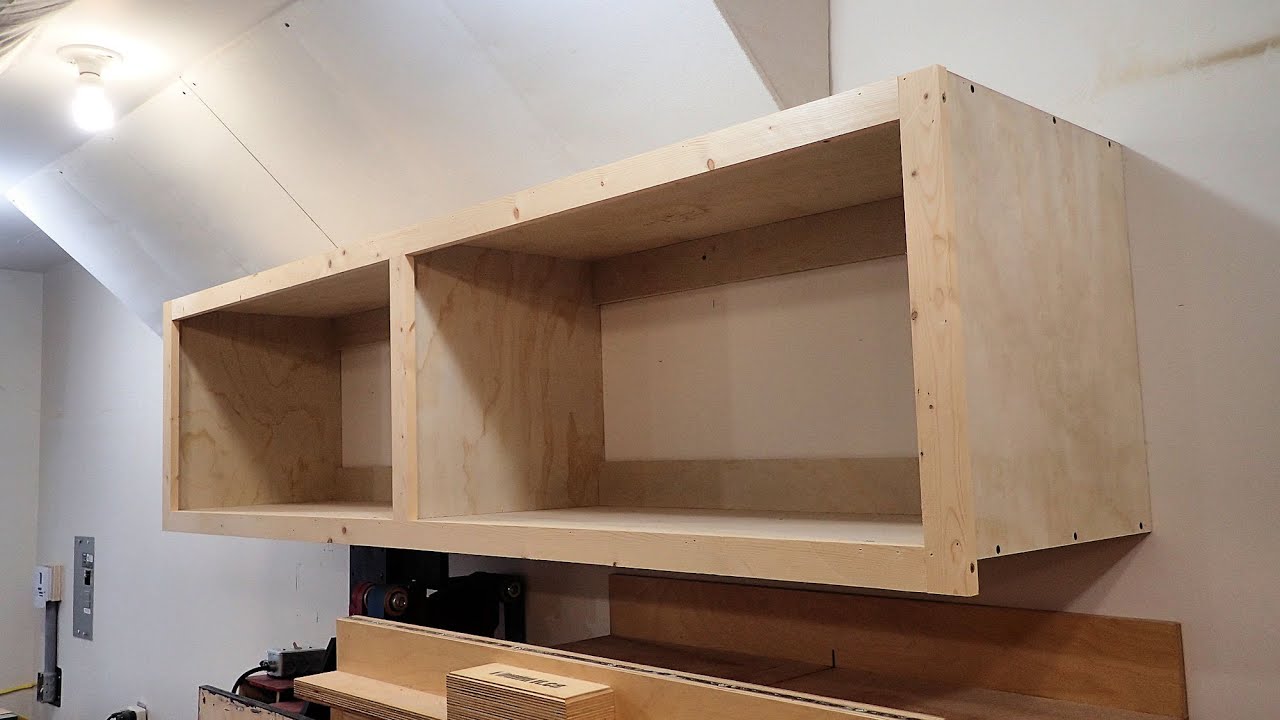
To build a simple box: Cut the side pieces so they’re 1″ shorter than the depth of your wall. Then cut the front and back pieces so they’re 1/16″ narrower than the side pieces but 1/4″ taller. Now cut all four pieces to length and assemble them with glue and nails or screws to form two frames (1).
To build an inset cabinet: Cut two plywood panels that are 4-1/2″ high by 24″ wide by 24″ deep (or whatever size fits your space). Then cut out 3/4″-wide × 3/4″-deep rabbets along three sides of each panel using a router table or jigsaw (2
Wall cabinets are a great way to hide your stuff, but they can get expensive if you buy them at retail. Here’s how to build one yourself for just a few bucks — and no fancy tools required!
I know you can save money by building your own cabinets, but it seems like such an involved process that I’m not sure where to start. Would you please help me out? I want to build some simple wall cabinets for my garage workshop.
What do you mean by “simple wall cabinets?” You’re talking about a cabinet with doors on it, right? Well, then this is the article for you! In fact, let’s start with some definitions:
A wall cabinet is any piece of furniture that has doors or drawers attached to its front face. It may be freestanding (as opposed to built into the wall) or recessed into the wall itself. The term “cabinet” refers specifically to a closet or storage unit within an enclosed space (like a closet or bathroom), whereas “shelf” refers more generally to any flat surface on which objects can be placed (such as the inside of a bookcase).
The following article will give you a step by step process on how to build a simple wall cabinet. The first thing you will want to do is decide what type of cabinet you want to build. You can design any type of cabinet that fits your needs and your space.
The next step is to measure out the space where you want your cabinet to go. Mark off where the doors and drawers will be located on the wall, then measure up from the floor to where they will be located. This should give you an idea of how tall and wide each side of your cabinet should be.
Now that you have an idea of what size your cabinet needs to be, it’s time to start building! The first thing you need is some wood for framing out the sides and top of your cabinet. I used 1×2 pine boards for this project because they are cheap and easy to find at any hardware store or home improvement center like Home Depot or Lowes (just make sure whoever cuts them for you knows exactly what type of wood you are using so they cut them correctly). Make sure every piece is cut long enough so that it overlaps with each other when placed together and nailed together with 2 1/2″ nails (
How to Build a Wall Cabinet
Step 1: Cut the plywood to size.
Step 2: Drill holes in the back of your cabinet to allow air flow. This can be achieved using a hole saw or jigsaw.
Step 3: Paint or stain the wood. Let it dry completely before moving on to the next step.
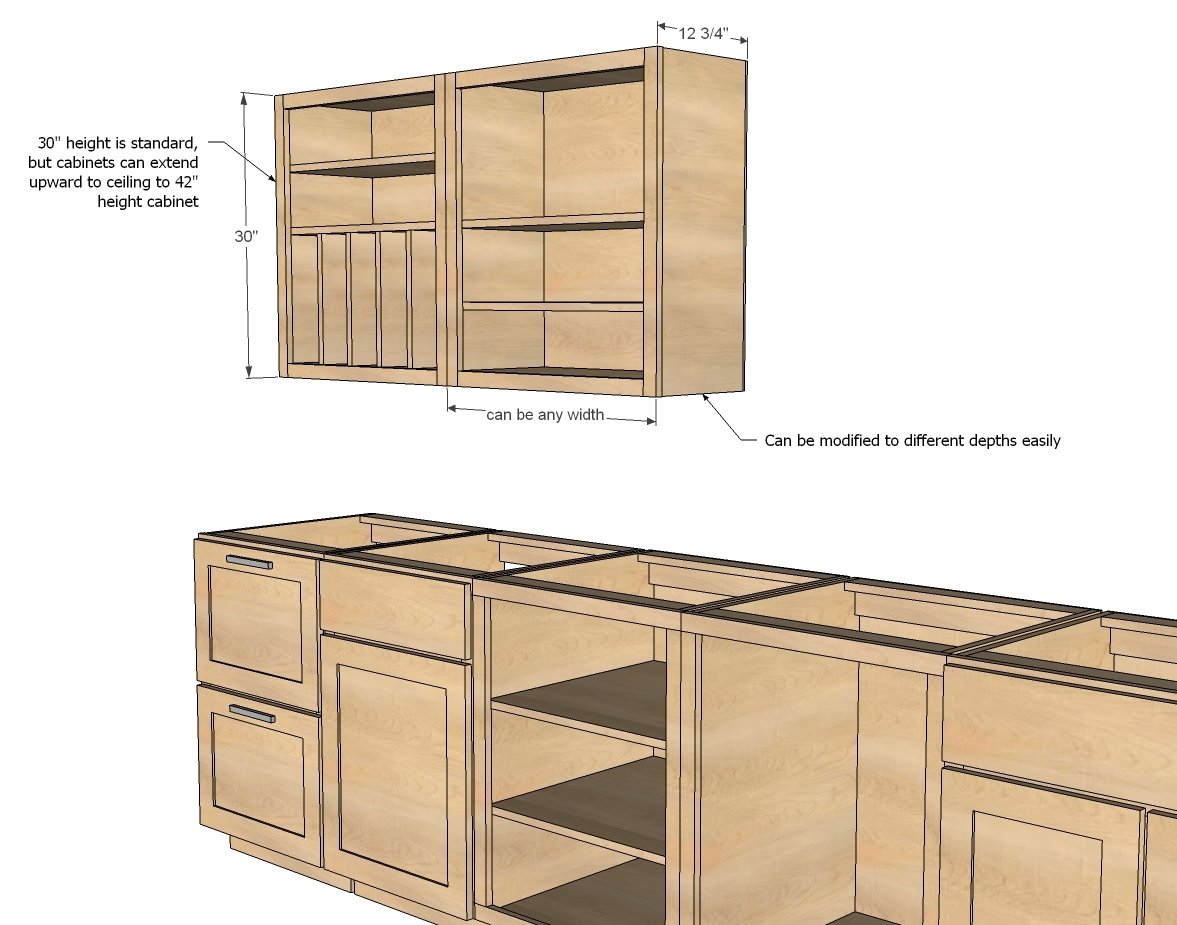
Step 4: Measure and cut the plywood for the sides of your cabinet box. The top, bottom, and back pieces should be cut slightly smaller than the front piece so that they fit snuggly into place when assembled. For example, if you want your cabinet to be 24 inches wide by 32 inches tall, then each side piece would need to be cut at 23 inches wide by 31 inches tall. Use a circular saw equipped with a plywood blade for this step (see Step 5 for details). Alternatively, use a table saw with a dado blade or even miter saw if you have one available (see Step 7 for details). If using a table saw or miter saw, set up an outside corner clamped into place so that the fence guides are aligned with their corresponding edges of your plywood pieces (see Step 8 for details).
Recessed wall cabinets are an easy way to add storage to your garage. They’re also a great way to add style and character to your garage space.
If you’ve already decided that recessed wall cabinets are right for your garage, here’s how you can build them:
Determine the layout and size of your cabinet
Once you have determined where you want your cabinet, measure the length and height of the space. This will help you determine how deep your cabinet needs to be. If you are installing more than one cabinet, keep in mind that they will need some space between them for airflow as well as access to electrical outlets if needed.
Create a rough sketch of the design
Draw out a rough sketch of what your cabinets will look like on paper. Include measurements for each side and make sure all of them are equal in size so they fit together perfectly when assembled. Make sure that all pieces fit together seamlessly before cutting any wood!
Cut all boards into pieces using a circular saw or table saw depending on what kind of wood you chose for your project (recommended 2×4 pine boards for this project as it’s cheap and easy). Then sand down any rough edges with sandpaper so that
If you’re building a recessed wall cabinet for the garage, here’s how to do it.
This is a great way to store and organize tools, small appliances and supplies.
You can build one using any material you like, but I chose plywood because it’s cheap, easy to work with and sturdy.
The first step is to build a box using 2x4s and plywood. Cut the pieces according to the diagram above and then glue them together with construction adhesive. After it dries overnight, you’ll want to trim off any excess wood with a jigsaw or circular saw so that everything fits together tightly inside the opening in your wall.
Next, cut holes in all four sides of your cabinet so that you can wire up an electrical outlet inside it. You’ll need an outlet placed at least 18 inches from any other outlet — this is code so make sure your circuit breaker will support multiple outlets on one circuit in your home!
Then cut out holes in each side where you want doors or drawers (I used doors on two sides). These should be slightly larger than whatever size door or drawer you plan on installing so there’s room for expansion when they swell up with moisture over time (which they will!). Now measure
Build a recessed wall cabinet for your garage or workshop. This DIY project is an easy way to add storage space and organization to your garage or shop.
Build a Recessed Wall Cabinet
This guide will show you how to build a recessed wall cabinet that’s great for storing tools, supplies and other items. The cabinet can be installed in any room of the house and can be adapted to fit almost any space.
Recessed Wall Cabinet Materials
To build this recessed wall cabinet, you’ll need:
Two sheets of ¾” plywood (or other material) – one sheet will be used for each side of the cabinet;
Four 1 × 3 boards cut into 24″ lengths;
One 4′ × 8′ sheet of ½” plywood (or other material);
Four hinges;
Twelve ¾” screws;
How to Build a Recessed Wall Cabinet
Materials List:
2 – 2x4x8s (for top and bottom rails)
1 – 2×4×48 (for sides)
1 – 2×4×96 (for back)
1 – 1/2″ Sheet of MDF or Plywood
Wood Glue, Construction Adhesive, Screws and Nails**
First, measure the area that you intend to install the cabinet in and make sure it’s large enough for the size of the cabinet that you want to build. In this example, we’ll be building a 2’x4′ wall-hung cabinet with a depth of 3.5″.
Next, cut out your openings for the cabinet using a jigsaw (if you’re using plywood) or circular saw (if you’re using MDF).
Then, sand down all of your edges until they are smooth. You can also use a router if you like for more professional results.
Next, cut out two pieces of 3/4″ plywood or MDF that are 1″ bigger than your rough opening on both sides (i.e., if your rough opening is 23″x23″, then cut two pieces of 24″x24″).
Next, place these two pieces into position on either side of your rough openings and screw them into place with some 2 1/2″ finish screws or drywall screws depending on what type of material you’re working with (typically plywood or MDF). Be sure to space these two pieces equally apart from each other so that they match up evenly with