Building free standing shelves can be fun and enjoyable as well as look great. So if you have the time, why not build these shelves or even a whole room full. You will have total freedom with your design and build. There are lots of different woodworking joints you can use too. I’m going to show you how to use mortise and tenon joints on this project. By the end of this tutorial you should have enough information to get started building free standing shelf like the one in my photos
Building a shelf can be a fairly simple process, and the materials required are very inexpensive. However, if you want to limit backache from mounting the shelf on your wall or cutting it to fit whatever space you have available, there are a few tools that will make life a lot easier. Knowing how to build free-standing shelves or standalone shelves is worth considering as an option when you have difficult corners to fill or massive quantities of items you need to organize and display. Since building a wooden shelf doesn’t require any expertise, constructing one is often a better idea than turning to the store for assistance.
How to build a simple shelf
A shelf is a great way to display your favorite things and create a focal point in any room. But, you can’t just throw anything on the wall and expect it to look good. The right shelves will make any space look polished. If you’re looking for a quick DIY project, here’s how to build free standing shelves that you can use in any room of your house.
Materials:
1x4s (8)
1x3s (12)
Plywood (2′ x 4′)
Wood Glue (optional)
Finish Nailer (optional)
Step 1 – Measure and Cut Wood Pieces For Shelves And Legs
How to Build a Free-Standing Shelf
A free-standing shelf is a great addition to any home, and it can be easily built with just a few basic tools. The shelf will add storage space for books, decorative items or even a television set. This project is easy enough for anyone who has basic woodworking skills, but it also allows for creativity in design.
Step 1: Cut the Wood
The first step when building a free standing shelf is cutting the wood. There are many different types of wood that can be used for this project, but the best choices are pine and poplar because they are inexpensive and easy to work with. You will need two pieces of 1 x 2 pine lumber measuring 4 feet long each. You will also need two pieces of 2 x 4 pine lumber measuring 3 feet long each. In addition to these materials, you will need two pieces of 1/2 inch plywood measuring 2 feet by 4 feet each.
Step 2: Attach the Plywood Sheets to Each Side Panel
Now that all of your materials are cut into proper sizes, you can begin attaching them together using screws and glue so that they form three separate sides for your shelf unit. Begin by attaching one side panel to one end of one
You can build free-standing shelves in a variety of ways. This guide will show you how to build free-standing shelves with a few simple tools.
The first step is to decide what type of shelf you would like to make. The most common types of shelves are built with 2×4 or 2×6 boards, and require very little carpentry skills.
The second step is to determine what size your shelves need to be. You can use the following formula:
(Shelf Length) x (Shelf Width) = Shelf Area
For example, if you want a 3 foot long by 4 foot wide shelf area, your board dimensions will be 12 inches by 16 inches each.
The third step is to cut your boards in half using a miter saw or table saw so that they are the correct width for your shelf and also length for your shelf length. If you do not have access to these tools, you may want to pick up some pre-cut wood at home depot or lowes so that you can easily get started building right away!
How to Build a Simple Shelf. Building a simple shelf is a great project for both beginners and more experienced woodworkers. The process is not complicated, but it does require some basic woodworking skills.
Here’s what you’ll need to build your own simple shelf:
Wood – You can use any type of wood you like for this project, as long as it’s strong enough to support the weight of whatever you want to put on your shelf.
Nails – You’ll need nails or screws for construction; the exact number will depend on the size of your board and how many shelves you want to make. It’s best to use nails that are slightly smaller than the width of your board so they don’t show through the other side too much when they’re hammered in place.
Sandpaper – Sanding blocks are handy for finishing off rough edges on your boards before assembly; however, you can also just use sandpaper if you have no other option than buying them separately from a hardware store or online retailer like Amazon.
Building a shelf is a great way to add storage space to your home without taking up too much room. Shelves can be built in any shape, size and style. The most basic type of shelf is one that stands on its own. This type of shelf is called a free-standing shelf.
Materials Needed:
Wooden boards (1x12s)
Nails
Hammer
how to build free standing shelves,
how to build a simple wooden shelf
How to Build Free-Standing Shelves
You can make these shelves in less than an hour. They’re sturdy and easy to construct. And the best part? You won’t need any special tools or skills!
1×4 lumber: 4′ length of 1×4 (for each shelf)
2×2 lumber: 2′ length of 2×2 (for each shelf)
Wood screws: 1 1/4″ or longer wood screws (to attach the brackets), and shorter ones for attaching the shelves themselves
Cut List:
1. Cut 4 pieces of 1×4 to length at 31″ each. These will be your shelf pieces. Cut 2 pieces of 2×2 to length at 36″. These will be your shelf brackets. Cut 4 more pieces of 1×4 at 11″ each for cross supports between the brackets. Cut 6 pieces at 7″ long for legs on each end of your shelves. These will be used as spacers between the brackets and legs when attaching them to your wall board
How to Build a Simple Wooden Shelf
A simple wooden shelf is an easy DIY project that you can complete in a weekend. It requires just one sheet of plywood, some screws and brackets, and a few other tools. The best part is that when you build the shelf yourself, you can customize it to fit your room’s needs.
Here are the steps to follow:
Measure your space to determine how wide your shelf should be. Add an inch or two for each side of the shelf if you want it to be sturdy enough to hold heavy items. For example, if you want a 12-inch-wide shelf, measure how far apart the studs in your wall are and add 2 inches on either side for support. This will result in 14 inches for each side of your shelf.
Cut one piece of plywood into two pieces that are equal to the measurement from step one plus 4 inches (for screw holes). Place the two pieces together so they overlap at least 1 ½ inches all around. Mark where each stud is located on both pieces of plywood using a pencil, then drill holes where they intersect using a drill bit slightly smaller than the screws you plan on using (about ¼ inch).
Building a simple wooden shelf is a great way to add storage space in a room and can be done in just a few hours. You don’t need any special tools or experience to build one. All you need is a little bit of woodworking know-how and this simple step-by-step guide.
Here are the materials you’ll need:
Wooden boards (you can use old pallets)
Nails
Drill
Measuring tape
Pencil
Saw (jigsaw, table saw or circular saw)
Building a simple wooden shelf is a great way to add extra storage space to your home. This guide will show you how to build a basic shelf that will last for years.
The best time to build a shelf is when you have some spare wood lying around, so if you haven’t got any wood just yet then you can use this step-by-step guide to help you find the right type of wood for your project.
Materials needed: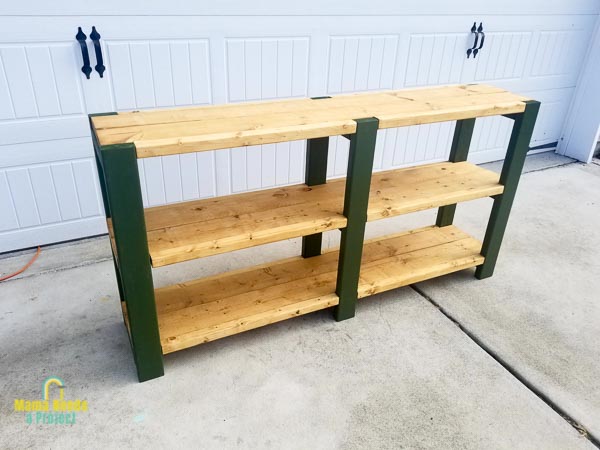
1x4x8 pine board (2)
hardwood dowels (2)
Building a simple wooden shelf is a pretty easy project. It’s basically just a box with some shelves inside. The best part is that you can build it in any size or shape you want. These simple plans will show you how to build a basic shelf.
If you’re looking for more advanced plans, we have those too! We’ve got plans for an entertainment center, a console table, and even a floating shelf!
Materials Needed:
1″x6″x8′ board (pine)
1″x4″x8′ board (pine)
1/2″ plywood (3/4″)