This article is the result of my research on how to build a wooden bench, in other words how to make a wooden bench, which is exactly what this tutorial will cover.I know it’s not rocket science, but after one too many weekends trying to think of ways how to build a simple bench that doesn’t look like one of those cheap garden benches you buy at IKEA (in other words, how to build an outdoor bench), I decided it was time I gathered all the information together into one resource and hopefully make my life easier the next time I’m in need of DIY inspiration.
We all have ideas of how to do the things we want to do. The best case is that the way you think it should happen, is the way it actually does happen. But this will not be always the case and you need to learn how to work around that.
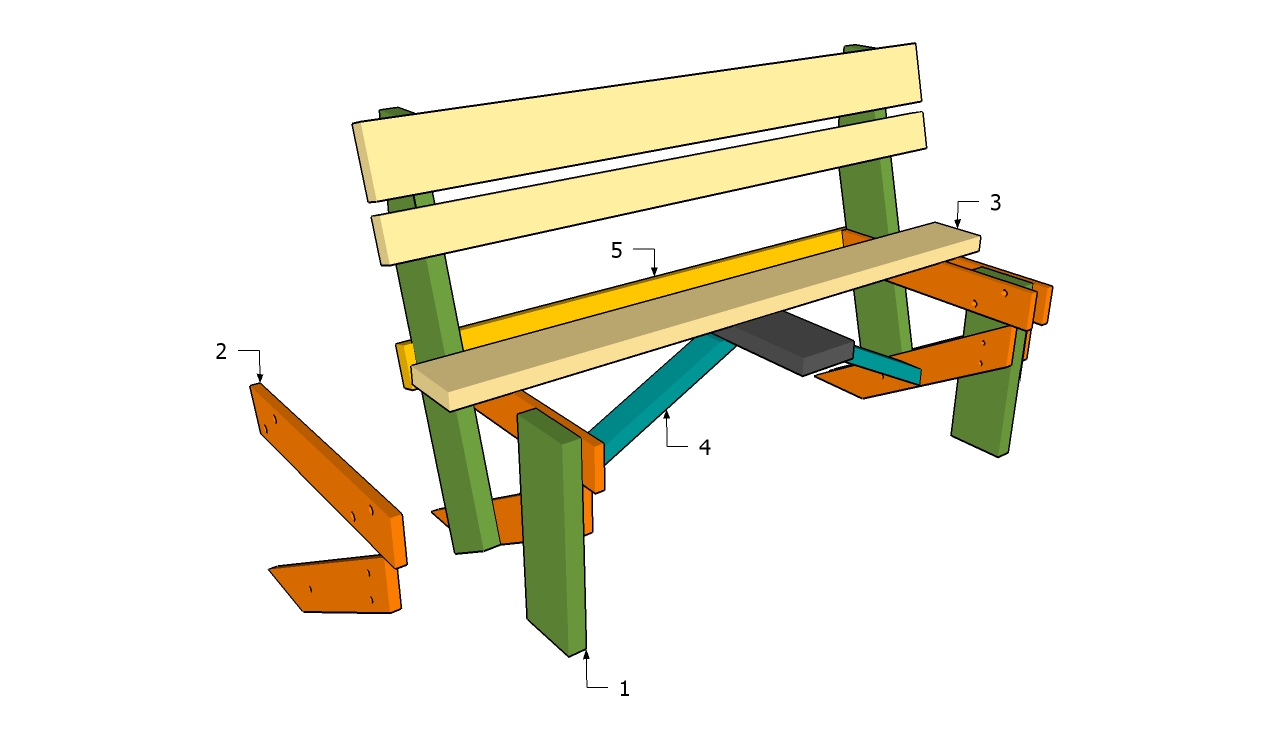
How to build a simple bench
When you’re ready to put your skills to the test and build a bench from scratch, follow these steps.
The first step when building a wooden bench is to determine what type of wood you want to use. You should choose a wood that is hard enough to withstand years of weathering but still flexible enough for comfort. Cedar, redwood and cypress are all good choices for outdoor benches.
After choosing your wood, cut it into boards that are 4 feet long by 2 feet wide by 1 inch thick. Sand down each board with 80-grit sandpaper until they are smooth and even.
Next, cut two pieces at 3 feet long and insert them into one end of each board so that they overlap by 1 inch on all sides. Drill holes through the ends of these pieces so they’ll be easy to attach later on in the project. The holes should be evenly spaced apart so they don’t show up when you’re finished assembling the bench.
Now it’s time to assemble your bench frame! Screw two pieces together along their length using 1 5/8-inch deck screws (or another size depending on how deep your pocket holes are). Make sure the screw heads aren’t visible when you’re done — if there’s a gap between
Benches are a great way to add seating to your yard and garden. They can be made from a wide variety of materials and built in a number of styles. The simplest benches are made with two parallel boards, but you can also make them more comfortable by adding a back or armrests.
If you’re looking for a quick and simple project, this free tutorial will show you how to build a basic bench with just three pieces of wood. But if you want something more elaborate, we’ve got other projects that will help you create unique benches with interesting features like arched backs or curved arms.
Check out our gallery below for some ideas on how to build your own DIY bench:
If you’re looking for a DIY project that’s simple, inexpensive and fun to make, a bench is the way to go.
Benches are great for any outdoor setting, from backyards to patios and decks. They’re perfect for entertaining guests and can be used as extra seating when needed.
You can even use benches as part of your landscape design by placing them along pathways or under trees. A bench can also be used as an entryway seating area or placed in front of your garage to create a waiting area for guests.
When building a garden bench, it’s important to use the right materials. For example, if your bench is going to be in the sun, it’s not going to last as long if you use cedar. The weather will cause the wood to rot and split.
Wooden benches are great for any garden or patio area, but there’s something extra special about a custom-made wooden bench. You can design them to match any style or theme of your home. Plus, they’re very strong and can be customized to fit any size or shape space.
What you’ll need:
– A saw
– A rubber mallet or hammer
– Wood glue and clamps (optional)
– Sandpaper (100 grit and 220 grit)
– Wood stain or paint (optional)
– Stainable wood conditioner (optional)
How to Build an Outdoor Bench
1. Get Your Materials
2. Cut the Wood
3. Assemble the Base Frame
4. Attach the Seat Supports
5. Add the Seat Slats
Building a bench is a great way to add extra seating, and it can also be used to provide a place for your children to play. If you have the tools, it’s easy to build an outdoor bench that will last for years.
You’ll need some basic tools and materials to build an outdoor bench.
Tools:
Hammer
Chisel or pry bar
Level
Measuring tape
Cordless drill/driver (optional)
Materials:
Deck screws (1 1/2-inch) – 80 pieces with washers (for the seat slats)
Deck screws (1 1/2-inch) – 20 pieces with washers (for the legs)
In this article, I will explain how to build a simple outdoor bench that works best in a small garden or patio. The design is simple, but it will look great in any setting.
The materials needed for this project are:
-A piece of wood (20 x 80cm)
-A saw
-Pencils and a ruler
-Pliers
-A drill
-Wood glue and screws (3mm)
So you want to build an outdoor bench, but you don’t know how. Well, I’m here to help. It’s actually pretty easy and can be done in a weekend.
Here’s how I built my own concrete garden bench:
Materials:
1/2-inch plywood (or MDF) – $10 for 4×8 foot sheet (you’ll only need about 1/4 of it)
Wood screws – $6 for 100 count box
Concrete mix – $20 for 50 pound bag (I used Type 3 because it’s stronger than Type 1)
Paint for concrete (optional) – $5 for quart bottle
If you want to make a wooden bench, there are two main approaches:
The first is to buy a kit. These can be purchased from most home improvement stores and usually include everything you need to make the bench – including the wood, screws and glue.
The second method is to buy individual parts and then assemble them yourself. This is a cheaper option but it does require more work on your part.
Whichever route you choose, there are some basic steps that you should follow when making a wooden bench::max_bytes(150000):strip_icc()/bench-myoutdoorplans-56686c2d5f9b583dc3deadba.PNG)
1)Buy or cut the wood into its required shape. You should make sure that each piece of wood has enough room on all sides so that it doesn’t touch another piece during assembly (this will help prevent splitting). It’s also important not to cut too much off your stock at once (unless using a circular saw) because this can cause splintering or cracking in your final product.
2)Lay out all of your pieces and start assembling them with glue and screws (or nails if appropriate). Try not to use too many screws as this may weaken your finished product; just enough so that it holds together securely without any gaps between each piece of wood left exposed by nails or glue alone