How to build a shower wall. A shower caddy can be attached to any free standing wall in your bathroom. Here are step-by-step instructions on how to build a shower wall and create extra storage space in your bathroom. Today’s tile technology has a great selection of ready made sheets that you can easily attach to a shower wall.
A shower wall is a protective divider between the bathroom and the rest of your house. It adds an element of design to your bathroom and provides you with privacy when you are having a shower. Building a shower wall can be challenging, as you will have to be very precise in creating it.
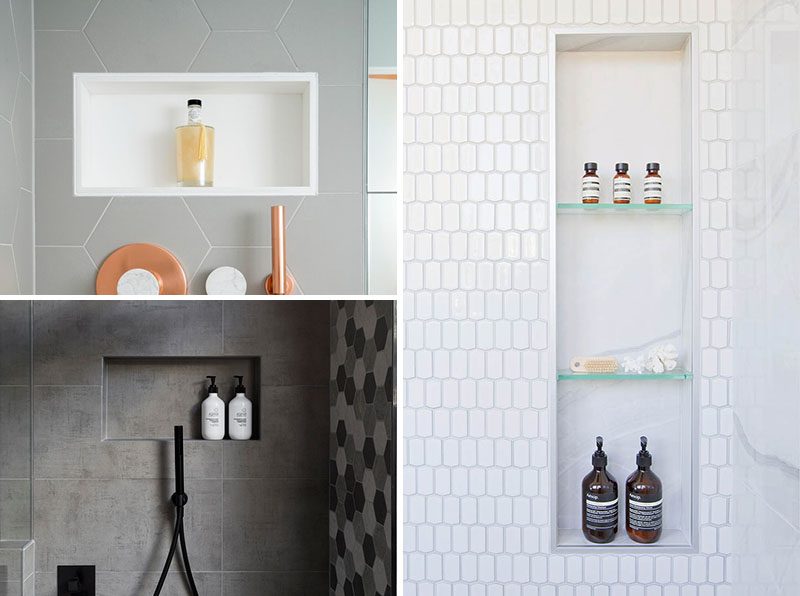
How to build a shower wall niche
Shower walls are one of the easiest and most efficient ways to create a bathroom that looks like it cost a lot more money than it did. The only problem is that installing a shower wall can be a little tricky. The first thing you need to do is determine whether or not your shower has studs in the walls that can be used for mounting the wallboard. If so, then you’re in luck. If not, then you’ll have to find some other way to mount the wallboard onto your existing wall before you start tiling.
Step 1: Measure the existing wall for tile and mark off where the studs are located on the inside of the wall with chalk or masking tape. Mark off where your tile will go by measuring from one end of your existing shower tile and marking off with chalk or masking tape every 12 inches until you’ve reached the opposite end of your existing shower tile. You should also mark off where your electrical outlets will go as well as any valves or pipes that may be in this area if they need to be removed before you start tiling.
Step 2: Remove all of your old shower tile by chipping away at it with a hammer and chisel
How to Build a Shower Wall: A shower wall can be built using a variety of materials. It is important that the materials used be able to withstand water and humidity.
1. Prepare the construction site. The first thing you need to do is prepare the construction site. Clear off any debris and ensure the area is clear of debris and obstructions. This will help ensure your shower wall is level and solid when it is finished. If there are areas where there is uneven ground, use plywood or other material as a base for your construction site so it doesn’t sink into the ground when you pour concrete later on in this project.
2. Prepare the wall framing lumber by cutting it down to size using a circular saw or other cutting tool with a guide attached to keep it straight as you cut through each piece of 2×4 or 2×6 lumber. Make sure you measure everything carefully so that all pieces fit together properly later on during this project since mistakes could result in an uneven base for your shower niche or other problems down the road if not caught now before moving on to more advanced steps like pouring concrete or installing tile directly onto your new
The following are the steps to build a shower wall niche:
1. Measure and mark your shower niche location.
2. Cut a hole in the wall where you want your niche to be, using a drill or a jigsaw.
3. Install an anchor for your tile backerboard on top of the studs inside the walls, against which you’ll attach your backerboard later. These anchors should be placed every 16 inches along each stud.
4. Cut your gypsum board into pieces that are slightly larger than the size of the niches, plus 1/2 inch on all sides for extra room for tiling later on. Attach these pieces to each stud with screws spaced about 6 inches apart from one another and about 12 inches from either end of each piece of gypboard so that it is level with the top of the studs when it is installed in place later on. You can use screws that have been pre-drilled through holes in your gypsum board or you can use toggle bolts and toggle bolts only if they are long enough to go through both layers of drywall without coming out on either side. If they don’t have enough length, then use screws instead but make sure they have been pre
A shower niche is a great way to add storage and style to your bathroom. This tutorial will show you how to build one yourself using standard materials. The process is simple and easy to follow, even for beginners.
The first step is to find the studs in the wall and mark where you want your niche to go. You can use a stud finder or just tap along the wall until you hear a solid sound. Then measure the distance between the studs and make sure it’s equal on both sides of where you want the niche. If it’s not, adjust until it is.
Once that’s done, you need to cut out the space for your niche using a sawzall or jigsaw (if you have one). Cut down each side of each stud, starting at least 2 inches away from where they actually are so they don’t end up being cut off later on in this project.
Next, install two support beams that run horizontally across the entire width of your shower niche area (see photo below). These beams should be about 1 1/2 inches wide by 3/4 inches thick and should be attached directly onto studs with screws every 12 inches or so around their circumference and in between them
A shower niche is a built-in alcove that can be used to house your shower head, or as a storage area for towels and other items. A niche can be as simple as a small space in your shower wall that you tiled over, or it can be an elaborate custom-built design with shelves and cubbies.
The easiest way to build a niche is to use preformed shower niches. These are made from plastic and come in many different sizes and shapes. They snap together quickly, making them ideal for a home improvement project that needs to be completed quickly.
If you want something more unique than just a simple shower niche, then you will have to make it yourself from scratch using masonry materials such as concrete blocks or bricks. The advantage of this method is that you can make it any size or shape that you want, but the disadvantage is that it takes some skill to get right so it doesn’t look like an eyesore when finished.
If you’re building a shower wall for tile and want to create the look of a glass partition, you can build a half wall with a decorative tile backsplash. You’ll need to install a framing system that is strong enough to support the weight of the tile and any water pressure that may be exerted against it.
The easiest way to attach tiles to a half-wall is by using mortar and grout between each tile. However, this method works only if you are installing tiles around an entire shower enclosure or tub/shower combination. If you’re working with a small area, such as in the corner of your bathtub or shower stall, mortar may not be strong enough to hold tiles in place. In this case, use mastic instead of mortar. Mastic is easier to apply than mortar because it’s more forgiving if you make mistakes while tiling.
Measure Your Tile
Measure the width and height of your planned shower wall and subtract 1/8 inch from each measurement for caulking and tiling mistakes. A general rule of thumb is that each tile should measure at least 1/4 inch larger than its actual size on both sides so that they have room for caulking and grout lines around their edges without overlapping onto adjacent tiles’ surfaces during
How to Build a Shower Wall for Tile
Building a shower wall is not difficult, though it does require some basic tools and skills. If you can use a miter saw, hammer and nail gun, drill and level, you can probably build a shower wall.
Step 1: Measure the wall.
Measure the width of your existing tile wall to get an idea of how much material you need to buy. You’ll also need to take into account any accessories such as shelves or niches that will go on the walls.
Step 2: Get your materials together.
You’ll need concrete board for waterproofing under the tile, metal lath for reinforcement and framing pieces for mounting your tiles on top of each other. If you’re working with plaster or drywall instead of concrete board, follow this guide instead. If you’re working with brick or stone rather than concrete block (which isn’t recommended), follow this guide instead.
Step 3: Install metal lath around all four sides of the shower area (including above any niches or shelves). Metal lath is usually sold in rolls at home improvement stores like Home Depot or Lowe’s — it looks like thin strips of metal mesh bent into shapes that match up with your blocks (see picture below). The
A half wall is a great way to add a little extra space in the shower. It can be used to create a niche for your shower head, or it can be used to separate the shower from the rest of the bathroom. Half walls are also very easy to install, as they only require some basic framing and drywall work. If you want to learn how to build a half wall for your bathroom, then keep reading!
Step 1: Cut 2x4s
The first thing that you need to do when building this half wall is cut 2x4s down so that they are 6 inches shorter than the height of your desired wall. You will need at least two pieces of wood cut down for each side of the wall, so make sure that you have enough material before starting this project!
Step 2: Frame The Foundation
In order for your new half wall foundation to be sturdy enough for tile, it needs to be framed out properly. The easiest way to do this is by using 2x4s as joists and attaching them directly onto your studs with lag screws. This will make sure that everything stays nice and tight together so there are no gaps between any of the pieces of lumber.
Step 3: Drywall And Paint The
A half-wall for a shower is a great way to add privacy and style. The other day I was in my local Home Depot and I saw this half wall that they had made for their display. It’s perfect for doing a DIY project like this.
Here’s how to do it:
1) Buy two pieces of plywood, one board should be 4′ x 8′ and the other should be 6′ x 8′. The thinner piece needs to be cut down to 4′ x 6′. You’ll also need a few 2x4s for framing out your shower. You can also use 2x6s if you want to give yourself some extra width.
2) Next, screw the pieces together in order from top to bottom so that it looks like a long rectangle with no gaps between boards (see picture). Make sure you have a 1/2″ gap between the top board and the ceiling, this will allow you to install tile later on without having any issues with the joint grout lines being disrupted by the ceiling or other fixtures in your bathroom! Also make sure that there are no gaps along any edges of your frame where water could get trapped and cause mold problems!
3) Finally paint or stain your new frame with whatever color
A half wall is usually a wall that extends from the floor to ceiling. It can be built in any length or width, depending on your needs. These walls can be used to separate areas of a room, provide privacy or add more storage space.
The first step in building a half wall is choosing your material and design. You can use plywood, sheathing board or OSB (oriented strand board) as your baseboard material. Plywood is the most commonly used material because it is strong and easy to work with.
Next, measure the length and height of the area you want to cover with your half wall. The height should be equal or slightly higher than the top of your baseboard so no one bumps their head on it when walking by.
Use this measurement as a guide for cutting all of your pieces before starting construction on site. Cut all of them at once on a table saw so they are exactly the same size for easy assembly later on. If you don’t have access to a table saw then use a circular saw instead with a straight edge guide attached to it so everything stays straight while cutting each piece from plywood sheeting or OSB board.