So, you have purchased the best tile design for your bathroom? If so, you have already purchased everything that makes your bathroom more attractive and stylish. But somehow, you are still doing these regular things: stepping over the wet trail across the bathroom floor to avoid slipping on damp tiles and showering wet in places which sound like a penalty from the last ice hockey game. You must want to fix or change something in your bathroom. Updating your old shower area to a humble human shelter doesn’t mean damaging your current renovations either. Even if you want to do something extraordinary to create an organized space in your bathroom. Here we give you step by step guide how to build a shower pan on wood floor below it is how to prepare shower floor for tile
The shower pan is a form of a subfloor onto which the walls for the shower area are set. A typical shower pan is made of fiberglass or acrylic panels that make it easy to cut and to lay the panels in place. Below we will discuss how to build a shower pan in detail, so you can learn how to do it correctly.
How to build a shower pan on a wood floor
Step 1: Preare the subfloor.
Pre-build your shower pan in its final location so you can test it for leaks before committing to tile. This also allows you to level the drain and make sure there are no gaps between the drain and subfloor. If you’re building a concrete shower base, use mortar, not sealant, to join pieces of tile together.
Step 2: Dry fit your shower pan on top of the subflooring.
Make sure everything fits properly and that there are no gaps between the walls and floor. If there are gaps, fill them with cementitious backer rod or masonry sand before adding mortar or grout.[1]
Step 3: Install plumbing fixtures like faucets and drains after you have finished installing tiles but before installing grout between tiles.[2] You will have an easier time installing plumbing fixtures when they are not covered by tile grout.[3]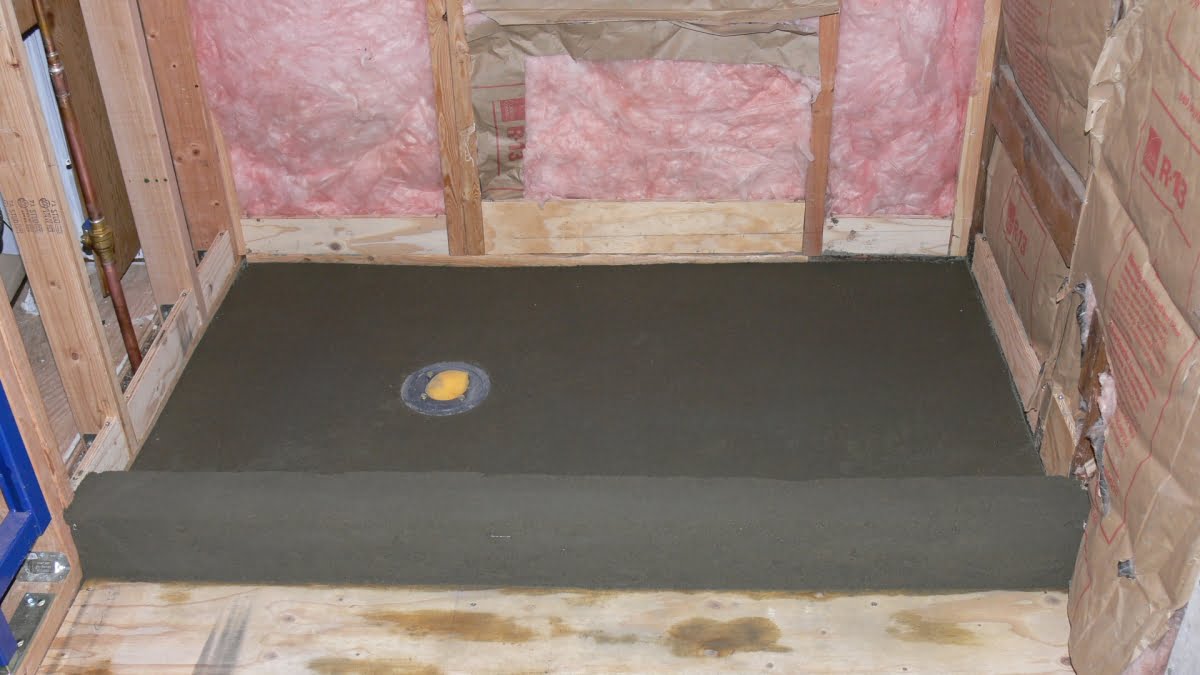
Before you can lay tile, you need to prepare the shower floor. There are several ways to do this, but they all involve removing old tiles and adhesive. You may also want to add a new layer of waterproofing material before starting or after finishing your tiling project. Here are some common methods for preparing your shower floor for tile:
You can use a razor blade or chisel to remove old tiles and adhesive from your shower floor. This is an inexpensive method, but it can be time-consuming and messy if you have many layers of old tile to remove.
You can rent a jackhammer if you have many layers of old tile on your shower floor. This may be the most effective way to remove old tiles, but it is also the most expensive option because jackhammers can be expensive to rent and operate.
You can use an electric saw with a diamond blade attachment to cut through the top layer of concrete in your shower so that you can install backer board over it instead of using cement board as a waterproofing material between the bottom of your new shower pan and the concrete subfloor underneath it. You then lay down cement board over this backer board before installing new tiles on top of
The most common way to build a shower pan is on top of a concrete slab. This is the easiest, fastest and least expensive way to build a shower pan. It can also be done on top of an existing concrete slab or on top of plywood that’s placed over the subflooring.
Step 1 – Determine the Drain Location
The first step in building your shower pan is to determine where you want to put your drain. If you are installing a new shower base and drain, this will be easy. However, if you have an existing drain location that is not where you want it, you may need to move it. This can be accomplished by digging under the floor and using some pipe fittings to move it into position.
Step 2 – Dig Hole for Pan
Once you’ve determined where your drain will be located, dig out enough space for your shower pan in this area (see diagram). Make sure that there is at least 3 inches between the bottom of this hole and any pipes or other obstructions so that they don’t interfere with its function or leak water onto them when it rains. The depth of this hole should also be 3 inches deep so that it will fit over your drainpipe once it’s installed inside it
A shower pan is the bottom layer of a new shower. It is typically made of fiberglass or concrete, but it can also be made of rubber or other materials.
The shower pan should be installed on a solid surface like concrete, not over a wood subfloor. The pan will be placed directly on top of the floor joists and fastened in place with metal brackets and screws. The bathroom walls are then attached to the sides of the shower pan with metal brackets and screws.
To install a fiberglass shower pan, you will need:
Shower base;
Cement backer board;
2×4 studs;
Metal brackets;
Screws
The most common way to build a shower pan is to pour a concrete slab. This can be done in a variety of ways, but the basic concept is that you will create a level surface for your shower pan to rest on. The other option is to build your shower pan directly on top of the floor joists that support your floor.
A poured slab is usually easier and cheaper than building directly on top of the joists, but there are some drawbacks:
-Your foundation must be able to support the weight of the slab and any fixtures you add to it (shower head, faucet). If you’re working in an older home, this may not be an option unless you plan on replacing your entire foundation.
-You’ll need access below the floor joists, which means removing drywall or knocking out some walls if they’re blocking access. If there’s no other way into your basement besides through those walls, this method won’t work for you at all.
-You’ll have less flexibility with placement since you won’t be able to move things around once they’re installed on top of each other (see below).
How to Prepare Shower Floor for Tile
Step 1: Remove all existing shower base, walls and tile.
Step 2: Apply a thin layer of thinset mortar to the concrete floor and let it dry overnight.
Step 3: Spread a 1/4-inch layer of mortar over the entire surface, leaving space around the drain hole.
Step 4: Position the shower pan liner onto the mortar base and press down firmly with your hands until it is smooth and flat against the surface. Make sure there are no air bubbles or holes in the liner.
Step 5: Allow mortar to dry overnight, then fill in any gaps with more mortar using a notched trowel. Smooth out with your hand until flat and level.
If you’re building a shower, it’s important that the floor is level, smooth and waterproof. You can build a shower pan from scratch or use a prefabricated pan. If you’re building a new home or simply want to upgrade your current bathroom, consider installing tile in the shower.
The first step in preparing for tiling is to make sure that your shower floor is level and smooth. You’ll also need to waterproof it so that water doesn’t leak through cracks in the flooring or around the base of the tub. Here are three ways to prepare your shower floor for tile:
1. Build a Shower Pan on Concrete
2. Use a Prefabricated Shower Pan
3. Prepare an Old Bathtub
How to Prepare a Shower Floor for Tile
A shower pan is a structural base for your shower floor. It can be made of concrete or waterproofing membrane, and is typically encased in the finished tile floor.
Shower pans are not required by code in most cases, but they are extremely important if you want a durable, long-lasting shower. They also provide an aesthetic appeal that complements the overall design of your bathroom.
You can purchase pre-formed shower pans or build your own using standard materials. However, before installing a new shower pan, it’s important to have a working knowledge of basic plumbing and building techniques.
Step 1: Cut Out an Opening for the Shower Pan
The first step in preparing your concrete floor for tile is to cut out an opening for the new shower pan and drain pipe (if applicable). If you’re using a pre-formed pan, simply place it over the opening and secure it with screws through the flange into the subfloor. Otherwise, if you’re making your own pan from scratch, use a chalk line to mark out its size on top of the subfloor. Then use a saw (either circular or jigsaw) to cut out this opening so that there’s enough room around all four sides
The first step in installing tile is to prepare the shower floor for tile. This is not as simple as it sounds because wet concrete can be very slippery, so it’s important to use caution when working with it. If you have a concrete shower pan that you purchased from a hardware store, there are a few things you need to know before installing tile on top of it.
First and foremost, make sure that the concrete has completely dried out before installing tiles on top of it. This means that you’ll need to allow at least 24 hours for the concrete to dry out after finishing construction. You can do this by running fans over the area or by pushing cardboard boxes across the wet surface.
Next, use tile spacers or mastic tape between tiles and joints to ensure even spacing around each edge of your shower floor area. Make sure these spacers are placed in between each individual tile so they don’t overlap onto other areas of your shower flooring later down the road when installing grout (which will ruin your entire project).
Finally, there are several different types of grout available for use when installing tile on top of concrete bases such as epoxy or polyurethane based products which are extremely resistant against stains from water damage or household chemicals such as chlorine
The first step in installing tile is to build a shower pan. The pan is a waterproof barrier that sits between the concrete floor and the tile. A shower pan is usually installed with cement board and mortar, but it can also be made with other materials such as plastic or metal.
The steps for building a shower pan depend on whether you’re working with cement board or another material. If you are using cement board, follow these steps:
Add an adhesive layer to the floor and allow it to dry for about an hour.

Use a chalk line to mark off where your shower walls will be located (if you’re installing them). The lines should be about 6 inches from each side of the drain and should run down both sides of the drain pipe so that they form an “X” when they cross in the center at right angles to each other. This will provide support for your tiles when they are installed over top of this temporary support system.
Cut out holes around any drains with a utility knife or circular saw (depending on how large your drain opening is).