How to Build a Shower Pan for tile … How to Build a Shower Pan. Building a shower pan – A step-by-step picture … Simply soak the bottom of the pan in water, then flip the porous plastic upside down and place on top of your subfloor.
To create a shower pan that complies with building codes and provides a sturdy, functional platform for tiling, you’ll need to build the pan on a solid base. Our step-by-step tutorial will show you how to build a bathroom shower pan using simple tools and materials. This project should take less than two days to complete and costs around $200.
How to build a shower pan from scratch
Building a shower pan is a simple task, but it requires some planning and preparation. The process involves installing waterproofing membrane, waterproofing the floor, pouring the concrete and installing the drain.
The first step in building a shower pan is to install the waterproofing membrane. You can use one of several different types of membranes, including a self-adhesive type that comes in sheets and requires no mixing or measuring. The membrane should be applied to both sides of the plywood floor using an adhesive designed for this purpose.
To ensure that your shower will be waterproof, you should install at least three layers of membrane and allow each layer to dry before adding another layer.
When installing the waterproofing layer on top of concrete slab floors, you should first apply a layer of thinset mortar on top of the slab before applying the membrane. This will help bond it to the concrete slab and make it stronger when installed with screws or nails.
Once you have finished installing your waterproofing layer, you can move on to laying down your drainage system for your new shower space. Your drainage system can be as simple as placing a drainpipe in your shower pan or as complex as installing an entire underground drainage system if you don’t want water sitting around inside your home during
How to Build a Shower Pan on a Concrete Floor
If you’re building a shower in your home, chances are you’ll need to install a shower pan. A shower pan is the bottom of the shower enclosure and provides support for the rest of the structure. Installing a shower pan is not too complicated, but it does require some time and attention to detail.
Step 1: Prepare Your Concrete Slab
Before you begin, clean and dry your concrete slab so that it’s ready to receive adhesive and sealer. Then, apply an adhesive primer with a paintbrush over all areas where you will place tile or stone. Next, apply an acrylic sealer over all areas where you will place tile or stone. Allow these products to dry overnight before installing your shower pan.
Step 2: Install Drainage Pipes and Drains
Install 1-inch ABS drain piping around the perimeter of your shower base using PVC cement; this will allow for easy cleaning and prevent leaks from occurring in the future. Place drain fittings at every corner of your tub area as well as at each end; this will allow water from within the shower to drain directly into your plumbing system via pipes underneath the flooring surface.
Building a shower pan is not as difficult as it might seem. With these instructions, you can build a simple shower pan in your own home.
Building a shower pan from scratch is an easy project that most people can do in just a few hours. If you don’t have the time to build your own shower, consider hiring someone to do it for you.
Materials Needed to Build a Shower Pan
Shower pans are typically made of fiberglass or plastic and come in several different sizes and shapes. They’re available at most hardware stores and online retailers like Amazon.com. The exact type of pan will depend on the size of your bathroom and how much room you have for installing it.
Some materials that are needed to build a shower pan include:
A tape measurer
A leveler
Carpenter’s glue or silicone sealant (optional)
Plywood flooring or other material for the base of the shower
A shower pan is the base for a shower stall. The pan is typically made of fiberglass, concrete or tile, but there are other options available. To build a shower pan, you will need to determine what type of material you want to use and how much time you have to construct it.
Step 1 – Determine Your Needs
The first thing you should do before building a shower pan is determine what type of material you want to use. There are three main options: metal, concrete and fiberglass. Each material has its advantages, so consider each one carefully before making your decision.
Fiberglass: Fiberglass is lightweight, easy to install and relatively inexpensive compared to other materials. However, it can be damaged by harsh chemicals and high temperatures such as those found in steam showers or whirlpool tubs. In addition, if not properly installed, the seams between pieces may leak water around them or allow mold growth inside them over time.
Concrete: Concrete pans are sturdy and durable but require specialized tools for installation such as saws and drills that can damage other surfaces around them during installation (such as tile) as well as considerable time spent mixing the concrete necessary for construction (approximately 24 hours). Additionally
A shower pan is a waterproof tray that sits below your shower or tub. It’s made of a material that is non-porous, meaning it doesn’t allow water to penetrate the surface. This helps keep your bathroom floor and walls dry.
A shower pan comes in two basic styles: preformed and custom-designed. Preformed pans are constructed from a single piece of material that has been molded into a specific shape. They’re usually made from fiberglass, plastic or resin and can be installed quickly and easily. Custom-designed pans are made from multiple pieces and require more skill to install.
The best choice for you depends on how much time and money you want to spend on the project, as well as how much space you have available in your bathroom.
A shower pan can be built on a concrete floor that is already in place, or on a plywood floor. It’s easier to build a shower pan on plywood than directly on the concrete because you can easily cut the plywood to fit your shower space. If you’re building a new home, it’s best to wait until the house is finished and the floors are poured before installing your shower pan. If you are remodeling an existing home and have to install your shower before pouring any new concrete, here’s how to do it:
1. Install a barrier between your plywood subfloor and the gravel base where the drain pipe will be located. This keeps any moisture from rising up through the drainpipe into your house from condensation in the shower. Use thin-set mortar or adhesives that are specifically designed for use in showers (such as ShowerMate or G-Flex).
2. Pour water-resistant backer board over top of the barrier material (such as cement backer board). The backer board keeps water from seeping through seams between boards or through gaps between panels of tile, and also provides a solid surface for tiling around fixtures such as faucets and shower heads.
How to Build a Shower Pan on a Concrete Floor
Building a shower pan on top of a concrete slab is the easiest way to create a waterproof barrier between the bottom of your shower and the floor below. You don’t have to remove any existing flooring, and you don’t have to worry about whether or not you’re going to make mistakes in construction.
Step 1 – Remove Existing Flooring
If you’re building a new shower, there’s no need to remove your existing flooring because you won’t be using it anyway. However, if you’re converting an existing bathtub into a shower, then you will need to remove any flooring that is already in place. This can be done by simply pulling up the tile or linoleum and placing it aside while you work on installing the new shower pan.
Step 2 – Install Piers
Plywood piers are used in this project because they are easy to install and provide plenty of support for the sheetrock walls that will later be installed from above. For each pier location, cut two pieces of plywood into 3 x 3 foot squares and nail them together at their corners with galvanized nails so that they form a “T” shape
A shower pan is the base for your shower. The pan is waterproof and designed to contain any leaks or overflow from your shower. A shower pan has a curb around it, which allows you to have a larger surface area for your shower fixtures. Shower pans can be built on top of concrete slabs, plywood subfloors or directly over joists. Before installing your new shower pans, make sure that they are level and plumb so that the walls will be straight when you install them.
Prepare the Area
1 Remove any debris from around the area where you want to install your shower pan. If there are any protruding nails or screws on the floor, remove them using a hammer and screwdriver before tiling the floor. Make sure that there’s no grease or oil on the concrete slab; this will prevent adhesion between the mortar and materials used in tiling. Use an oil-resistant primer before laying tile over concrete slabs if they are not brand new or recently cleaned with degreaser. Check all plumbing lines before laying tile to ensure there aren’t any leaks; if there are leaks, fix them first before laying tile over them so that they don’t damage
If you’re planning to build a shower pan, you’ll need to first decide whether you want a pre-sloped pan or a custom-built one. The best option is a pre-sloped pan, which comes with a built-in slope and drainage system. This type of shower pan is more expensive than the custom option but is easier to install because it requires less labor. It also has an attractive appearance that improves the look of your bathroom.
If you choose to build your own custom shower pan, you will need to measure the dimensions of the area where it will be installed. You should also consider whether your floor slopes down toward the drain or if it’s flat. If your floor slopes toward the drain, then there will be no need for much of a slope on your new shower floor; however, if your floor is flat, then you will have to create more of a slope on your new shower floor in order for water to drain properly into the drain pipes beneath it. In either case, creating an adequate slope will help prevent water from pooling around your feet when stepping out of the shower onto dry ground again!
Shower pans are typically made of fiberglass, acrylic or plastic and then covered with a thin layer of tile. The pan is separate from the shower walls and floor, so it’s easier to clean and maintain than a traditional bathtub.
If you’re building a new bathroom from scratch, your shower pan will be installed before any other wall or floor surfaces are put in place. If you’re retrofitting an existing shower or tub, you’ll need to remove the old tile and drywall before installing your new shower pan.
The type of material used for the shower pan depends on its intended use. For example, if you’re planning on using your shower as a spa and want to install a steam generator in it, then you’ll want to purchase a plastic pan that won’t rust or corrode when exposed to high temperatures or humidity levels.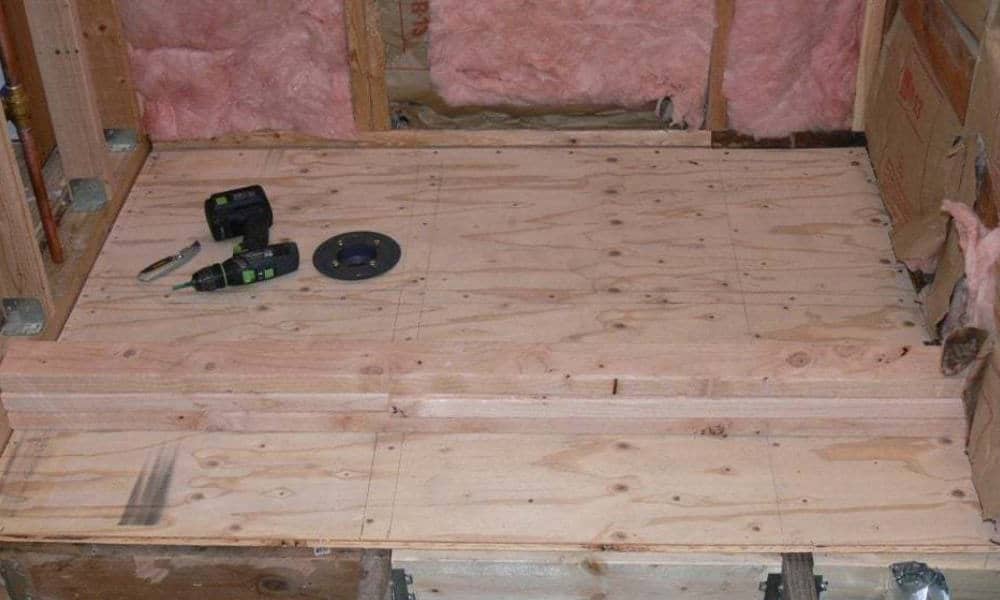
If you’re building a small bathroom or renovating an older home where space is limited, consider using a prefabricated fiberglass shower kit instead of custom-making one yourself because they’re easy to install and relatively inexpensive compared to other types of materials like concrete block or ceramic tiles which require extra labor costs for installation such as cutting holes in walls for pipes etc