Almost everyone has a desire to look after his or her own home or office. Choosing a house with a shower niche and having your own shower built in is a commonplace desire. The purpose of this article is to share on some aspects of how to build a shower niche and waterproof it and tile it.
You’ve found out that the niche in your bathroom suite is leaking because the niches are not waterproof. Not wanting to fork out money to replace this, you want to take a DIY approach and fix the niche using tile.

How to build a shower niche with cement board
The best way to waterproof a shower niche is by using cement board. Cement board is a very popular material for shower niches, because it will resist water and moisture penetration, while providing a smooth surface that is easy to tile. In addition, cement board can be used in wet areas such as the shower niche.
The first step in building your shower niche is to install a cement backerboard. This material can be purchased at any home improvement store and comes in several different thicknesses. For most shower niches, you will want to use the 3/8″ or 1/2″ thick type of backerboard.
To install the backerboard in your shower niche, simply cut the pieces according to the dimensions of your niche and then screw them into place using a drill and screws that are about 1″ long. If you are installing this material over an existing wall surface like drywall or plaster, then you should consider using construction adhesive as well as screws when installing the backerboard onto your existing wall.
You will then need to make sure that there are no gaps between each piece of backerboard within your niche area so that water cannot seep through these gaps during use of your shower after installation of your new walls are complete
The shower niche is the space between the wall and the tub or shower. It can be made of cement, glass or tile. If you’re tiling your niche, you’ll need to seal the niche with cement board.
Step 1: Finish Tile Edges
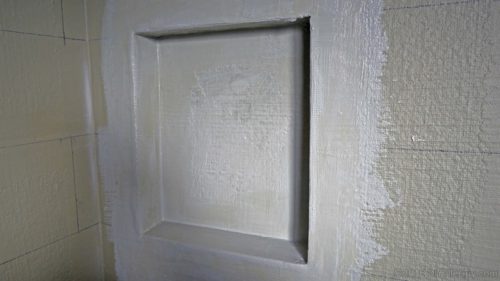
Start by installing a full tile edge on all four sides of the niche in order to hide any imperfections in your mortar joints. Apply grout as directed by your manufacturer’s instructions and let it dry before proceeding to step 2.
Step 2: Seal Cement Board
Cut cement board so that it fits snugly against the inner walls of your shower niche, then install it using clips along the top edge and screws along the bottom edge (screws will not go through the shower pan). Apply a thin layer of caulk around each clip as well as around any cracks or gaps between panels on top of cement board.
If you want to add a shower niche to your bathroom, you can install it in a number of ways. The most common method is by using cement board and tile. This will give you the strength and durability needed for the fixture. You can also use this method if you want to waterproof your niche.
1. Preparing the Space
The first step is to measure out and mark where you want your shower niche to go on the wall. Make sure that you have enough room for all of the plumbing fixtures and that they will not interfere with each other.
2. Installing Cement Board
Once you have decided on where to put your niche, it is time to install the cement board. Start by cutting out a piece of cement board large enough for your niche, including any extra space around it so that there are no gaps between the edges of your niche and the walls around it. You should also make sure that there is at least 6 inches between each corner of the cement board so that they do not overlap when installed on an angle against one another or against another surface like a tub or shower stall wall or ceiling tile trimming (depending on how much tile trimming is used).
3. Installing Tile Trim
A shower niche is a great way to add extra storage and style to your bathroom. You can build it yourself with a few simple tools and some supplies from the hardware store.
The first thing you need to do is decide where you want to put your niche. Measure the length and height of the area where you want it, then subtract about 6 inches from both measurements. Use these new measurements as the cut lines for your cement board.
Cutting cement board isn’t hard; all you have to do is score the board with a utility knife, then snap it along the score line using pliers or another sturdy object like a hammer or mallet. Once you’ve done that, use a circular saw with either an abrasive masonry blade or a fine-tooth blade designed for cutting cement board (these are sometimes called “tile blades” or “trowel blades”).
Once you’ve cut all four pieces of cement board, lay them out on top of each other so that they form one continuous piece large enough for your niche plus an extra 6 inches on each end for overlap when tiling later on. Make sure there are no gaps between them so water can’t get through any cracks!
shower niches are a great way to add storage and style to your bathroom. If you’ve got an older home, you may have seen the classic built-in shower niche that looks like part of the wall. Today we’re going to show you how to build a shower niche with cement board and tile.
We’ll walk you through all the steps:
1) Install cement backer board on the wall
2) Tile over the cement board
3) Install a drain in your shower niche
The niche is the space between the shower wall and the shower floor. It can be an attractive focal point in your bathroom, if done right. If you want to add tile to this area, it’s important to waterproof it first and then get started on the project. The following steps show you how to do both:
Waterproofing
1. Tape off the edges of the niche with blue painter’s tape. This will keep water from seeping out after you apply sealant.
2. Mix up some grout release sealer according to manufacturer’s instructions and apply it evenly over your niche walls and floor using a paint roller or paintbrush.
3. Let it dry overnight so that any excess sealant can be wiped away with a damp cloth before tiling begins (this will also ensure that no sealant gets on your tiles).
For a shower niche, you’ll want to use a waterproofing membrane and tile adhesive. Use a waterproofing membrane that’s designed for use with drywall or plaster. It will be a thin sheet of plastic with an adhesive backing that you’ll apply to the backside of the drywall.
I recommend using Dap 3 Premium Drywall Repair Adhesive from Home Depot. You may also want to consider using 1/4-inch extruded polystyrene insulation board (XPS).
The process is very similar to tiling a shower surround except that you don’t have to worry about water splashing behind the tile, so you can get away with using thinner tiles.
Use 1/2×1/2 inch tiles in your niche unless you’re going for a more modern look. For this project I used 12×24 inch subway tiles cut down to size. I also used several out-of-square bullnose tiles around the drain opening and along the edge of the niche on the floor.
Shower niches are the perfect place to install a shower, but they can be challenging to tile due to their size. A shower niche is a small area that you need to cover with tile. You will have a limited amount of space for your tiles and grout lines, so you need to make sure that you plan out your design properly before installing the shower niche.
Tiling your shower niche can be done on your own but it is recommended that you get someone who knows how to do it professionally. They will make sure that everything is done correctly and that there are no leaks in the future.
If you want to do it yourself, here are some tips:
Make sure that all of your measurements are exact. If they aren’t, then your tiles might not fit right and could cause leaks later on down the road. Make sure that if any pipes or wires run through your shower niche, they will not interfere with them once it’s finished being tiled. This will save time and money in the long run because you won’t have to rip up everything just because something didn’t fit right at first glance
A shower niche is a recessed area in the wall of a shower that holds bath products, shampoo and soap. The niche provides space for these items without taking up floor space in the shower. The niche can be made from tile or other materials, such as drywall or wood. The type of material used depends on the aesthetic you want to achieve and how much money you want to spend.
Tiling a shower niche involves several steps:
1. Measure the dimensions of the niche and cut the tiles to fit within those dimensions. Tile may be purchased in precut panels or as individual tiles from a home improvement store or tile supplier.
2. Plan out where each tile goes so that there are no gaps between them when they are installed.
3. Use mastic cement to adhere one side of each tile to the wall behind it and allow it to dry overnight before continuing with step 4 below.
4. Apply mortar or grout over top of each tile so that mortar fills in any gaps between tiled surfaces. Allow mortar to dry overnight before proceeding with step 5 below
5. Paint grout lines white if desired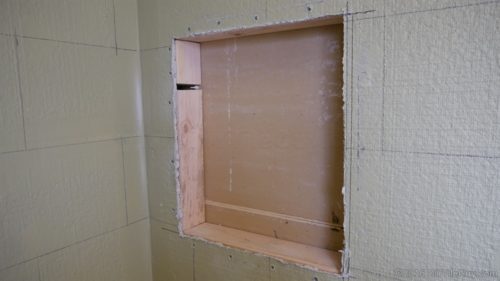
A niche is a recess or cavity in the wall of a building, often rectangular and made to hold a statue. Niches can also be built into the side of a building. The term “niche” has been used in the history of art since at least 1550, and its use has spread from architecture to other fields such as biology.
The word niche comes from French nichoir, meaning “a nest for birds.”