How to build a shower base with concrete. The method I am going to show you today is my favorite. It is probably the easiest way to build a shower base for a tiled shower stall, and definitely one of the cheapest. It will cost you less than 100 bucks!
How to Build a Shower Base: Buy vs. Build A walk-in shower is a popular addition for the homeowner that has a physical disability. The ease of access, space and design make it an excellent space for this type of addition. The initial cost of constructing a custom walk-in shower might be less costly than buying one already made. You just need to consider how much time and expertise you can contribute.

How to build a shower base for walk in shower
Building a shower base is a great weekend project that can be completed in one day, and it’s not as difficult as you might think. The most important thing to remember when building a shower base is to plan ahead of time. You’ll need to get your materials together, draw up some plans and make sure you have all the tools you need before starting on this project.
Planning Your Shower Base:
The first step in building a shower base is planning out where the drain will go and how big the shower will be. If you’re using an existing tub, measure it and use those measurements as your guide. Once you have the size of your new shower figured out, draw up some plans on paper so that they can be modified later if needed.
Making Your Shower Base:
Once you’ve figured out how big your new shower needs to be, it’s time to start building! Start by pouring concrete into your mold (which should have been laid out on top of 8″ x 8″ wooden skids). Once the concrete has set overnight (or longer depending on how thick you want your walls), remove the mold and add any plumbing fixtures or other accessories that may be necessary
You can build a shower base for your walk-in shower in a weekend. The key is to have everything ready before you start the project. Here’s how to build a shower base for your walk-in shower:
Do your research. Walk into a local home improvement store and check out their selection of preformed shower pans. They are very easy to install, but they are also expensive. If you’re handy, you can save money by building one yourself with concrete and plastic sheeting.
Measure the interior dimensions of your bathroom and subtract two inches from each measurement — this will give you the exterior size of your base pan. Cut four pieces of plywood that are at least an inch larger than this measurement on all sides (these will be the walls of your pan). Smooth out any rough edges with sandpaper or a belt sander.
Using your tape measure, mark off where each leg will go on each wall piece and use a drill with masonry bits to dig holes in the plywood for the legs (the legs keep water from seeping under the pan). Place both legs on one piece of plywood so they’re equally spaced apart; attach them together using screws or nails driven through pilot holes drilled into each
Materials:
Concrete
Shower pan liner
Tile backer board
Tile mortar or adhesive
Grout (optional)
Tools:
Tape measure and pencil for measuring and marking the floor. Use a chalk line to make straight lines on the floor. Use a level to make sure everything is even and plumb. A drill for drilling holes in the concrete for the anchor bolts. A hammer drill works better than a regular hammer drill because it has more power and can drill through harder materials like concrete and tile backer board.
The method that I used to build my shower base was to build up with 2×6’s and then pour the concrete around them. You can see the results in the photos below.
I built a frame of 2×6’s and then poured the concrete around them.
The frame is made from 2×6’s with a 2″ gap between each one to allow for drainage. I also have a 1/2″ gap between each of my joists so that there is room for expansion and contraction when it rains or when it heats up inside the house. I used pressure treated wood because it will last longer than regular lumber, but you can use whatever type of wood you like if you don’t care about it lasting very long at all!
I had some pressure treated plywood left over from another project, so I used that as my sub-floor material instead of regular plywood since it is easier to work with. You could definitely use regular plywood if you wanted though! Just make sure that you’re using something that won’t rot away after being exposed to water for many years like Cedar or Redwood would do!
Next, I cut 3/4″ plywood into pieces large enough so they would fit into my gaps between joists (1
The shower base is the bottom part of your shower that you stand on. It can be any shape or size that you want it to be, although most people choose rectangular bases with rounded corners.
Shower bases come in a variety of materials. Concrete is one of the most popular choices because it’s cheap and durable. However, if you’re not sure how to install a concrete shower base, you’ll need some help from a professional contractor or do-it-yourselfer who is experienced with concrete work.
The first step in installing a concrete shower base is to prepare the area where the base will go by adding reinforcement mesh around its perimeter and removing any obstacles (such as pipes) that will interfere with its installation. Next, dig out about 6 inches of dirt from around the perimeter of where the base will sit so that you have room for it to expand when it dries out; this will also make leveling easier later on.
Now comes the fun part: mixing up your own batch of concrete! You’ll need one wheelbarrow’s worth of sand and gravel mixed together with water until it resembles cookie dough; this should be enough for one shower base at a time (or two small ones). Mix up enough for both sides of your
How to Build a Shower Base with Concrete
Building a shower base is not difficult if you follow the steps and use the materials provided in this guide. The steps below will give you an overview of what it takes to build a shower base.
Step 1: Cut & Prepare the Floor
The first step is to cut and prepare your floor. You want to make sure that your floor is level, so if there are any bumps or dips in your floor, you can fill them with concrete patching compound before installing the shower base. To make sure everything is level, place some 2x4s on top of the floor joists and shim up any high spots until they are level with each other.
Step 2: Prepare Your Forms
When building a shower base, you need to make sure that everything lines up correctly, so you want to make sure that your forms are set up correctly before pouring any concrete into them. In most cases, this means placing two L-shaped pieces of wood on each side of where you want the shower base walls to be placed, then nailing another board across the tops of these pieces (see diagram). This will allow for easy placement of boards across all four sides once it’s time for
Step 1: Prepare the shower base
Before you can begin building your shower base, you need to prepare the area where it will be placed. If the flooring is tiled, remove the tiles and set them aside. Then, remove any other obstructions in this area and make sure that there is enough space for the base to fit. The next step is creating a level surface on which you will pour the concrete. To do this, use a laser level or a string line to mark out an area that is level with each other on all sides. Make sure that you are using a level that is accurate because if not, then your walls will not be straight when completed. You can also use an auto-leveler for added accuracy during this step.
Step 2: Pour Concrete into Shower Base Form
Once your form has been prepared, it’s time to pour in some concrete! To ensure smooth walls with no air bubbles trapped inside them, mix together 1 part cement with 4 parts sand and 6 parts gravel per cubic yard of concrete needed (or 3 parts cement per cubic yard). When mixing concrete yourself, always wear goggles and gloves while doing so to avoid inhaling any dust or
You can build a shower base with concrete, but it’s a solid project to take on. If you’re not sure of your skills, hire a professional. The base needs to be level and plumb. The walls must be straight and square. To ensure that the shower pan is level, use a laser level to mark the bottom of the walls before you pour the concrete.
The first step in building a shower base is to create a level surface for your shower pan to sit on. You can use plywood forms or blocks of wood that are cut with notches on one end so they fit together to form an interlocking frame. Once the frame is in place, pour the concrete into it and let it cure until it has hardened enough for you to remove the forms and start installing tile or stone on top of it
A concrete shower base can be built in a few easy steps. First, measure the area where you want to build your shower and make sure it is level. Use a level or plumb bob to check for level. Next, excavate the desired depth of the shower using a shovel and hand tools.
Build the wall forms to match your desired dimensions. Place them on top of the ground where they meet with the desired outer edge of your shower pan. Secure them in place by digging small holes around each form and inserting stakes into the holes. Fill each hole with concrete mix and let it harden overnight before removing any excess material from around each form with a hammer chisel and cold chisel. Remove all excess material from around each form by cutting off any extra material with a reciprocating saw or circular saw before removing forms from site completely after concrete has cured for at least 24 hours (48 hours for maximum strength).
Mix up some concrete according to instructions on bag and pour it into your prepared formwork cavity to create your shower base (make sure you have enough concrete mix on hand). Let it cure for one day before removing forms completely (it may take up to three days depending on conditions such as temperature and humidity).
When you’re building a shower, you can either make the base yourself or buy one. A pre-made base is easy to install and costs less money than making one yourself. Plus, it’s more convenient if you don’t have the time or skills to build your own.
A pre-made base is usually made of fiberglass, concrete or wood. Fiberglass is lightweight and easy to cut with a hacksaw. Concrete bases are heavy and require sanding and finishing before they’re ready for use. Wood bases are also difficult to finish because they warp over time.
If you decide to make your own base, it’s best to start with a plywood sheet large enough for your shower pan and cut it down to size later on. You’ll need at least two 2x4s for the frame and add support braces if needed for extra strength.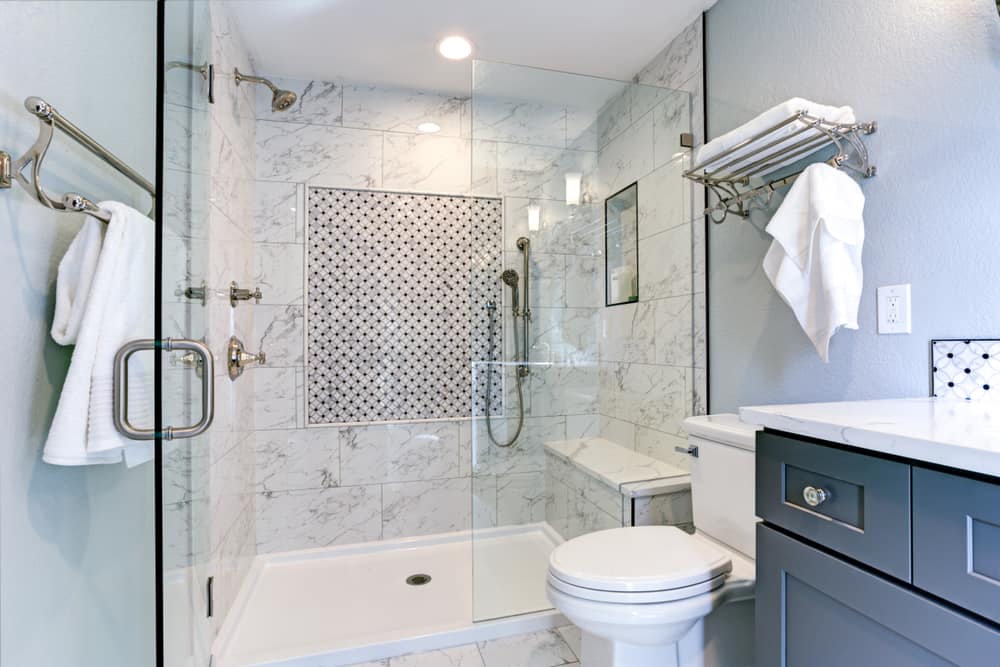
Once all pieces are assembled, screw them together using galvanized screws so they won’t rust when exposed to water in the shower over time. Then apply cement backer board around the perimeter of the frame before adding mortar between each layer of bricks until they reach the top of your frame (about 1/2 inch below) and level it out evenly so that no