Building a shower base for tile is a part of the job that many tile setters don’t want to deal with. However, there are advantages to doing it yourself because you can save quite a bit of money. Of course, bathroom remodeling requires education and technical expertise in order to avoid messy mistakes or over-spending. It also requires patience to make sure that the bathroom is not going to leak in the future due to poor planning or execution.
Determine what type of shower base you want to build. You’ll need to decide whether you want to build a concrete shower base, an acrylic cement one or a tile mortar bed. A concrete shower base is more durable and can handle heavier showers, but it’s also more costly and needs cement, water and power hookups. An acrylic cement base is stronger than a tile mortar bed, but costs less.
How to build a shower base for tile
A shower base is the foundation for your shower, and it can be made of concrete, tile or a combination of both. The shower base should be level, sturdy and waterproof.
Step 1 – Prepare the Floor
Scrape off any loose paint or old caulk from the floor. Use a hammer drill to drill holes in the floor where you will screw the wood supports into place. Make sure you are using screws that are long enough to go through both layers of plywood and into the joist below them.
Step 2 – Install Wood Supports
Cut pieces of 3/4-inch plywood so they fit snugly between two joists located on opposite sides of your planned shower location. Screw these sheets together into one solid piece, making sure to use plenty of screws all along each seam. Attach this piece to the joists with screws or nails every 12 inches or so, making sure not to penetrate into the joists themselves (this would weaken them). Attach this piece upside down so that it lies flush against the subflooring below it when you flip it over later on in this process (this will make it easier for you to install your shower pan later on). Once everything is assembled properly, flip it over so that it lays flat
A shower base is the bottom layer of a shower stall, which is typically constructed of concrete or tile. The shower base is designed to support the weight of water and the water’s force, so it should be installed correctly to prevent potential damage to your home.
Building a Shower Base for Tile
Step 1: Prepare the subfloor with a vapor barrier and waterproofing membrane.
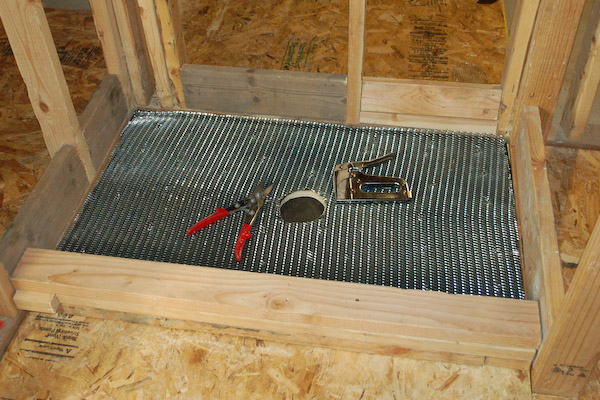
Step 2: Install a layer of reinforcing mesh, such as wiremesh, on top of the subfloor, if desired.
Step 3: Set the cement board on top of the reinforcing mesh and fasten it in place with screws or nails every 12 inches along its edges. If you’re installing tile directly on top of this layer, cover it with a thin coat of thinset mortar first; then press down each piece firmly until it is set into place. For an extra-strong bond, cover each piece with plastic wrap before setting it into place; then remove it once all pieces are set in place.
Step 4: Mark out where each wall is going to be placed on your floor by measuring from one corner to another along both sides of each wall; then make marks where those lines intersect at regular intervals along both sides of each wall
The best way to build a shower base is to use tile. You can use either ceramic or porcelain tiles, but it’s important to know that ceramic tiles are less durable than porcelain and will scratch more easily.
A shower base is the floor of the shower. It sits on top of a concrete slab and is usually made out of tile or stone. The easiest way to do this is by laying out your tiles directly on top of your concrete slab, but you can also build up the sides of your shower base with mortar and then lay the tiles on top of it.
Create a Mortar Base
1 – Make sure that the surface of your slab is level, flat and smooth so that you don’t get any gaps or cracks between your mortar base and the surface of your slab. If you have any cracks in your slab, fill them in with cement before continuing.
2 – Mix together some mortar and water until it forms a thick paste-like consistency (about two parts water to one part mortar). Apply this mixture onto your slab using a trowel until all areas are covered in an even layer at least 1/8th inch thick (or 1/16th inch if possible). Let it dry overnight before proceeding
Shower bases are a great way to add a little extra storage space or even a seat to your shower. If you’re doing a remodel, installing a shower base is one of the most cost effective ways to create more space in your bathroom. In this article we’ll show you how to build a shower base for tile, including how to install it over drywall and concrete.
Before You Start Building A Shower Base
Before you start building your own shower base, here are some things you should know first:
1) Check local building codes before starting any project.
2) Always check for plumbing and electrical lines before digging. Make sure there’s enough room for the pipes and electrical wires before making any cuts or holes in the floor or walls.
3) If installing over drywall, make sure the studs are located directly below where you want them installed (see image above). It can be very difficult to move them once they’re up against drywall.
If you’re building a bath or shower, the first step is to determine whether you want a preformed base or to pour your own.
Poured concrete bases are typically cheaper and easier to install than prefabricated models. However, they require more preparation and finishing work. Prefabricated bases can be installed with less hassle, but they cost more. They also don’t offer as much flexibility for customization.
If you’re not sure which type of base will work best for your project, call in a professional who can assess your needs and help you make the right choice.
The shower base is the foundation of your shower and can be built with concrete or tile. Shower bases with seats offer an extra level of comfort, but they do require more work to build. Building a shower base with concrete takes time and patience, but the end result is a solid foundation that won’t leak.
Building a shower base with tile only requires basic skills and tools. The finished product looks great, but it may not last as long as a concrete base.
If you’re ready to build your own shower base, follow these steps:
Determine where you want to place your shower by measuring from wall to wall and marking where the top edge of the wall will line up with the bottom edge of your tub. If you have an existing tub in place already, measure from inside the tub’s walls down to where you want your new floor to begin.
If you’re installing an acrylic- or fiberglass-lined tub this step may not be necessary; however, if you’re replacing an old cast iron tub or going with a freestanding unit instead of one built into a cabinetry enclosure then it will be necessary since most freestanding units come without an overflow drain hole drilled into them so that they can be.
How to Build a Shower Base With Concrete
Building a concrete shower base is a simple DIY project that can be completed in a weekend. This is a great way to save money on your home remodels, because it’s cheaper than building with tile or stone.
To build a concrete shower base, you will need:
Concrete mix and water (available at home improvement stores)
Mortar (mix with water)
Shower pan liner (available at home improvement stores)
Tile adhesive or grout sealer (optional)
If you’re remodeling your bathroom, building a shower base with concrete can be a great idea. Not only does it provide a solid foundation for your shower, but it can also improve the look of your bathroom. Here’s how to build a shower base with concrete.
The first step is to prepare the area where you want to install your new shower base. You’ll need to level the floor by adding or removing dirt or sand. If you’re using a preformed shower pan, you’ll want to make sure there are no obstructions in the way of where you want to put it.
Next, add rebar every 8 feet or so around the perimeter of where you want your new shower base to go. The rebar will help strengthen the concrete so that it doesn’t break when someone stands on it later on.
Once that’s done, pour some gravel into the bottom of your prepared area and then add some cement mix over top of that until you have about 4 inches worth of concrete in place. Let this dry overnight if possible so that everything has time to settle properly before moving on to step 5 below!
This article will guide you on how to build a shower base with concrete. We will discuss the different parts of the shower, what tools are needed and how to install them.
The first step is to measure your bathroom and determine where you want your shower to be located. Measure from the ceiling to floor and make sure it will fit in that area. The next step is to get the materials needed for building your shower base with concrete. You will need cement, sand and water along with a mixing container and measuring cups.
The next thing you need is a form or mold that can be used as a guide while pouring the cement into it. There are many different types of molds available but they all have basically the same purpose – they hold up while the cement dries and sets in place. The best type of mold depends on what kind of look you’re trying to achieve when building your shower base with concrete.
Once you have all your materials together, it’s time to start building your shower base with concrete!
Mixing Cement:
Mixing cement is easy but takes time so plan ahead! If possible, mix small batches at one time so that if something happens (like an accident), there won’t
Step 1: Gather Materials
Materials: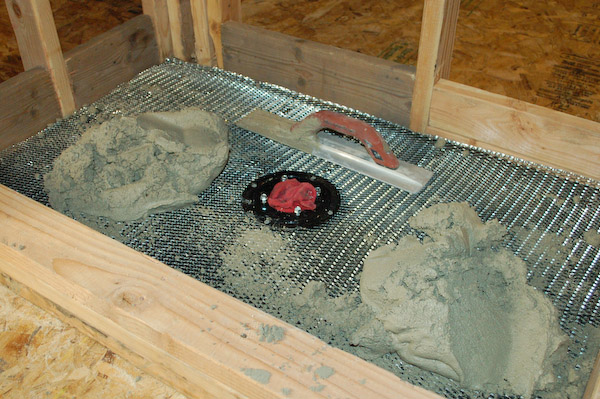
Shower base pan (can be purchased at home improvement store)
Concrete mix
Plastic sheeting or tarp
Plywood pieces (size depends on how big you want your shower base to be)
Tape measure and pencil or chalk line for marking out dimensions of the shower base
Level, square, and tape measure for ensuring the base is level and square when finished
Hammer or sledgehammer (to break up any large rocks in the concrete mix)