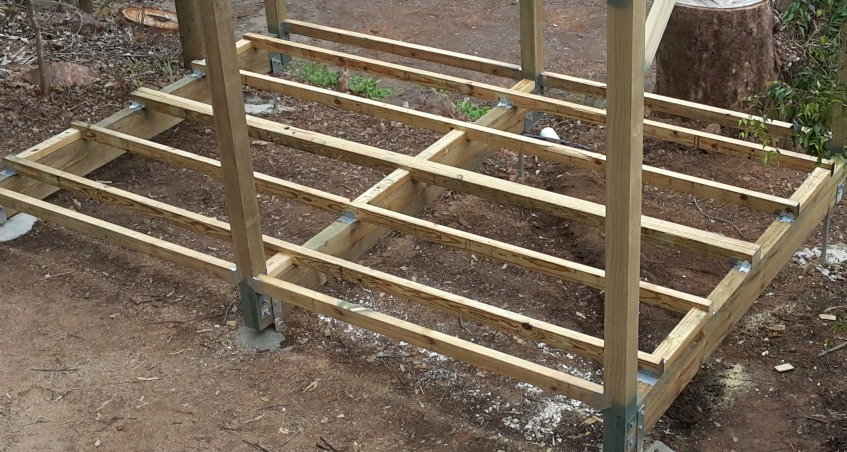
The project was going to be fairly extensive, which meant certain things about the shed were going to have to change. For one thing the floor was weak, so it had to be replaced. Which meant we would need to build a shed floor frame, and then place a new floor on top of that. I figured while we were at it, we might as well clean out the interior of the old shed and fix up the exterior as well.
Sheds have been around for a long time. A shed is basically a one-story house, usually a single bay and rectangular in shape. Sheds are generally closed on the sides but have large doors at the front which can be opened which allow you to drive your car or ride on your lawn mower into them. Sheds are used for storage of gardening equipment, tools, machinery and seasonal items like water skis and snow boards.

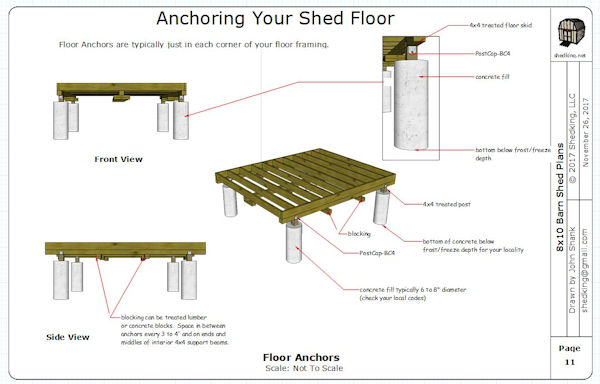
How to build a shed floor frame
A shed is a small outbuilding that you can use for storage, as a workshop or even as an office. The floor of the shed must be built correctly in order to support the weight of whatever you choose to store in it.
Step 1 – Prepare the Lumber
You will need to prepare the lumber for your shed floor frame. To do this, cut one 4-by-4 piece of lumber into four equal lengths and another 3-by-4 piece of lumber into four equal pieces. Then, cut six 2-by-6 pieces of lumber into four equal pieces. These are your joists, which will rest on top of the 4x4s and support the floorboards that make up your shed’s decking.
Step 2 – Build a Base Plate
Use two 4x4s and two 2x6s to build a base plate that is 8 inches high by 24 inches long by 24 inches wide (20 cm x 61 cm x 61 cm). Screw these together with three 1/2 inch screws on each joint and then attach them to the bottom of your foundation wall so they are level with it. This will serve as both a base for your shed floor frame and a seam between
This post will explain how to frame your shed floor. The frame of your shed is made up of two by fours, or two by sixes, depending on the size of your building. These are fastened together with wood screws and metal brackets. The metal brackets allow for a sturdy foundation for your shed floor.
In order to build a shed floor frame, you will need:
A level surface where you can build your shed
A hammer and screwdriver
Metal brackets (these are available at any hardware store)
How to Frame a Shed Floor
When framing your shed, it’s important to follow the manufacturer’s instructions on how to build a shed floor frame. However, if you want to create a more custom design for your shed, here are some tips:
Locate the center of the shed. Measure from each corner with a tape measure and mark the center point. If you have a compass, use that to find the exact center point of your shed as well.
Mark where you want your floor joists to go on each side of the shed. You can use chalk or pencil marks on the ground if you don’t have any stakes or other marking devices available.
Use stakes or something similar to mark where you want your 2×6 boards placed along each side of the frame. You can also use chalk or pencil marks on these boards as well if they are not already made out of pressure-treated lumber (which is ideal).
Using 2×6 boards that are already pressure treated is an excellent idea because it will make them last longer in outdoor conditions without getting damaged by weather or pests like termites and beetles. These boards should be placed so that they run parallel with each other on both sides of
Here are some tips for building a shed floor frame.
1. Use treated lumber: The floor of your shed is a good place to use pressure-treated lumber, because it will be exposed to moisture and will be subject to weathering. Pressure-treated lumber is soaked in chemicals that prevent decay and resist insects.
2. Build the floor frame with joists on 16″ centers: Joists are the horizontal beams that support the floor boards or plywood subflooring. They should be spaced at least 16″ apart so they don’t sag under their own weight or from the weight of whatever is stored in the shed.
3. Use joist hangers: Joist hangers help you attach each joist to a wall stud or header without having to drill into them or fasten them directly through their sides. You’ll find these metal clips at any home center or hardware store; they come in several different sizes depending on the spacing between joists and studs. Each one has two holes so that it can be attached directly over either a top plate (for attaching joists) or a bottom plate (for attaching headers).
4. Use metal straps where needed: If you’re using treated lumber, you may not need metal straps, but if
If you want to build a shed, you need to build a solid foundation. The best way to do that is with a floor frame.
A floor frame is made up of beams and posts. The beams and posts are connected together with nails or screws. You can use metal brackets to connect the beams and posts if you want, but it’s not necessary.
There are two ways to build a floor frame: start at one end and work your way down until the floor is complete; or start at both ends and meet in the middle. Both methods have their advantages and disadvantages, so choose which one works best for your situation.

How to frame a floor for a shed
In this video I show you how to build a shed floor. This is the floor that will support your shed and keep it from falling over. It’s not as hard as it seems so if you want to learn how to frame a floor for a shed, just watch this video.
If you’re going to build a shed, then you’re going to need a place to store all of your stuff. This is where we come in. We’ll help you build your shed! In this video we’ll show you how to frame a floor for a shed. This is the base that supports everything else in the shed and keeps it from falling over.
The first step is choosing where on your property you want the shed placed because once you have it there, it’s not going anywhere! You don’t want it too close to any trees because they will eventually grow around it and start causing problems; however, if there are no trees nearby then go ahead and put it wherever suits you best!
The next step is making sure there’s enough room for the door opening on one side and also enough space for whatever tools or equipment you plan on storing inside of it! You should also make sure that there’s plenty of room around all sides so that nothing will get damaged if