By simply understanding how to build a room divider foundation and give it a try, you could already save a lot of money. There are various ways on how to build a room divider foundation is one of them.
On a concrete foundation, support walls will be necessary to support your deck. Decks are heavy, and they can bear a lot of weight, especially if they are well made. Before any deck is erected, check with your local building department to determine their rules and regulations.
How to build a room addition foundation
When building an addition, the foundation is one of the most important parts of the project. It keeps your new home up off the ground and allows you to add on to your existing house without having to worry about structural issues. A good foundation will last for decades and provide a solid base for your home. Here are some tips for building a room addition foundation:
Measure your existing home’s footprint. When building an addition, it’s easy to get caught up in all the excitement of adding space and forget that you’re still working with a house that already has walls and floors in place. This means that you need to make sure that you have enough room for your new structure within those walls and floors.
Make sure there’s plenty of room between existing structures and your proposed addition for plumbing, natural gas lines and electrical work. You’ll also want enough space for insulation around each new wall so that heat doesn’t escape through walls during winter months or air conditioning doesn’t overwork itself during summer months.
Build up instead of out if possible. If you can’t find enough space between existing structures, consider building upward rather than outward. This will help save money on materials as well as give your home an aesthetically pleasing appearance

Building a room addition foundation is similar to building a regular house foundation. There are some differences, however. For example, if you’re building an addition onto your existing home, you need to build two foundations instead of one. You also need to build the addition so that it blends with the existing structure and doesn’t look like an afterthought. Here’s how to go about it:
1. Design Your Addition
You should design your room addition before you start work on the foundation. This will help ensure that your new structure looks right when it’s finished and that it won’t conflict with any other buildings on your property or nearby properties.
2. Prepare Your Site
Before you can build a room addition foundation, you need to prepare the site where you’ll be placing it. First, clear away all vegetation from this area as well as any other debris such as rocks or roots from trees or shrubs growing near your proposed site for the foundation itself or from any other areas where concrete will be poured during construction (such as against exterior walls). Then dig down about 8 inches below grade level and add compacted gravel or sand at least 2 inches deep (or according to local building code requirements). The
A room addition is a great way to expand your home. If you’re building a room addition, you’ll need to choose the right foundation for your project.
Building a room addition is more involved than building a stand-alone structure. You’ll need to consider how much weight the foundation will bear and how far it will be from the original house foundation.
If you’re adding an open-plan living area that includes an attached garage or carport, you may want to use the same foundation as the original home. But if you’re adding a structure that’s independent of the main house, such as an enclosed porch or garage, you’ll need separate foundations for each structure.
You’ll need to build a foundation for the room addition, which can be simple and inexpensive. The main requirement is that it must be level and square so that your new room addition will be level and square.
The easiest way to build a foundation for a room addition is to dig down below the frost line (the depth of the frost line varies but is typically between 3 and 6 feet). Then you can place concrete blocks on top of the dirt inside the hole to create a pad for your room addition.
You can create an insulated crawlspace by covering this dirt pad with plywood and insulating it with fiberglass insulation. When it’s finished, you’ll have a crawlspace under your new addition that provides additional storage space or serves as an extra room in your home where you can store things like holiday decorations or Christmas gifts until they’re needed.
Step 1: Survey the site and draw a floor plan
The first step in building any room addition is to survey the site and draw up a floor plan. This will determine the size, shape and location of your new space. The next step is to figure out if you have enough room for it. If not, you may need to redesign your house or add on to it later.
Step 2: Dig the hole for the foundation
In this step you need to dig a hole for your new foundation. You’ll want to make sure that the depth of your hole is at least as deep as the width and height of your room addition’s footprint. You’ll also need to make sure that there is enough room around your foundation so that it won’t get damaged by falling trees or other objects. If possible, try digging down into an area that already has some type of foundation (such as an old tree stump). This way, you don’t have to dig too deep into soft earth which can be dangerous for both yourself and your tools. After digging down about 3 feet (1 meter), fill in around the perimeter of the hole with dirt so that water doesn’t seep into it during rainstorms or snow melt from above ground level.
Build a room foundation
The first thing that you need to do is build a foundation for your room divider. This will be the base of the divider, and will be where it stands when you are not using it. This can be done by digging out a trench in the ground, or by using bricks or concrete blocks to make a foundation for your room divider. You may also want to add a layer of stone around the outside of your trench or block foundation to give it more stability.
Once this has been done, you can start building up the walls of your room divider. Make sure that you have enough space between each wall so that they will not touch one another when they are standing upright.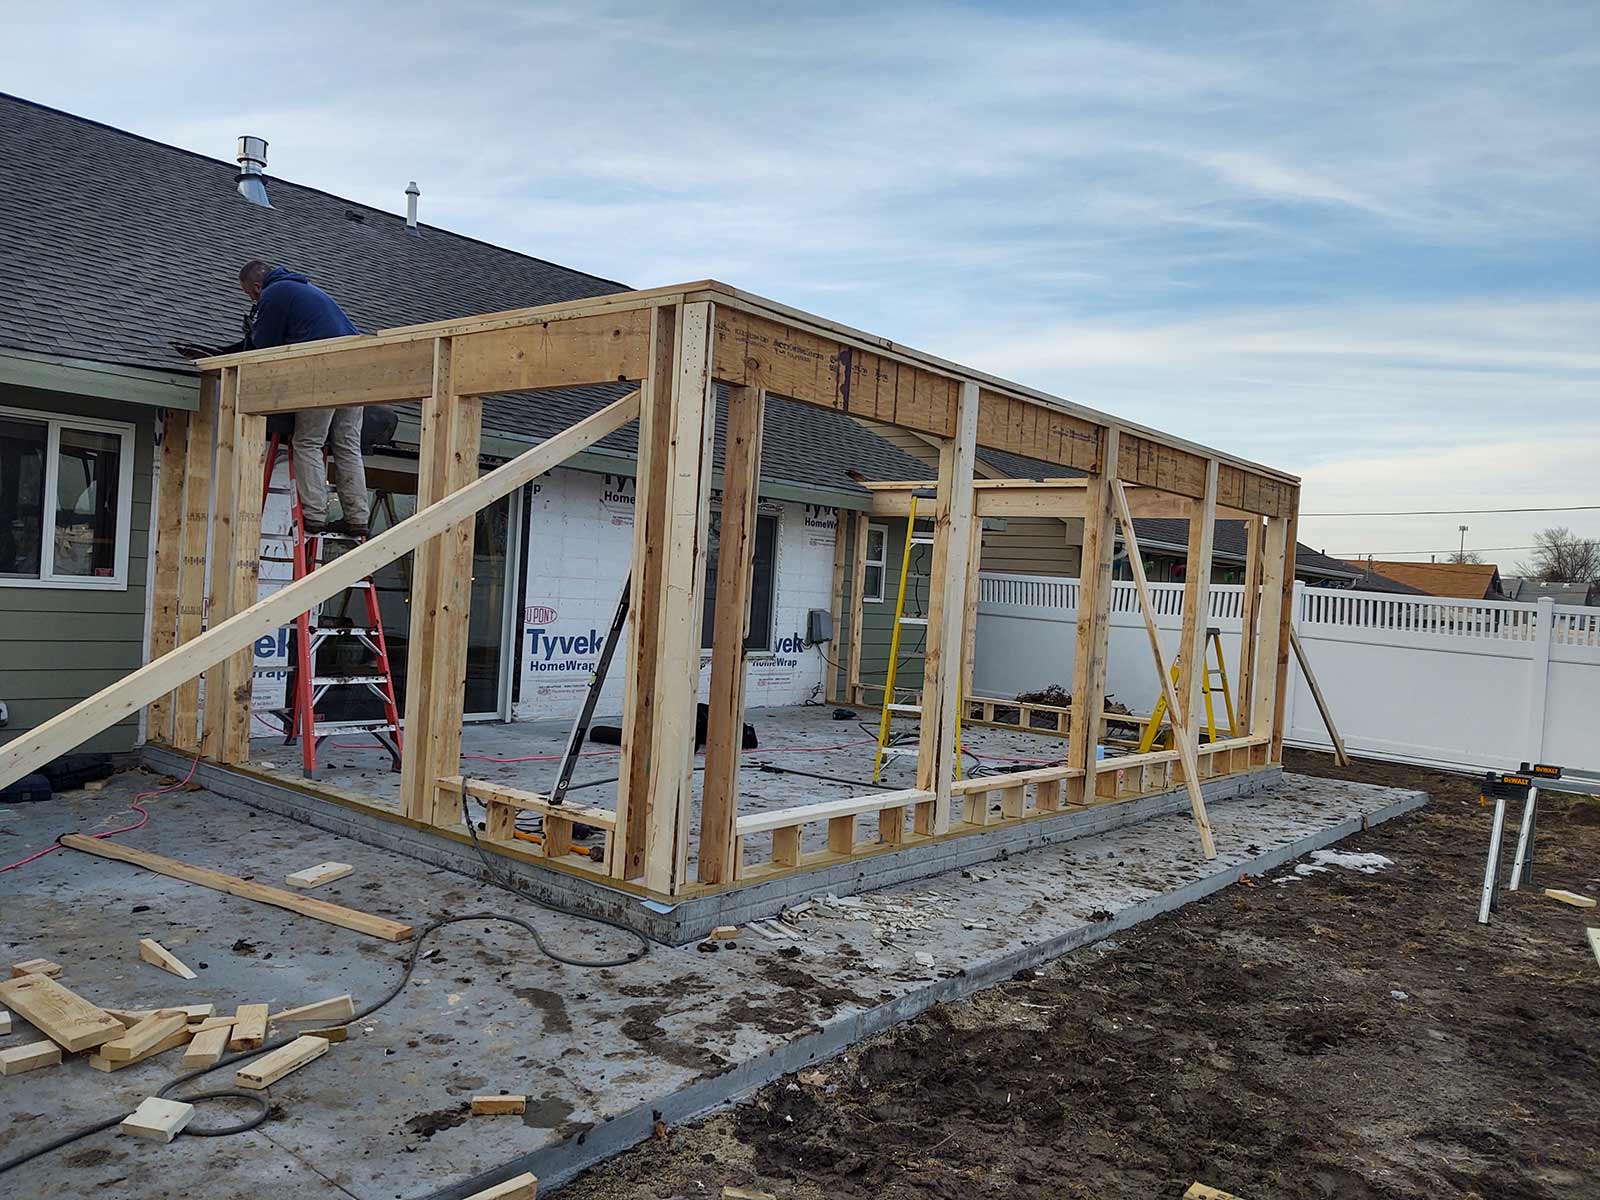
A room foundation is the foundation for a room. It is usually built when you build a basement or an extra story on top of your house. The room foundation is made from concrete, bricks or stone. The space between the floor and ceiling is called the “headroom.”
Building a room foundation is an important step in building a room because it provides stability to the structure. Without this stability, the walls may crack or crumble over time.
The first step in building a room foundation is to dig out an area where the new structure will sit. Ideally, this area should be at least 4 feet (1.2 meters) deep with straight sides and square corners. This will help keep water away from the walls during rainstorms and heavy snowfall periods.
Next, install forms along each side of the excavation site so they are level with each other and at least 3 inches (7.6 centimeters) thick. These forms help you create a sturdy base for your wall’s footing system so that it doesn’t shift when you pour concrete into them later on down the road during construction processes.
Building a room divider is not a very difficult task. However, you should know how to do it properly and safely. If you don’t have experience, you should ask for help from someone who does.

1. Find a place for the room divider where it will be most useful in your home. It doesn’t need to be in your living room or bedroom; it can also be placed in the hallway or bathroom.
2. Measure the length and width of the area where you want to build the room divider so that you know how big of a foundation to build (the size depends on what type of flooring material you want to use). Also take into consideration whether or not there will be any doors that open into this area (if so, make sure they will open after building your foundation).
3. Once you’ve decided on an area, measure out where each post will go (this will depend on what kind of material you’re using). For example, if you’re using wood posts make sure they’re evenly spaced apart from each other by about 5 inches or more depending on how wide your boards are going to be (you’ll have to check with local building codes before doing this
Building your own room divider is a great way to save money and get exactly what you want. You can build a room divider with just a few tools and basic carpentry skills.
A room divider is an attractive piece of furniture that serves as both a wall and a partition. It’s ideal for small spaces, such as an entryway or hallway, but it can also be used in larger rooms to create separate seating areas or simply to add visual interest.
The basic steps involved in building a room divider include measuring the area where you want to install the partition; choosing wood for the frame; cutting the wood; assembling the frame; attaching hardware; staining or painting the wood; and installing it in place.
A room divider is a partition that separates two areas of the same room. Room dividers can be used to separate areas of a large room or to create smaller rooms within a larger space. They are often used in bedrooms, living rooms and offices.
Room dividers are available in many different styles and materials. The most common types are folding screens and freestanding panels. Both types may be either portable or built-in. Portable dividers can be moved around easily while built-in ones are attached directly to the wall or floor.
The benefits of using room dividers include:
1) Separating a large space into smaller ones
2) Creating privacy without blocking out light completely
3) Allowing light through without making it too dark