You can go over and give a look at the photos to learn how to build the structure of pitched roof on a mobile home, and then if you want to make your search easier use the guides in images.
Roof Your Mobile Home. Roofing a mobile home is basically the same as any other type of home. You need flashing, insulation and vapor barrier. But you’ll have to be ready for a few surprises when it’s time to apply the asphalt shingles or metal roofing material.
How to build a roof on a mobile home
Step 1: Select Your Materials
To build a pitched roof on your mobile home, you will need some materials. First, you will need to purchase a set of plans for your mobile home. These plans will show you exactly how much wood you need and how to cut it. You will also need nails or screws, roofing material and a hammer. If your mobile home has an attic, you may want to buy some insulation as well.
Step 2: Lay Out Your Roof Frame
The first step in building your roof is laying out the frame of the roof. The frame consists of rafters that run across the length of the house and ridge beams that run from end-to-end along the length of the house. Each rafter connects at one end to one side of the ridge beam and at its other end connects to another rafter at right angles in order to form an X shape when viewed from above. The ridge beam runs along the top edge of each rafter at its closest point to ensure proper drainage during rainstorms.
One of the most common questions I get is:
How do I build a pitched roof on my mobile home?
The answer is pretty simple. As with any building project, you’ll need to plan it out first. This will help you determine how many rafters and trusses you’ll need, what size they should be, and how many joists to use.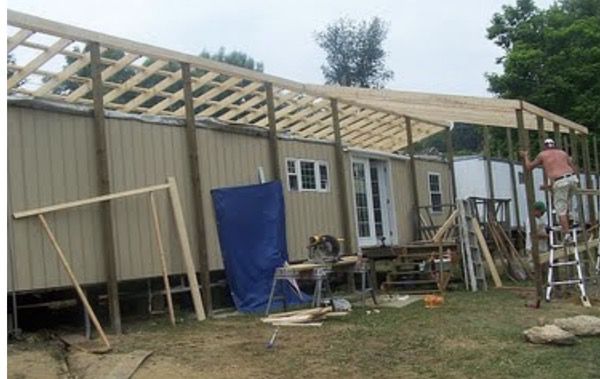
I have found that the easiest way to build a pitched roof on a mobile home is by using 2x6s at every connection point. For example, if your home has 10 foot walls then your roof pitch would be around 7% (1/7th of 10 feet). You can get a very good approximation of this angle by using 1/7th of 12 feet or 3 1/2 inches per foot (1/7th*12 feet=3 1/2 inches per foot). This means that for every foot of length there will be 3 1/2 inches added to the top plate for each rafter placement.
Here’s an example: If you had a 10×20 structure with a 7% pitch then you would use 3 1/2″ per foot for each rafter placement (10*3 1/2=35) so the total run would be 35
Mobile homes are a popular choice for housing. They are affordable, can be moved and can provide a comfortable home.
However, they do not have the same structural integrity as traditional houses. The metal frame is not as strong as wood or concrete, so if you want to build an addition or make structural changes, you need to take extra precautions to ensure that your mobile home does not become unsafe.
When building a pitched roof on your mobile home, it is important to follow all local building codes and use materials that are approved for mobile homes. You will also need to hire an experienced contractor who knows how to work with this type of structure.
The pitch of a roof is the angle that the slope of the roof makes from horizontal. A 10-12 degree pitch is typical for mobile homes. You can also use a long ladder, if available, and measure the angle directly from above.
1.Measure and mark the rafter length on each side of the mobile home’s ridge beam. Use a tape measure to measure from the top edge of the ridge beam to where you want each rafter to meet it. Mark this point at both ends of each rafter with a pencil or felt tip marker.
2.Cut rafters with an aviation snips or hacksaw if possible — these tools can make quick work of cutting through aluminum roofing material (as well as other materials). If using aviation snips, clamp down on one end of your cut line with vise grips while making your cut to prevent damage to your tool or fingers. Make sure you’ve got both hands securely gripping whatever you’re cutting before you try to start cutting!
3.Using a level and framing square (or straightedge), mark out both sides of each rafter with a pencil or chalk line (see photo 3). If you don’t have access to either tool, just measure up from
1. The first step is to determine the pitch of the roof. This is the angle at which the roof rises from the wall. Pitch can be determined by measuring from the top of one wall to the top edge of another wall or from corner to corner in a square or rectangle.
2. Cut 2 x 4s or 2 x 6s to length and attach them together with joist hangers every 16 inches on center. Use 16d nails for joist hangers and 10d nails for all other connections.
3. Place a 2 x 6 on top of two adjacent 2 x 4s so that one side faces down and one side faces up, forming a right angle with them (see Figure A). This will form the floor joist that supports the subflooring and provides lateral support for the walls when they are attached to it later on. Do this with each pair of adjacent floor joist so that you have four pairs when you’re done (see Figure B).
How to Build a Pitched Roof on a Mobile Home
Building a pitched roof is one of the most difficult home-improvement projects. It requires more than just knowledge; it takes practice to master. When working with a mobile home, building a pitched roof is especially challenging because you will be working with an unlevel surface and limited space.
Step 1: Make sure that you have all of your tools ready before starting to build your roof frame. You will need sockets, wrenches and hammers, along with nails and screwdrivers. It is also important that you have a level and square at hand so that you can make sure that everything is aligned correctly as you build your roof frame.
Step 2: The first step in building a pitched roof on your mobile home is to build the rafters for each side of the roof. To do this, measure from the ground up 20 feet for each side of the mobile home. At that point, use your level to mark off where each rafter will be placed on top of the rafters already in place for that side of the house. Use your square to make sure that each rafter is perfectly straight and level with those already in place before nailing them into place with nails or screws depending on what
A pitched roof is one of the most common types of roofs found on homes. It has two sides that slope downward and meet at a ridge line in the middle. The angle of the pitch can be steep or shallow, depending on what style you choose. A pitched roof allows water to run off easily and prevents leaks.
The pitch of your roof gives you an idea of how strong it will be and how well it will withstand wind and heavy snow loads. The steeper the pitch, the stronger and more durable your roof will be.
A pitched roof is a roof with a sloping plane that rises from all sides of a building and ends in a point. A pitched roof is constructed with an underlying structure called rafters, which are usually horizontal beams that run parallel to each other and support the weight of the roof.
A pitched roof typically has two types of coverings: shingles, which are thin pieces of wood or asphalt; and tiles, which are made from clay or concrete. Shingles are more common on houses in colder climates because they are easier to install, but they do not last as long as tiles.
There are several ways to build a pitched roof on a mobile home:
1) Rafters can be installed horizontally over the top of the mobile home’s frame using bolts and screws. If you want to install them vertically, you will need access holes in the walls for each rafter.
2) Install gable trusses by screwing them into place on top of the mobile home’s frame with screws or bolts. You can then attach plywood panels to these trusses using nails or screws to create an attic area around your mobile home’s living space
The easiest way to build a roof frame on a mobile home is to use a mobile home roof kit. These kits are affordable and will save you time and money.
They also come with step-by-step instructions that make it easy for even the most inexperienced DIYer to install.
If you don’t want to buy a kit or cannot find one that fits your mobile home specifications, you can build one yourself using these simple steps: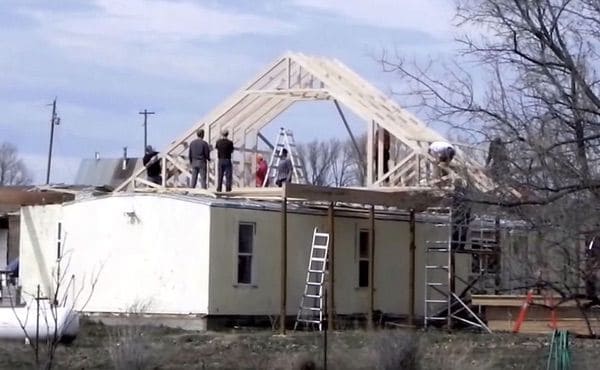
Step 1: Install rafters on the gable ends of the mobile home (the walls that slope down from the peak). Rafters are typically installed at 16 inches on center but can be spaced at 12 inches on center if needed.
Step 2: Install joists between rafters with nails or screws. Joists should be spaced at 24 inches on center, but again, the spacing can be increased if necessary.
Step 3: Attach plywood sheathing to joists using wood screws or nails (if using plywood panels). Make sure that sheathing extends past rafter joints so as not to leave any exposed areas between rafters where rainwater could enter your home through leaks in your roofing shingles or other roofing materials.
Step 1: Start with the rafters. Cut the 2x4s to length and nail them to the top plate at 12-inch intervals. Use a level to make sure they’re straight.
Step 2: Cut the roof sheathing to size, then attach it to each rafter with nails or screws. Make sure you leave an overhang on each side of the mobile home, so that water can’t get inside when it rains.
Step 3: Attach the trusses to the rafters with screws (photo 5). You may need a helper for this step because some trusses are quite heavy.
Step 4: Install sheathing over the top of all of these components, then fasten it down every 6 inches with galvanized nails or screws (photo 6). This will keep your roof from leaking during rainy seasons and help protect your interior ceiling from moisture damage as well.