To say that the driveway was in bad shape, would be an understatement. After several years without an installed retaining wall or gate, they were not only showing their age, but they were falling apart due to the permeating salt and clay material. If it wasn’t soon going to collapse on its own, I knew I’d have to replace them as soon as possible.
Have you ever wanted to make your own paver driveway? Maybe you just want to know if it’s possible to build a paver driveway yourself instead of having a contractor come in and do the job for you. Read on for some tips about how to build a paver driveway, what materials you will need, and what the process will be like.
How to build a paver driveway
If you’re looking to create a beautiful, hard-working patio area, you may want to consider paving it with concrete pavers. Pavers are a great alternative to traditional concrete because they’re lighter and easier to install. You can also use them as part of a driveway or walkway project.
Typically made from concrete or stone, pavers come in a variety of colors and styles to match any décor. The most common size for a paver is about 3 inches by 6 inches (7.5 cm x 15 cm), but other sizes are available as well.
If you want to install your own patio or driveway with pavers, here’s how:
Step 1 – Remove Existing Grass or Dirt
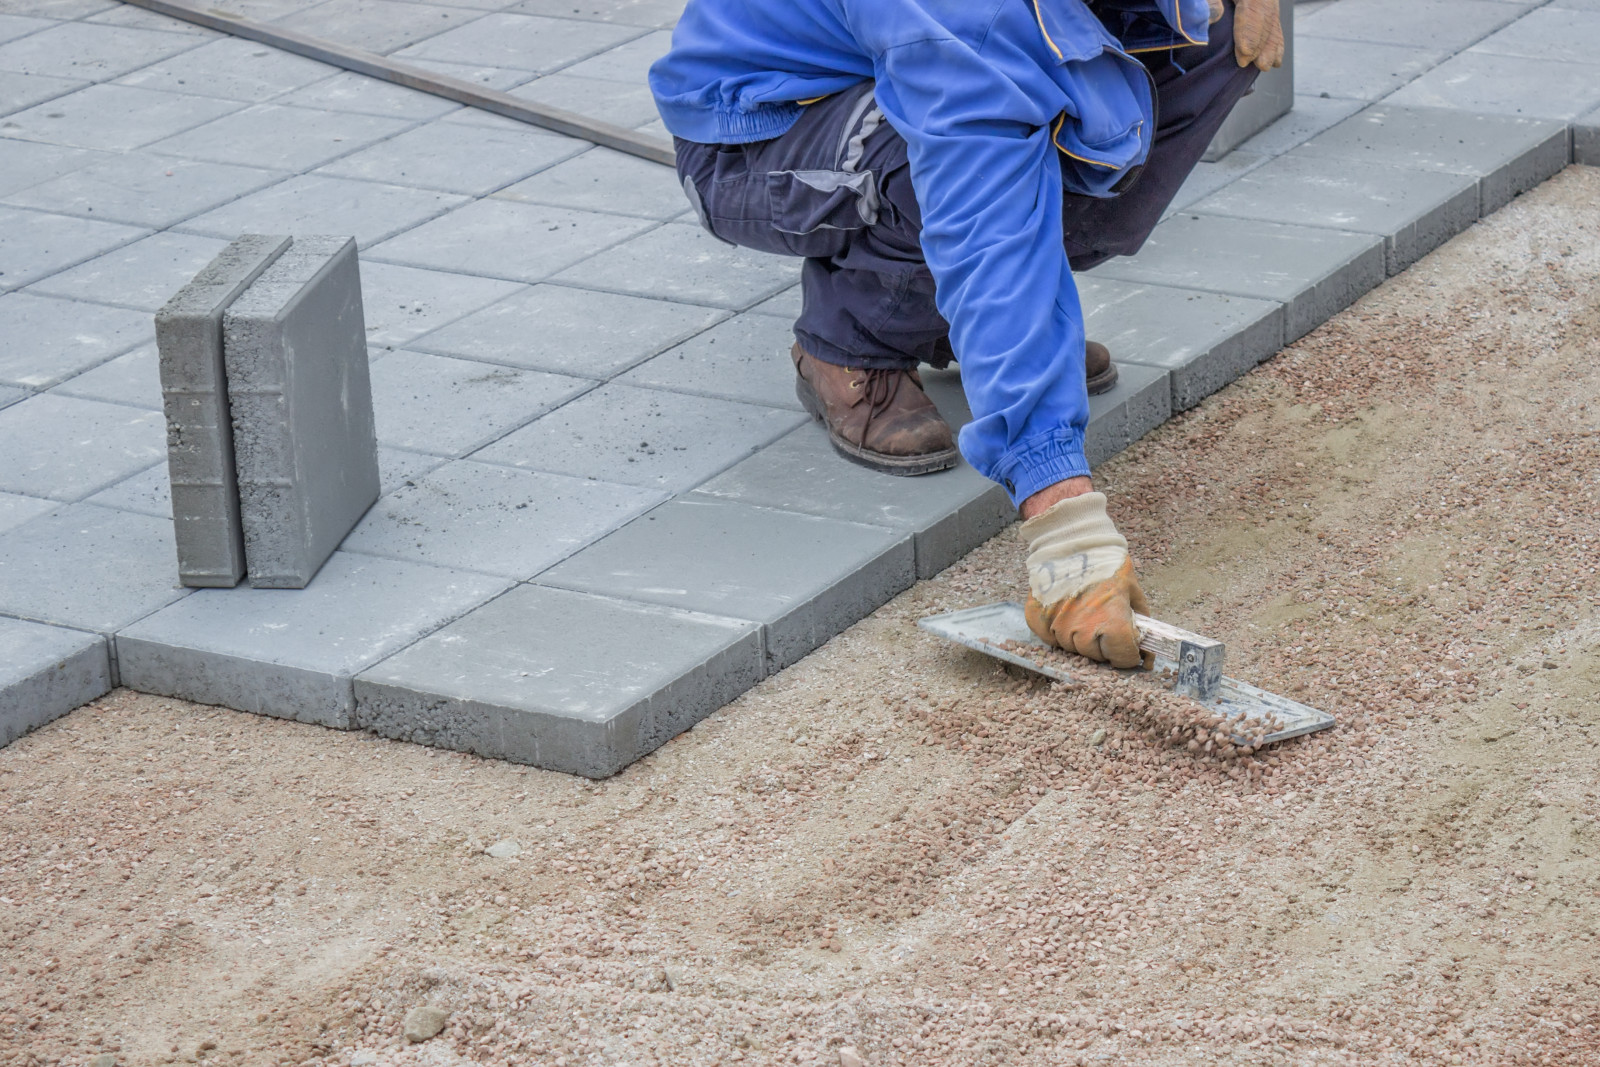
First, you’ll need to level the ground where your patio will be built. To do this, remove all grass from the area and dig down at least 6 inches (15 cm). If there is dirt on top of the subsoil layer, you may need to remove it before adding new soil and compacting it firmly (see Step 2).
Step 2 – Add Soil and Compaction
Next, add 4 inches (10 cm) of good quality topsoil over the entire area that will be paved with pavers. Then spread
A paver and gravel patio will provide a durable and attractive surface for your outdoor kitchen. This type of patio is typically installed in the same manner as asphalt or concrete. The main difference is that pavers are made to interlock, so they don’t need to be mortared together.
Step 1 – Prepare the Area
Before you begin installing your paver and gravel patio, it’s important to prepare the area. Make sure that you have adequate drainage in place, as this will help prevent water from pooling up on your patio during rainstorms. You’ll also want to remove any loose rocks or debris from the surface of your yard.
Remove all sod from the area and dispose of it properly. Make sure that there is no grass growing between the pavers or gravel before installing them on top of your leveled ground. Apply weed-killer if necessary, then let it sit for at least two weeks before proceeding with installation.
Step 2 – Install a Base Layer
The next step in creating your paver and gravel patio is pouring a base layer of compacted crushed limestone. This layer helps ensure drainage and provides a solid foundation for your project.
You can easily install this layer yourself using landscape edging stones or other materials available at home improvement stores
A paver patio is a great way to add beauty to your home. Patios are typically built over concrete slabs, but you can use pavers as well. Not only are they more attractive than concrete, but they’re more durable and easier to maintain.
Pavers are available in many different shapes and sizes, so you can create a unique look that matches your home’s style. You can also choose from different materials, including stone, brick or concrete.
If you’re looking for a way to improve the appearance of your property, consider adding a new paver patio. Pavers offer several advantages over concrete slabs:
/cdn.vox-cdn.com/uploads/chorus_image/image/65891719/howto_ppdriveway_01.0.jpg)
They’re easier to install than concrete slabs (although they do require some experience).
They offer greater flexibility in terms of design options — you can create any shape or size that suits your needs and tastes.
When it comes to building a patio, the first choice is whether you want to go with pavers or gravel.
Pavers are a great option if you’re looking for more of a classic look. They can also be used in larger spaces such as driveways or walkways.
However, if your budget is tight or you want something that will last longer, gravel might be a better option for you.
Gravel is an affordable alternative that has its own benefits, including longer life expectancy and lower maintenance costs.
With so many options available today, it can be difficult to decide which type of patio material is best for your home. Here are some things you should consider before choosing between pavers and gravel:
If you’re looking to build a paver and gravel patio, you have many design options. The easiest way to get started is with a basic brick pattern, but you can get more creative by adding patterns or even creating your own brick design.
Here are the steps for building a simple brick patio:
1. Lay out the pavers in your desired pattern. If you want to create your own design, lay out your bricks to make sure it works before you start laying them down permanently. Set aside any bricks that don’t fit where they should go.
2. Remove any grass from the area where the patio will be installed. This can be done using a sod cutter or shoveling it up by hand if there isn’t much grass present in the area where you want to build the patio.
3. Pour concrete into each hole in which a brick will be placed so that each hole is filled with concrete up to about 1/2 inch below its top edge (or until it reaches ground level if it’s not going over dirt).
4. Place pavers into holes and tamp down firmly with a rubber mallet or hammer until they are level with one another (but do not force them into place).