Outdoor sinks are a relatively new trend in design and if you’re looking to build a garden, pond or outdoor room – there’s no better way to keep it functional and stylish than by including an outdoor sink. This type of fixture serves many different uses • Adds extra seating • Helps keep the surrounding area organized • Keeps clutter off your indoor kitchen counter
If you’re like most DIYers, you know how much of a pain pipefitting can be, how to build outdoor sink table, outdoor sink faucet with hose attachment, so why bother? Why spend that much time for a feature that you’ll never use? And besides, what’s the difference between a sink with a hole in the top and an outdoor sink. It’s all just semantics isn’t it?

How to build a outdoor sink
A quick look at the topic of outdoor sinks and you’ll see there are a lot of options. You can buy one, have one made or build one yourself.
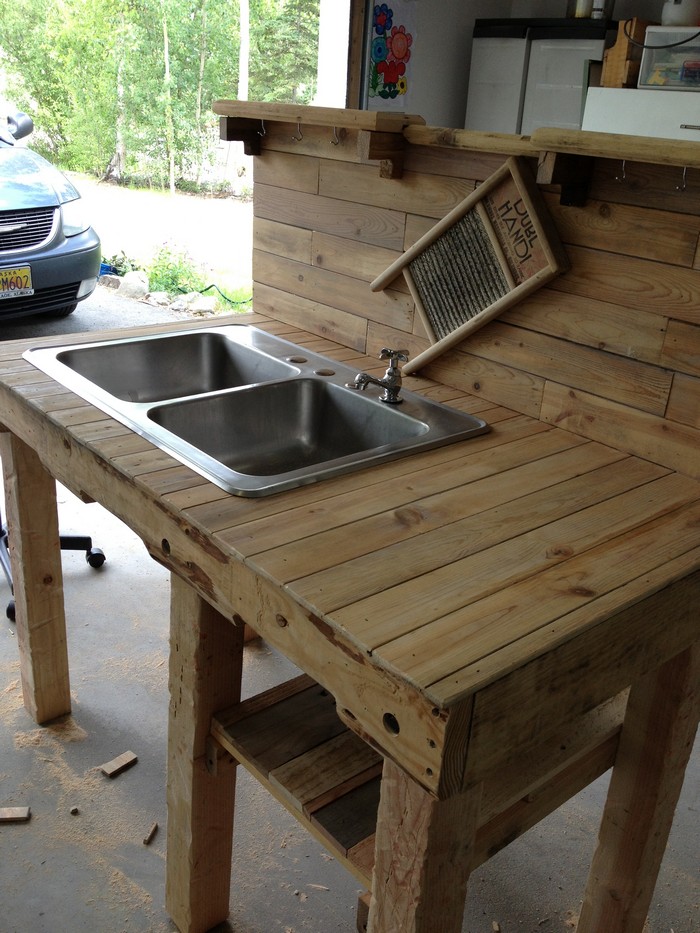
Build a Outdoor Sink Table
There are many different types of wood that can be used to make this type of sink but the most common is redwood because it is so durable and easy to work with. The first step is to cut out the top slats for the decking for your table. The width should be about 12 inches wide by 36 inches long. These will be attached to the legs with nails or screws and glued together with waterproof glue like Elmer’s Carpenter’s Wood Glue .
Next measure down from the top slats on each leg and cut two pieces that are about 8 inches wide by 40 inches long for the legs themselves. Then cut four more pieces that are about 10 inches wide by 40 inches long for cross braces between each pair of legs. You will need two braces per pair of legs so don’t forget to make two sets!
How to Build an Outdoor Sink
You have a great idea for an outdoor sink, but you’re not sure how to put it together. It’s not as difficult as it might seem, especially if you know what tools are required and how to use them. This article will show you how to build an outdoor sink that works well and looks nice.
Step 1: Find a Good Location for the Sink
The first thing you’ll need to do is find a good location for your outdoor sink. Ideally, this should be near your outdoor kitchen so that you don’t have to carry dirty dishes too far away from where they were used. If possible, place it near a water source so that there’s no need for long hoses or pumps. If you have room, leave at least 4 feet between the faucet and the nearest tree or shrubbery so that people don’t accidentally bump into them while washing hands or cleaning up after dinner parties or barbecues.
Step 2: Mark Out Square Footage
Next, mark out where your new countertop will go using stakes or string lines (make sure they’re level).
Outdoor sinks are very useful additions to your home, whether it’s for washing dishes, washing your hands or even just for a place to rinse off the dog. They come in many different styles and sizes, so you can use them for many purposes.
1. Choose the right materials.
Outdoor sinks are typically made from concrete or metal, but anything waterproof will work. If you want to make one yourself, you’ll need a large box of cement and some sand or gravel. You can also buy premixed concrete in bags at most hardware stores or home improvement stores.
2. Build a simple box frame out of 2x4s and metal connectors (and maybe some wire mesh if you’re worried about critters). Make sure the frame is strong enough to support a few hundred pounds of concrete!
3. Put down plastic on top of everything where water will be poured or splashed down once the frame is done—it’s best not to risk getting any moisture inside your house! Pour the concrete into the frame according to directions on the bag (or ask an expert). Let it dry overnight before removing plastic and sanding off any rough edges with an electric sander
Outdoor sinks are a great addition to any home. They’re perfect for washing your hands, watering your plants and cleaning up messes outside of the house. You can also use them in your yard to wash dishes, hose off your car or clean up after pets.
Whether you want to add an outdoor sink to your existing deck or build one from scratch, there are many ways to do it. Here’s how:
1. Plan Your Sink Location and Size
2. Install Water Supply Lines
3. Build a Base for the Sink
4. Install the Sink Faucet and Countertop
How to build an outdoor sink
Step 1: Prepare the site
Before you begin any project, you should prepare the site. This includes cleaning up your work area, laying down drop cloths, and making sure that you have all of the tools and materials ready. For this project, I used a simple plastic drop cloth and a small garbage can to hold my screws while I worked.
Step 2: Cut the wood for the top
I cut out the wood for my countertop using a circular saw with a miter gauge attachment. It was easy to do because all of my cuts were straight lines — there were no compound angles or curves involved. If you’re using your own design, make sure that your pieces will fit together well before moving on to Step 3!
Step 3: Attach the pressure-treated plywood to the base
Next up was attaching the pressure-treated plywood top to the base frame by drilling pilot holes and screwing them together. I made sure that all of my screws were countersunk so they wouldn’t be visible after assembly!
How to build outdoor sink table
If you live in a smaller home or apartment, then you might not have room for a full-sized laundry room. But that doesn’t mean you can’t have easy access to a place where you can wash clothes on the go. This DIY outdoor sink is perfect for those who want to keep their clothes clean and dry without taking up too much space in their home.
How to build an outdoor sink
This DIY project is a great way to add value to your home while also adding some extra storage space. The size of this project will depend on how much space you have available in your backyard, but it can be built from materials that are readily available at any hardware store or home improvement store. You will need:
Sink cabinet – This can be made out of wood or plastic and comes in many different styles and sizes depending on what type of look you are going for with your laundry room or garden shed. You can choose between one or two doors as well as drawers on the inside for extra storage space!
Outdoor Sink Table
If you want to add a little extra convenience to your outdoor kitchen, it might be a good idea to build an outdoor sink table. This will allow you to wash dishes, cook and clean all at the same time. It will also be very useful if you are entertaining guests since everyone can help themselves to drinks and snacks without having to go inside the house.
The first thing that you need for this project is a small table that can support the weight of your outdoor sink faucet with hose attachment. You should also consider using a thicker piece of wood for the tabletop so that it will last longer outdoors.
Next, you will need some plumbing supplies such as PVC pipes, fittings and tubing that will allow water from your house’s main water supply line to run through the faucet and down into the sink itself. The last step is to attach these pieces together in order to create an outdoor sink countertop that can be used by anyone who wants to enjoy a nice meal outside on a warm summer evening or rainy day!
If you have an outdoor sink, it’s a good idea to build a table for it. This allows you to place your sink away from the main kitchen and dining area, which makes it easier to keep clean. If you want to add a faucet and hose attachment, here are some ideas on how to do so.

Outdoor Sink Table
You can build your own outdoor sink stand by using pressure treated wood and fasteners that will withstand the weather. Keep in mind that you will need access to water and electricity for both the faucet and the sink itself. If you don’t have this access, you may want to consider hiring someone who does or buying a ready-made unit instead of building one yourself.
Outdoor Sink Faucet with Hose Attachment
If your outdoor sink is close enough to your house or garage, consider installing a hose attachment that runs from the faucet into the drain pipe of your home’s plumbing system. This way, when you’re washing dishes or cleaning up outside, there is no need for buckets or other types of containers; simply use the attached hose and let gravity do its job!

Build an Outdoor Sink Table
To build this outdoor sink table, you’ll need:
– 4×4 lumber (the height depends on how tall you want your table)
– 2×4 lumber (for the frame)
– Plywood (for the top of your table)
Outdoor sink with hose attachment. The outdoor sink is a great addition to your patio, balcony or backyard. It’s functional and it looks nice. You can use it for washing the dishes and rinsing fruits and vegetables before cooking. In this article we will show you how to build a simple outdoor sink with a hose attachment for water supply.
Materials:
Sink basin – 1 piece (We used 20 x 20 cm)
Faucet – 1 piece (We used 10 cm)
Hose – 1 piece (We used 25 cm)