I’ve always wanted a new bathroom. And by new, I mean everything but the tub. A nice walk in shower without the curtain and a larger vanity would be great. Last year at The Cabinets Show, we discovered that they have custom cabinets that fit right in with the original construction of your home.
This article will discuss how to build a frame for a drop in tub and bathtub frame kit, how to build a frame for a bath panel, how to install a drop in tub in an alcove
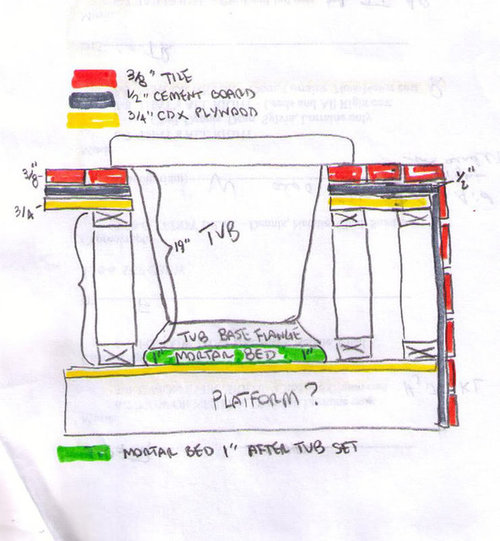
how to build a frame for a drop in tub
A drop-in tub is an excellent choice for a bathroom remodel. They’re simple to install and easy to clean. They also come in a wide variety of sizes, shapes, colors and configurations to meet your needs.
In this how-to video from Lowe’s, learn how to build a frame for your new drop in tub.
Bathtub frame kit
This step will help you determine the size of your bathtub frame kit. It’s important that you measure correctly so you don’t end up with a bathtub surround that either doesn’t fit or looks awkward. Measure the distance from the floor up to the bottom edge of your new bath panel shower enclosure or alcove tub wall (not including any trim).
How much space will be left over on each side? If it is less than 5/8″ then there will be room for trim around the outside edge of your new bath panel shower enclosure or alcove tub wall without flexing or pulling away from its mitered corners. In this case, use these measurements as your guide when selecting a bathtub surround kit from our selection below:
Some bathtubs are made with a separate frame, while others are built directly into the wall. If you have an alcove or other space to work with, installing a drop-in tub is easy.
If your bathroom is already finished, you can use a kit that comes with all the tools and materials you need to build a frame for your tub. The kit includes plastic panels that slip into the frame to create the shell of your bathtub. It also includes a drain hole and overflow holes for connecting pipes.
If you’re working with an unfinished space, you’ll need to build a wooden frame before installing any plastic panels. The size of your tub will determine how big the wooden frame needs to be. To figure this out, measure the length and width of your new bathtub and subtract 3 inches from each measurement on each side (for example: 60 inches x 60 inches – 6 inches = 54 inches). You’ll want enough room around all four sides of the tub so that it doesn’t touch any walls or other objects when it’s installed.
Once you’ve determined how big your wooden frame needs to be, buy some 2x4s for lumber and cut them into two equal lengths (one for each
When you’re ready to start installing your tub, the first thing to do is build a frame. This will help support the weight of the tub and keep it in place while you are working. It also helps to create an even surface for you to install tile on, if that’s what you’d like to do.
When building a frame for a bath panel or tub, it’s important to keep in mind that there are different ways to do so. You can buy premade frames from a store or build one yourself from scratch using lumber and PVC pipes.
We’ll show you how to build both types of frames below:
Build Your Own Frame
The easiest way to build a frame for your bath panel or drop-in tub is by using PVC pipes. These pipes come in different sizes, but they are usually measured by diameter and length (the longer they are, the bigger they are). The larger the diameter, the easier it will be for you to get good leverage when moving around heavy objects like bathtubs. You’ll also want pipes with thicker walls so they don’t bend under pressure
To make things easier on yourself, invest in some pipe clamps. These clamping devices will secure all of your pieces together while
Building a frame for a drop in bathtub is not difficult and can be done by the average do it yourself homeowner. If you are unsure of your ability, however, you may want to contact a professional carpenter to build the frame for you.
Building the frame requires some carpentry skills and tools such as a table saw, router, nail gun and measuring tape. The materials needed are plywood, 2x4s and 3/4-inch thick OSB (oriented strand board).
The first step is to lay out the framing on the floor where the tub will go. This will give you an idea of how much space you need for your walls and floor. The next step is to cut all of your wood pieces using the measurements from your layout drawings. Once all of your pieces are cut correctly, start assembling the frame around the tub using nails or screws.
Before installing any cabinets or other items inside of this area, it’s important that there be sufficient ventilation within this room since it will be enclosed by so many walls and doors. You can install ventilation by drilling holes through each wall with an electric drill and then installing venting pipes into each hole as well as one that goes up through
A drop-in bathtub is a great way to add extra space and style to your bathroom. But installing one can be tricky for the DIYer.
Here’s a step-by-step guide on how to build a frame for a drop in tub, so you can have a beautiful new tub in your bathroom without having to hire an expensive contractor.
You’ll need:
A level surface on which to build (a concrete slab or flooring works best)
A tape measure or measuring tape
Drill with bits and screws for anchoring wood into concrete or wood studs
Wood screws for attaching the panels together
Hammer and nails for securing panel joints