Installing fence panels between posts. Installing a wood fence is similar to installing a trellis. The steps to get the job done include measuring, digging holes with a post-hole digger and inserting pickets into holes with the post-hole digger.
Fence panels are included with all the wooden fence systems we supply i.e pressure treated fence panels, internal fencing and garden fencing. Fences that have panels with top rails or bottom rails (and sometimes side rails) allow you to include a gate so you can access your garden safely without going into your neighbor’s garden or crossing the road possibly endangering yourself and your family.
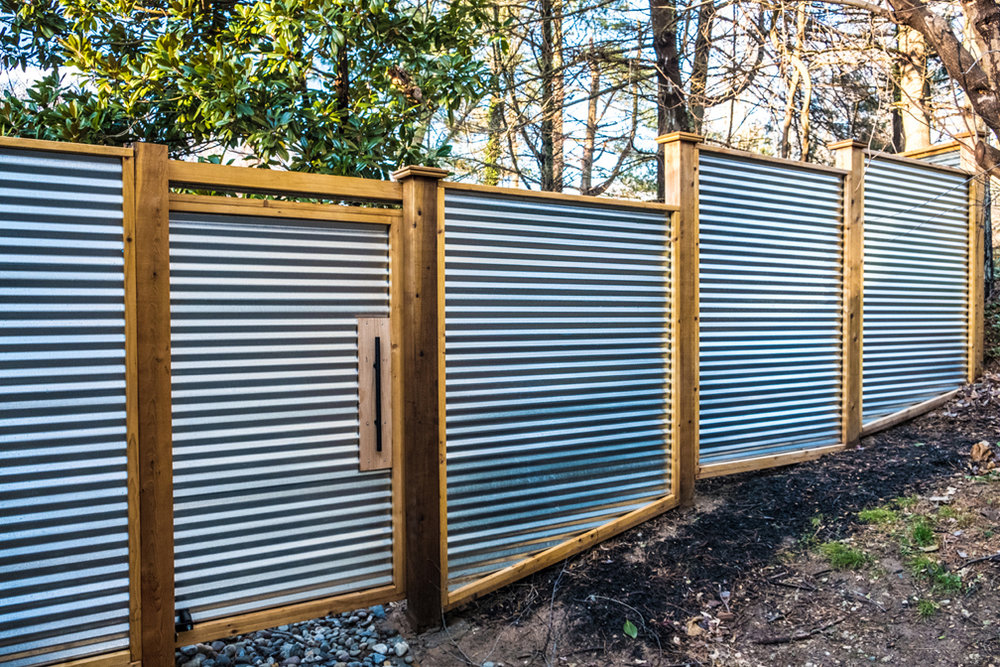
How to build a fence with panels
Fence panels are typically made of wood, vinyl or metal. Determine the type of material you want to use for your fence and select the appropriate installation method. Both wood and vinyl fences can be installed using a variety of methods, but metal fences are usually installed using post-and-rail systems that require specialized equipment.
Wood Fence Panels
Wooden fence panels are easy to install if you have the right tools and materials. You’ll need a hammer drill, masonry bit and a 2X4 pressure treated lumber boards to start building your fence. To install wooden fence panels between posts, follow these steps:
Measure the distance between each post then cut 4X4 pressure treated lumber boards into 10-foot lengths with a table saw.
Attach each pressure treated board along its length to one side of a post using galvanized nails or screws and washers every 8 inches along both sides of each board.
Line up the first pressure treated board on top of the first post so that it extends past both sides by at least 3 inches on each end; secure the board in place with galvanized nails or screws and washers every 8 inches along both sides of each board so that there’s enough room for your next board
Installing a wood fence is one of the easiest DIY projects you can take on. It’s also very affordable, and there are many types of wood that are suitable for making fences.
Fence panels come in many different sizes and styles, and they can be installed between posts or attached directly to them.
If you’re installing a wooden fence between existing posts, measure the distance between each post before buying any materials.
If you’re installing a new wooden fence and don’t have any existing posts, here are some tips on how to install posts:
If you’ve decided to install a wood fence, you’ll need to know how to build a fence with panels. You can use the same basic methods for both types of fences, but with some differences.
If you’re using posts, you will need to dig them into the ground. The size of the holes and how far they are spaced apart depends on the type of fence you want to install. If you’re using concrete blocks or bricks, they will be set in place by pouring concrete into each hole.
Regardless of whether or not you’re using posts, make sure that they are level before beginning any other construction work. Otherwise, your fence will be crooked and won’t look good when it’s finished.
The next step is installing the first row of boards or panels between two posts. If you’re working with wood boards, attach them together at one end by nailing through their edges into each other with galvanized nails that are long enough to penetrate both pieces. Then nail down this joint at regular intervals along its length so that it cannot move apart under pressure from wind or snow loads on top of it later on during wintertime weather conditions. If possible, make sure that all joints are staggered so that there aren’t any places where two boards meet directly
Installing a wood fence is a relatively simple project that can be done in just a few hours. The first step is to dig holes for the posts, which should be spaced at least 4 feet apart. Next, insert the posts and attach them to wooden stakes (called batter boards) made out of 2x4s. The posts should be driven into the ground at least 8 inches deep.
After the posts are secured in place, attach your fence panels by driving screws through each end of the board and into each post. If you’re using a composite material like vinyl or low-maintenance PVC, simply snap the pieces into place along the top of each post. Then use larger screws to secure them at intervals along their length.
Before attaching your pickets or slats, it’s important to make sure that everything is level and plumb (vertical). You can use a laser leveler or simply measure from corner to corner at several points along the length of your fence until everything matches up perfectly.
When installing vinyl fencing, we recommend using deck screws instead of nails — they hold better over time and don’t require any additional steps like staining or sealing afterwards
Step 1
Use a power miter saw to make the cuts on the 4×4 posts. Set a stop block at 2-1/2 inches from the end of the post that will be against the house. This will allow you to cut off the bottom 3 inches of each post, which will make it easier to install them later. If you don’t have a power miter saw, you can use any circular saw with a carbide blade.
Step 2
Use your circular saw to cut 2x4s into 8-foot lengths and then rip them down to 4 feet wide. These are your rails or top and bottom pieces for your fence panels (the vertical pieces). Rip two more 4x4s in half lengthwise using your circular saw (or take them to a home center or lumberyard where they’ll do it for free). These are your braces or middle pieces for your fence panels.
Step 3
Take one of the rails and attach it to two ends of one brace using two 3-inch nails per joint on each side of the brace (four nails total). Make sure your nails go into both sides of each joint so that when you flip over the rail, there’s no chance that any nails will pop out when you nail it
Installing fence panels between posts is a great way to add privacy to your property, but it’s not always easy.
If you’re installing a wood fence in the backyard or around your home, then you’ll need to know how to install wood fence panels. This is a simple process that won’t take long at all. If you’re planning to install a new fence and don’t know where to start, then this guide will help.
Here are the steps involved:
Measure out the area that you want the fence panel installed. Make sure you leave enough room for any gates or walkways that need to be included as well.
Dig holes for the posts into the ground at these locations.
Cut all of your posts and install them into their holes. Make sure they are level with each other so everything will look straight when it’s done. Be sure that each post is deep enough so that it reaches solid ground beneath it before proceeding further.
Now measure out where each board needs to go on top of each post by measuring from one end of the first post over to where it touches down on top of the second post and then continue on until there is enough space between each one for whatever type of panel
Installing a wood fence is a great way to add beauty and privacy to your property. A wood fence can be made of many different types of wood including cedar, redwood and pine. The cost of this project will depend on the type of wood you choose. If you are installing a cedar fence, it will cost $1.60-$2.50 per square foot. A redwood fence costs about $0.75-$1.50 per square foot while pine costs about $0.45-$1
Installing a new fence is not as difficult as it might seem at first glance. This guide will teach you how to install a wood fence so that you can enjoy it for years to come!
Step 1: Dig Post Holes
The first thing you need to do is dig holes at least 30″ deep and 12″ wide for each post location. You will also want to make sure that your posts are level before placing them in the ground – this will help keep everything straight once the project is complete!
Installing fence panels between posts is a common way to build a fence. The easiest way to install a panel is to set it in place and then use post-hole diggers or a shovel to form the post hole.
Install panels between posts by digging post holes, setting posts in place and attaching them to the fence panels.
Installing Fence Panels Between Posts
Step 1: Digging Post Holes
Dig post holes 4 feet deep, using post-hole diggers or a shovel. The holes should be about 2 inches wider than the post diameter. For example, if you’re using 6-inch by 6-inch posts then dig holes that measure 8 inches wide (2 inch wider than each end of the post). For an 8-foot section of fence with 1 foot on either side for overlap, count 11 feet from one end of the section to determine how far apart you should space your posts.
Step 2: Setting Posts
Set each post in place at one end of your fence line, making sure it’s level and plumb (vertical) as you go along. Then mark where each post will be placed at the other end of your line. This ensures that each section connects perfectly with its neighboring sections when installed later on down
Step 1: Use a level to set the height of the first post in the ground.
Step 2: Attach the first post to a concrete footing with masonry screws, then drive a post anchor into the ground.
Step 3: Level and plumb the second post, then attach it to the first.
Step 4: Repeat for each remaining post.
Step 5: Attach panel rails to the tops of each corner post with galvanized exterior screws.
Step 6: Fasten additional rails to top of gate posts using galvanized exterior screws or stainless-steel fasteners (if required by local codes).
Installing a wood fence can be a DIY project, but it’s probably best left to the professionals. Even if you’re skilled at carpentry, a fence is a large undertaking that requires planning and special equipment.
In addition to the expense of hiring a professional to install your fence, there are several other reasons why it’s best to leave this job to the pros:
A professional will be able to plan out your fence design using professional software that can take into account local building codes and zoning laws.
A professional will know how to properly attach posts so that they won’t fall over in high winds or heavy rains.
A professional will know how to install gate hardware correctly so that gates swing freely without sticking or squeaking.