This article aims at helping you build a fence door or get it done professionally, depending on your budget. It will also help you understand what type of door you need for your privacy fence.
Have you ever dreamed of building a fence by yourself? Good news. You can build a fence by yourself, and it will definitely save you some money. I know this because I built my own fence, and three of my friends are also building fences on their properties without hiring anyone to help them out. The reason I am telling you this is because you will stumble on a few blogs that try to discourage DIY fencing. This time, I am going to share with you the useful tips and tricks to build your own fence and save money at the same time.
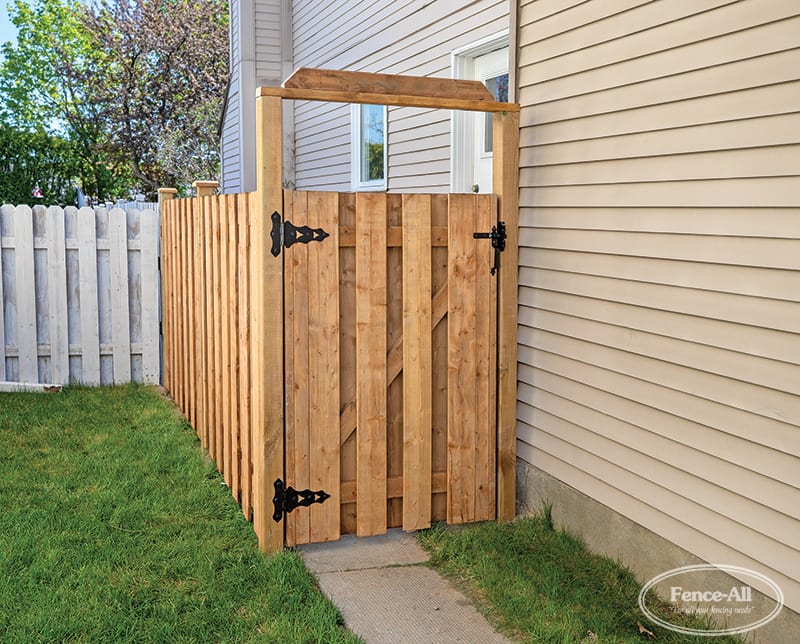
How to build a fence door wood
Wooden fence doors are a great way to give your home’s front entrance an elegant look. A fence door can be used to create privacy around the home, or it can be left open for added ventilation. A wooden fence door can also provide security and prevent intruders from entering your property.
Building a fence door requires pre-planning and careful attention to detail. This article will explain how to build a wooden fence door using simple tools and materials that are readily available at most hardware stores.
Step 1: Cut the Wood
The first step in building your wooden fence door is to cut the necessary pieces of wood for your project. The size of the pieces will vary depending on what type of wood you choose and how big you want your gate to be. You can use pressure treated lumber or any other type of hardwood that is available at your local lumber yard or home improvement store. Once you have purchased all of the necessary materials, place them on sawhorses so they are easy to work with while cutting them down into manageable sizes.
Step 2: Measure and Mark Your Lumber
Measure each piece of wood carefully so that each piece falls within a few inches (around 2 cm) of each other when laid side
How to build a fence door.
You will need to purchase the hardware to go with your fence door. You can buy pre-made doors or build them yourself from scratch. In this article, we will be discussing the latter option — building your own wooden gate door from scratch. However, if you are looking for a pre-made gate door, you can check out our selection of wood fencing gates here.
When choosing the type of hardware for your fence door, there are several factors to consider. For example, do you want it to swing open or slide open? If so, what kind of material will best suit your needs? If you have any questions about choosing the right materials and design for your custom gate door, feel free to contact us at any time!
One of the most important parts of a good fence is the door. It needs to be strong and sturdy, but also fit in with the rest of your fencing design. Here’s how to build a wooden fence door.
There are many different kinds of doors that can be used for wooden fences, but this article will focus on building a simple hinged door using only materials that can be found at any home improvement store.
The first step in building your fence door is choosing the right wood for the job. You want something that is strong, durable and affordable. You’ll want to go with something like cedar or redwood here because they’re both relatively easy to work with and they’ll last longer than most other types of wood due to their resistance against rot and insects.
You’ll also want to make sure that the wood grain runs parallel with the length of your fence so that it looks nice when installed correctly! If you’re using something like pressure treated lumber (which is recommended), then you won’t have much choice in this matter since pressure treated lumber always has its grain running parallel with its width (or length if it’s not cut into boards yet).
How to Build a Fence Door
The following guide will show you how to build a fence door. The first step is to decide what type of wood to use.
The easiest way is to purchase the wood at your local hardware store or home improvement center. You can also buy the materials online and have them shipped directly to your house.
If you want to save money, you can go with cedar or redwood boards that are already cut in the size you need for your project. Cedar has a natural resistance against insects and fungus; it also looks good for years after being installed. Redwood is great for exterior projects because it resists rotting, warping and insect damage. Both types of wood are very durable when used as fence material because they are hardwoods that will last for many years without maintenance if treated well by the homeowner.
You can also build your own fence door using pine boards or plywood sheets cut into panels that fit together like puzzle pieces. The wood should be at least 3 inches thick so that there is enough surface area on each piece for attaching hinges and handles later on in the process
1. Cut the door frame pieces to size. The top and bottom rails should be cut to length, while the stiles should be cut to fit between the rails.
2. Attach the frame together using nails or screws at each corner.
3. Cut out a rough shape for your door from plywood or another sheet material, based on your design. Leave enough space around the edges so that you can easily install your door latch later on.
4. Attach your plywood to the frame using nails or screws along each edge of the door opening in order to secure it in place permanently. Leave enough room so that you can still open the door after installing it into place on your fence post.**ENDWRITE

STEP 1: Choose your lumber. You’ll need 2×4’s for the frame, 2×6’s for the door and 2×4’s for the doorjamb. The lumber can be pressure-treated or clear pine.
STEP 2: Cut all pieces to size. Lay out and cut the 2×4’s to length (68″). Lay out and cut the 2×6’s (30″). Cut one of each length, then flip them over so that they’re mirror images of one another, then cut them again in the same manner. This will result in two identical pieces that are mirror images of one another.
STEP 3: Assemble the frame and install hinges. Nail together two frames using 3-inch galvanized nails or screws (2). If you prefer hidden hinges, use 5/8-inch pocket screws instead of nails or screws (3). Attach each frame to a post using 4-inch galvanized nails or screws (4). Add additional framing if necessary to reach desired height (5). Install a latch on each door, if desired (6).
A wooden fence door is a great way to add privacy to your home and yard. It also gives you the ability to lock up your backyard when you need to, which could be beneficial if you have kids or pets. Building a fence door is a simple project that takes very little time and effort. You can build one by hand, or you can use tools like a power miter saw and drill press to make it easier.
1) Decide on the Size of the Opening
The first step when building a wooden fence door is deciding how big the opening will be. You’ll need to measure the width of your gate opening and add 1/8 inch for each side of the door frame as well as 1/2 inch for each side of the hinges (see Resources below). This will give you an accurate measurement for cutting out two pieces of plywood at that size with your circular saw.
2) Cut Plywood Pieces for Each Side of the Opening
Place one piece of plywood on top of your work surface and make sure it’s square by measuring diagonally from corner to corner on each side (see Resources below). Trace around this piece onto another piece of plywood using a pencil or marker so that
A fence door is a great point of entry for your backyard. It allows you to control access and gives you an opportunity to add some style to your yard. There are many different kinds of doors available, but we’ll focus on the classic wooden fence door.
You can build this project out of any type of wood, but cedar or redwood are both excellent choices because they’re naturally resistant to rot and insects.
Step 1 – Set Your Posts
Start by setting your posts in concrete. Use treated lumber for the posts and make sure that each one is properly plumbed before setting them in place.
Step 2 – Install the Header Joists
Cut your headers so that they fit between your posts without creating a gap at the top or bottom of the post. You’ll need two header joists per opening; one on each side of the opening. Use 2x4s for these as well as for all framing materials in this project — it will help keep costs down while still providing plenty of strength for a gate that will see plenty of use over time.
Step 3 – Add Framing Materials
Install all framing materials first, then attach the decking boards after everything is framed up completely
Fence doors are great for allowing you to have an unobstructed view of your yard, but they can also be a great way to add value to your home. A fence door is a unique, custom piece that will set your fence apart from the rest.
The first thing you need to decide is whether or not you want a standard door or a curved door. Standard doors are easier to make and install because they do not require any special tools or equipment. Curved doors take more time and effort to make, but they can be quite stunning!
Once you have decided on what type of door you want, it’s time to get started making it! The best way to start making your door is by measuring out where each piece will go and how much space there will be between them. You can use any kind of square ruler for this step so long as it has markings on it so that you know exactly where every mark goes. Once all of these measurements are made, mark them onto your wood with pencil or chalk so that they stay in place while sawing them out with a jigsaw or other saw tool of choice (depending on type of wood used).
1. Cut the Door. Cut a piece of 2-by-8-inch lumber to the desired height of your door. The top edge will be cut at an angle, so make sure you measure down to the bottom of that angle when you’re determining how long your piece should be. Cut two pieces for the sides of the door and one piece for the bottom. All three pieces will be attached together at one end so they can swing open like a door.
2. Attach the Sides Together. Place one side on a flat surface and mark where you want to drill holes for attaching it to another side piece. Attach them together with screws and washers through these holes so that they are flush on both sides and at both ends of each side piece (see Fig 1). Repeat this process with your other two pieces, then flip over all three pieces so that they are now facing upward and place them together on a flat surface so that they form an upside down U shape (see Fig 2).
3. Attach Bottom Piece to Sides. Flip over all three pieces again so that they are now facing downward; this time place them in an upside down U shape with their bottoms touching each other